

Introduction: Connect Your Thinxtra Xkit Using Sigfox


The Thinxtra devkit Xkit boasts a full suite of features and
accessories to empower anyone to develop an IoT solution. Perfect for start-ups, DIY home IoT projects, and academic research, this kit has everything you need to hit the ground running using the Sigfox's global connection network.
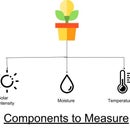
In this article, you will learn how to program an Thinxtra Xkit for an IoT application that takes and sends temperature readings via Sigfox, whenever motion is detected.
Step 1: Requirements
- Thinxtra Xkit
- Sigfox callback
- Ubidots account - or - STEM License
Step 2: Setup


1.- Register your devkit on the Sigfox backend portal; reference to this video to learn more and register your Thinxtra Xkit Device on Sigfox backend.
2.- Download the Thinxtra repository to receive the required libraries. The libraries should be copied to the location with Arduino libraries.
3.- Once the libraries are saved in the Arduino IDE, copy and paste this code
3a.- Next, compile the code into the Arduino UNO
NOTE: remove the Thinxtra shield to be able to compile the code properly.
3b.- Connect the board to the computer, then select the Arduino UNO as board from Tools > Boards, also select the Port COM of the board from Tools > Port.
3c.- Verify your code in the Arduino IDE by choosing the "Check Mark" icon in the top left of the IDE. Once the code is verified, you will receive a "Done compiling" message in the Arduino IDE.
3d.- Upload the code into the Arduino UNO by choose the "right-arrow" icon beside the check mark icon. Once uploaded, you will receive a "Done uploading" message in the Arduino IDE.
4.- Connect the Thinxtra shield with the Arduino UNO once your device is compiled and reset the board by pressing the red button on the Arduino UNO.
5.- The code above sends temperature value to Sigfox every time the board detects a movement. To visualize the the data sent, open the serial monitor of the Arduino IDE. You can also verify the messages via Sigfox's backend by selecting the ID of the Thinxtra device from the device list. Next, select the "message" option from the left menu.
6.- With the messages begin received by Sigfox's backend, it's now time to setup a pre-configured callback
to display your data with Ubidots. Reference the article below to setup an Ubidots callback and learn more about the configurations:
With the code from the article above, set the parameters below into the callback configuration to be able to handle this Sigfox data with the callback properly:
Custom payload config: temperature::float:32:little-endian
- Type: DATA - UPLINK
- Channel: URL
- Urlpattern:
- Use HTTP method: POST
- Content Type: application/json
- Body:
{
"snr" : "{snr}",
"avgSnr" : "{avgSnr}",
"rssi" : "{rssi}",
"position":{"value":0,"context":{"lat":"{lat}","lng":"{lng}"}},
"temperature" : {"value":"{customData#temperature}"}
}
Once you've entered all the parameters required, verify your callback looks similar to that of above.
7.- With the above quick steps, your device is now integrated with
Ubidots and sending data whenever the the Thinxtra Xkit senses movement. To visualize your data, sign into your Ubidots account and verify the device just created with the Device ID and see and manipulate the collected data as needed.
In this tutorial we describe taking temperature readings based on movement. When other parameters are assigned into the callback body like the rssi, snr, avgSnr, and position, these too will be recorded or assigned when built by the developer.
Pro Tip: Ubidots let you modify the name of the device with a friendly one when needed, if you don't know how to modify it reference to the article below:
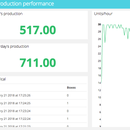
Step 3: Result
Now it is time to create a dashboard to control and manage the variables
of your Sigfox device. To learn more about Ubidots widgets and events, check out these video tutorials.


