

Introduction: Connecting a Serial Device to an Ethernet LAN


Connecting a Serial Device to an Ethernet LAN
This document should allow you to connect a serial device to an Ethernet network using a “Serial Device Server.” The example here is using a personal weather station WS-2310 as the serial device and a Moxa NPort Express DE-311 as the device server.
Note: “Device Servers” are almost generic. There are many manufactures with different features, but they all do the same thing. The device I chose I had on hand, so it was an easy choice. Features I'd look for if buying one off the shelf are PoE powered if you have a PoE switch, or Wifi enabled if you want a wireless connection.
The device server will do MUCH more than explained here - This is just a great use case!
Requirements:
*Serial Device Server with DB-9 and RJ-45 connections.
*Weather Station with serial connection
*PC or Switch with an open Ethernet port
*Cable to connect weather station to Device Server
*Ethernet cable to connect Device server to PC or switch.
Step 1: Gather Information


Gather Information:
* Weather Station Serial Connection
* Get the pinout for the serial connection. Here's what I found on a forum about my station (Image 1):
* The DB-9 side (Image 2):
* The RJ-11 side (Image 3):
* Test the cable with a multimeter to make sure of the cable's configuration. If you find the cable is different than what you require you'll need to make your own using a modular connection. The colors are irrelevant; if you have to make your own, you may have either 4 or 6 pins. In this example I have 4 pins.
* The Serial settings will also be needed. Internet research has shown that it is autoset in the software, so I can't do much there. I'll include what the actual settings are. Lazy for La Crosse not to include them in the manual!
Step 2: Serial Device Server Connections
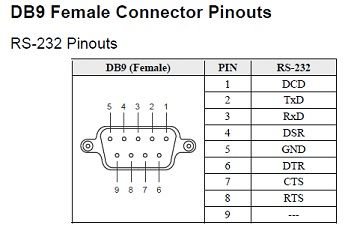

Serial Device Server Connections:
Here's the pinout for the connection on the Device Server (Image 1)
At a glance it looks like the pins don't line up, but upon inspection you'll see that the connection from the weather station and on the device server are both female connections. If a Null Modem adapter is used it will allow the female ends to connect correctly. Lucky for me, my device server includes one.
The pinout (Image 2) The orange part is the Null Modem.
Step 3: Ethernet Network Connection


Ethernet Network Connection:
If you're connecting the Device Server to a NIC on your computer you'll need a crossover cable. The cable looks like this (Image 1):
If you are connecting the Device Server to an open port on a switch, you need a plain old straight through cable. (Image 2)
If you have a modern NIC in your PC and are planning to connect the Device Server to a NIC directly, try a plain cable first before getting a crossover cable. Most modern NICs and switches are auto sensing and will do the work for you.
Step 4: LAN Information

LAN Information:
Open a command prompt. You can do this by Start>Run and typing CMD and hitting Enter. In Windows 7 do this in the search bar in the Start menu.
Type ipconfig /all and hit Enter. You'll see something like this. (A portion was omitted for privacy but the important part is there).
That's a whole lot of info. You may see less or perhaps more. What I'm looking for is an Ethernet Local Area Connection. There are two pieces of information that are crucial.
(Note: If you see a subnet other than 255.255.255.0 find a “Subnet Calculator” to determine your network range)
Check out http://media.packetlife.net/media/library/7/IPv4_Multicast.pdf for a sweet IPv4 cheat sheet!
* Subnet Mask: 255.255.255.0
* Default Gateway: 10.1.10.1
Now, you know that your LAN is running on 10.1.10.0/24. Without getting in-depth, this tells you that any IP address between 10.1.10.1 and 10.1.10.254 is a useable address. You'll likely see different addresses here, but the important part is going to be the first three octets of the Default Gateway.
Example: If you see 192.168.1.1, and a mask of 255.255.255.0 then you can use 192.168.1.1 to 192.168.1.254.
Pick an address that isn't used, and is out of your DHCP scope. Again, without getting too deep, pick an address at the end of the range, this is almost always outside of a range that will by dynamically assigned.
Example: 10.1.10.250 and 255.255.255.0.
Open up CMD again if you've closed it and type ping 10.1.10.250
if you get no response you're likely good to go for an IP Address. If you do get a response pick a different IP and ping again.
Step 5: Label and Document

Label and Document:
It's pretty easy to skip this step, but it will save you hours of heartache later.
Label cable ends. On each end of a cable I attach a label of what connects to it and where. In a switch it looks like this picture - my new switches (at work), and do the opposite on the other ends. Nothing fancy needed, masking tape and a ball point will work just fine.
Make a Switch-port map and network diagram. Just make a spreadsheet of which port connects to what. Draw out your network with what connects to what and how. I swear it will help in the future when you try to put everything back together after moving a desk.
Step 6: Configure Hardware:


Configure Hardware:
My Device Server can be configured by connecting to it via serial connection to set the IP information. Bummer. I don't have a serial connection available, so I'll need to connect via Ethernet.
Searching through the Device Server manual the device ships with a 192.168.127.254 /16 address. So my computer needs an address that will be able to talk to it. If you already have an IP address on your computer that starts with 192.168.x.x then you're good to go. I need to change my IP to edit the connection.
Open Control Panel and then go into “Network and Sharing>Change Adapter Settings”. If you're using XP it's called Network Connections.
Right Click on the Ethernet adapter and select properties. Highlight TCP/IP Version 4 and select properties.
Note: Write Down Everything you see here. If you don't remember your changes you'll have a hard time going back.This will also likely drop your internet connection until they have been changed back.
Check the button for Use the Following IP Address. Fill in the IP Address and Subnet, then click OK. If Windows prompts you about the Gateway, click yes to continue. Use Image 1 as an example. The IP address used here will likely work, just pick 192.168.127.x, where x is not 1, 254 or 255.
Now we need to telnet into the device and give it an IP that will work on our LAN. Go to Start>Search(or Run)> type cmd and hit Enter. Download PuTTY. Newer Windows version may or may not have Telnet or Hyperterminal installed, and PuTTY is pretty good. It should look like Image 2. Click Open.
When connected set the network parameters you selected previously.
Get back into your computer's network configuration and set the parameters back to what they were. Once that's complete, ping the device server, and make sure you have internet access again.
Step 7: Software Configuration


Software Configuration:
Note that most of the software configuration will vary greatly from each device.
* Download the Management Suite and install. This will connect the IP of the Device server to a virtual COM port that other installed software will think is local to the computer. Most devices will come with a COM port virtualization tool. Make sure whatever you buy does.
* Open the Real COM Mapper that was part of the install and follow the Add Server Wizard. (Image 1) I bound COM2 to the IP address of the Device Server.
* Download and Install WUHU.
* In the setup screen I did the following and clicked OK (Image 2):
Success! (Image 3)
I chose pretty bland serial settings and hoped that they would work. Looks like they are! (Image 4)
Step 8: Final Thoughts

Here's the whole setup in testing and working, now to label and find a dark corner to stash it all
Final Thoughts:
I've tried to lay this out in a way that a person with basic computer skills could actually connect most serial devices to an ethernet network. Hopefully I didn't overload on any point unnecessarily or gloss over something crutial. Please feel free to comment with any thought, criticism, correction or request for help on this tutorial. You can reach me @ Skymeat usethe@sign Gmail.com. Or by text at my Google number (5four1) 3five7-98three7
Hope you enjoyed.


