

Introduction: Creating a Calculator Visual Studio C#

This Instrucable will guide you through creating a basic calculator application in C# using Microsoft's Visual Studo development software. Visual Studio is a form of development software made by Microsoft to help developers create programs more easily. It is free and can be downloaded on their website.
What you will need:
A computer running Windows 7 or higher
About 30min - 1hr of free time
Possibly a scratch sheet of paper for understanding logic.
Visual Studio:
2013 Download: http://www.visualstudio.com/en-US/products/visual-studio-express-vs
2010 Download: http://msdn.microsoft.com/en-us/library/dd831853(v=vs.100).aspx
I will be using the 2010 version of Visual Studio in this tutorial, but every version is pretty similar.
If you are familiar with the Java programming language, C# functions very similarly. The syntax is just slightly different.
Don't worry if you aren't familiar with programming. This Instructable will guide you through the entire process. All you need are some problem solving skills!
Step 1: Creating a New Project


1.1. After downloading and installing, run Visual Studio so it is open on your computer.
1.2. At the welcome screen, click "New Project...," or do the following: File->New->Project
A window should pop up asking for some basic configurations.
1.3. Select "Visual C#" in the Installed Templates Column.
1.4. Next, select "Windows Forms Application" in the right column and name your project in the name field below. I have named mine "Calculator," but choose any name you like.
1.5. After completing all of the above, Click "OK" and let Visual Studio build the shell for your program. When finished, your screen should look like the last image above.
1.6. Click Save All (the triple save icon on top of the screen) and move on to step 2!
Step 2: Designing the Application


This step will help you create an intuitive calculator design for your users.
2.1. Select the "Form1.cs [Design]" tab if not already selected. This Form is the window that will display when your program is run. Clicking the green arrow in the toolbar on top of the screen will run the program as an application (opening it in a new window). Try it. Close the new window with the X when you are done.
On the right side of the screen*, there are two important menus (Toolbox and Properties). The Toolbox menu allows you to add new items (like buttons) to your interface, while the Properties menu allows you to change the specifics of your currently selected item on the screen.
*Note: These menus may not be located on the right for everyone. They can be placed wherever the programmer desires by clicking and dragging around the screen. If they are not visible, open the View menu, and choose "Toolbox" or "Properties Window." This will make the menus visible on the screen.
2.2. In the Toolbox menu, click and drag a Button and a TextBox onto your Form. You can change the the size of the Button/TextBox by clicking and dragging any of the dots surrounding it.
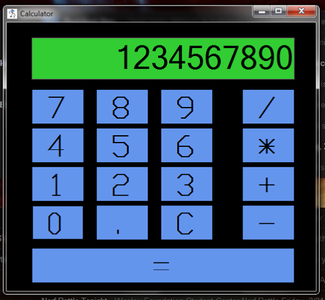
2.3. Add** 16 more buttons to the Form and arrange them to look like a calculator (See Fig. 3). Position them around the Form by clicking and dragging.
**Pro tip: Selecting a button and using "Ctrl-C" then "Ctrl-V" will copy and paste another button to the Form. Saves on clicking and dragging!
2.4. Select a button. Its properties will be displayed in the properties menu off to the side. In the Appearance section, you can edit an item's appearance. Use the Text field to change the text on a button. Have some fun picking different BackColors and types of font.
2.5. Scroll down to the Design section in the Properties menu and edit the name field for each button. (This isn't required, but it will make coding much easier). Name each button something you can easily keep track of. Eg: Name the 1 button "one," that way you can keep track of it in the code later.
2.6. Click Save All and move on to step 3!
Step 3: Creating Event Handlers

*Note: Make sure all of your buttons are named correctly before you start this step!
3.1. Double click a button. This will bring you to the "Form1.cs" tab. This is where all of your code will be written. Notice a section has been pre-written for you based off of the "Click" event. This section of code will be executed when that specific button is clicked. For the sake of this project, we will call these Event Handlers.
3.2. Double click all of your buttons so you have an event handler for each button (use the tabs to switch back and forth).
3.3. Click Save All and move on to step 4.
Step 4: Declaring Variables
This project requires three different types of variables, char, double, and String.
char - data type for holding any character like the letter 'c' or a star '*'.
double - Data type for holding number values with a decimal. The value 3.14 is an example of a double.
String - A string is not a data type, it is an Object that handles chains of characters. We call these chains strings. Ex: 'c' is a character, "ccc" is a character string.
Variables are declared in the following form: <Data Type> <Variable Name> = <Initial Value>;
Ex: To declare a new char initialized to contain 'c', the code would look like this: char mycharacter = 'c';
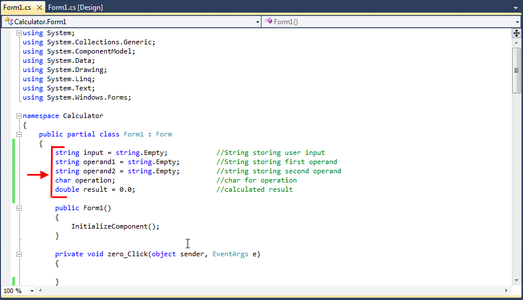
4.1. Declare 5 new variables above the Form1() method as shown in the image above. This will create the needed variables to store and process the input from the user.
*Note: It isn't required to initialize a variable. I do not initialize the operation variable because a value will be placed into it later depending on which operation the user chooses. I do initialize the strings to be empty (using string.Empty) however just to be sure that the string will be completely empty before it is used.
4.2. Click the Save All button and move on to the next step when you are ready.
Step 5: Recording User Input


Thinks are looking good. The shell is set up and ready to go. But in order for a user to interact with the program, we need to store the data given from the user clicking the buttons.
5.1. Type the line input += "0"; between the curly braces for the zero_Click event handler. This will add a zero to the input character string.
*Note: Each time the user clicks the zero button, another zero will be added to the input string. One click will have the string contain one zero like so: "0". Clicking the zero button again will add another making the string value "00", and so on.
**Note: += is a shortcut for writing input = input + "0"; Essentially, it is adding a zero to the end of what is already existing in the string.
5.2. Repeat step 5.1 for all the numerical input event handlers, as well as the decimal button event handler. Change the "0" value to match which button handler you are in. (Don't want to add a 0 to the string when a 1 is pressed).
5.3. Next add the following lines of code for each of your operand button event handlers (+,-,*,/).
operand1 = input;
operation = '+';
input = string.Empty;
This code will store the contents of the input string into the operand1 string, and set the operation character accordingly. The input string gets cleared at the end so it can be ready to record the next value from the user.
5.4. Repeat step 5.4 for all operand input event handlers.
5.3. Click the Save All button and move on to step 6.
Step 6: Viewing Input


Users would probably like to see what they are inputting into the calculator. This step adds that feature.
*Note: Don't forget code is executed in a top down manner!
6.1. Add the line this.textBox1.Text += input; underneath the input line as shown. This will add the input to the TextBox that was dragged to the screen earlier.
6.2. Repeat this step for every numerical input handler.
6.3. Next, add the line this.textBox1.Text = ""; before the input line. This is essential because it clears the TextBox before the input string is added to it. Forgetting this step will leave the user with a mess on the display (feel free to try it out by running the code without this step).
6.4. Run the program and see what happens!
6.5. Click Save All and move on to step 7.
Step 7: Clearing Input
From the last step, you have probably noticed that we can't clear the input off the screen. This step will fix that issue!
7.1. Add the following lines of code in the clear button event handler.
this.textBox1.Text = "";
this.input = string.Empty;
this.operand1 = string.Empty;
this.operand2 = string.Empty;
Code Explained: We have seen all of these lines before, but here is a quick refresher. The first line clears the TextBox, and the three lines after empty our input, operand1, and operand2 strings. This will effectively clear everything.
7.2. Run the program and see what happens. It should function similarly to the video.
7.3. Click Save All and move on to step 8.
Step 8: Calculating Output

Now time to do what a calculator does best, calculate output!
8.1. Insert the following code into the equals button event handler. (Try not to just paste it, try and understand what is happening).
operand2 = input;
double num1, num2;
double.TryParse(operand1, out num1);
double.TryParse(operand2, out num2);
if (operation == '+')
{
result = num1 + num2;
textBox1.Text = result.ToString();
}
else if (operation == '-')
{
result = num1 - num2;
textBox1.Text = result.ToString();
}
else if (operation == '*')
{
result = num1 * num2;
textBox1.Text = result.ToString();
}
else if (operation == '/')
{
if (num2 != 0)
{
result = num1 / num2;
textBox1.Text = result.ToString();
}
else
{
textBox1.Text = "DIV/Zero!";
}
}
Code Explained: We first set our input string equal to our second operand string (operand2). We do this because we are assuming that the user has clicked the "=" button. Next we create some more doubles (num1 and num2). These will store the numerical values that have been stored in operand1 and operand2. The next lines (double.TryParse(operand1, out num1); and double.TryParse(operand2, out num2);) will convert the string that is in operand1 or operand1, into a double type, and then place it in num1 or num2, depending on what we specified in the method. This will allow the computer to be able to perform mathematical functions on the numbers.
If() and else if() explained: The functions if() and else if() are used for data comparisons. The first if() statement can be read as "if the character in operation is equal to the + sign." If this condition is true, the code will execute whatever code is inside of the if statement's curly braces({}). Else if() statements are used if multiple if statements are being used to check a condition. If the previous if() or else if() is not true, then the code in the brackets will be skipped and the program will jump to the next if() or else if() in line, and so on.
If our condition is satisfied based off of what operation was set to, we tell the computer to execute the correct math by placing the correct functions in their corresponding if() statements. The code result = num1 + num2; will add the variables num1 and num2 together, and store the result in the result variable.
Displaying the result: The code line textBox1.Text = result.ToString(); Will convert the result variable to a string type, and then place it in the TextBox to display the output.
8.2. Run your code and see what happens!
8.3 Click Save All, and move on to step 9.
Step 9: Debugging
Debugging! Time to look for errors in our code and see what we can do to fix it!
9.1. Run the program and see how it executes. (You should notice a few minor errors. See if you can fix them on your own for practice. If you need some help however, the video below works with the couple bugs that I found in the code.
9.2 Click Save All and move on to the last step!
Step 10: Troubleshooting

Here I will give a few solutions to some FAQs.
Q: Why does my code say my variables are undeclared?
A: When variables are declared inside of curly braces {}, they can only be seen by the rest of the code inside those curly braces. You may have placed the newly declared variables in the wrong curly braces. A quick Google search on variable declaration/global variables may be able to help with understanding.
Q: Why does Visual Studio keep locking up/crashing?
A: It is something that seems to happen randomly with Visual Studio (at least the 2010 version). I do not know of a solution for this, so make sure to save your work early and often to prevent the loss of code.
Q: Why aren't my menus visible or in the right place?
A: The menus will most likely start off in a default position when you install Visual Studio. I have them set up in this Instructable to my personal preference. You can use the View menu in the top toolbar to change which menus are visible. You can also click and drag them around the screen to place them where you wish. I touch on this in the note in step 2. The menus can also be pinned open on the screen, or they can be set to pop up when you hover over them with the mouse. This can be toggled on and off with the pin icon in each menu.
Q: Why isn't my program working?
A: That is a difficult question to answer. Make sure that you test your code often as you follow the steps in this Instructable. If at any time it does not work, go back and see where your work may be different than the work provided. I also recommend using a pencil and a sheet of paper to help you through the logic in each line of code. It is easier to keep track of variable values this way.
Step 11: All Done!

Congratulations! You have successfully created a basic calculator application in C# using Microsoft's Visual Studio development software!
By completing this project, hopefully you have gained a basic understanding of C# and how it functions. Since you know some basics now, try out some new things! Play around with the code, add new buttons/controls, and see what happens. You can make anything. Use this Instructable as a reference. There are plenty of web sites on the internet as well that make great reference sources as well.
Thank you for reading, and good luck with your future projects! Feel free to leave comments for improvement or any questions you might have about the project below.


