

Introduction: Creating a Twist Octahedron


Materials and Tools:
- standard letter size paper (it is a good idea to practice on cheap copy paper first!)
- PDF of twist octahedron crease pattern (CP – see discussion of CPs here)
- an exacto knife OR if you want to do it all slick-like (and save a lot of scoring and cutting hassle), access to vector drawing software and a laser cutting machine. I made this at the TechShop (www.techshop.ws), which has both CorelDRAW and Epilog Lasers; you will also need a USB stick to transfer your files.
- fast-drying glue (ZipDry is great for quickly gluing paper to paper)
1. Download the PDF of the twist octahedron CP included with this Instructable. Note that the red lines are valley folds (they will fold “down”) and black lines (except for the outline and the rectangular border) are mountain folds (they will fold “up”); check out standard origami nomenclature if you are not familiar with these terms. Also note that the image does not fill the entire page, there is a border around the shape, which will become important when we use the laser for this project.
2. Using whatever vector art software you have, create your vector art using the PDF as a guide. Remember, in order for the lasers to interpret your work as vector art, you must use the “hairline” pen width in Corel; the color just helps you to keep things straight when you are looking at the image. Use separate layers for the valley folds, mountain folds, and outline of the image.
3. You will be flipping the paper over in the laser cutter, so you need to create a new layer that is the horizontal *mirror* of the valley folds.
4. You also need a way to ensure that the image is registered when you flip it over (the laser guides are not nearly as accurate as you need them to be), so you need to create a new layer that is a rectangle that defines the border around the image (mine is 0.25” on all sides).
5. Setting up on the laser, you will want some way to hold the paper down such that it doesn’t move around in the process. Either use tape or weights to hold down the edges. The bottom edge is most important to pin down because of the air flow, but you will want to keep at least three sides of the paper border firmly in place, as it creates the registration for the front and back images. Also, keep in mind that the laser will be cutting close to the edge of the paper – don’t laser the weights!
6. Now you can start laser scoring and cutting. Exact settings will vary by the thickness of paper and the specific laser that you are using, but scoring is similar to cutting (which you learned in the TechShop SBU) only a lot lighter on the power setting. Additionally, there is a threshold power setting below which the paper will not be scored at all. This makes it easy to determine your scoring level, as you can start with a power setting of, say, 2, and work up from there if you aren’t getting any visible mark on your paper (stop the process, change the power to 3, and try again; if that didn’t work, try 4; etc.) Unless your paper is fairly thick, you shouldn’t have to go above a power setting of 5 to get a score mark. All of this is done at a speed of 100%. Jot down the settings that work for that type of paper in case you need to make another (folding these nicely takes some practice).
7. First *score* the *reverse* valley folds that you made above.
8. Adjust the laser settings and *cut* out the rectangular border around the image. Be sure that the cut is clean all the way around the edge. Carefully pick up the cut rectangle so as not to disturb the border which is now providing the registration.
9. Turn the paper over as you would turn the page of a book (mirrored horizontally, not vertically), and set it back down into the border that is still on the laser bed. Tape or weight the paper firmly in place for the next set of scoring and cutting.
10. Now adjust the settings back, and *score* the mountain folds that you made.
11. Adjust the settings a final time, and *cut* the outline of the image. You are finished with the laser!
12. Now you have the paper as shown in the photos. Pre-crease all of the folds *away* from the score lines, making sure you don’t fold past the actual crease lines. Now you are done with the easy part!
13. Gather your patience together and start folding the octahedron. For those of you new to twist folds in origami, it may be worthwhile to practice a triangle twist fold on a plain sheet of paper, just to understand the concept; videos can be found on YouTube for this. Because this pattern involves creating several folds that will ultimately form a 3D shape, it is particularly challenging. Work from the outside in (the twists will be easiest on the triangles that stick out of the sides and those on the ends), and don’t expect to get any one triangle twisted until most of the shape is starting to collapse on itself.
14. Once the shape is folded, glue the tabs in place on their mating edges (the last side is particularly tricky, but using a toothpick behind the tab to help hold it in place while the glue dries can save you some grief).
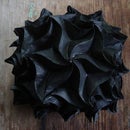
15. Voila! The twist octahedron!
Obviously, the PDF can be scaled up to make a bigger octahedron from a bigger sheet of paper, and you can use fancy art papers to make it more decorative. It will get substantially harder to fold with thicker paper, so keep this in mind when selecting your materials. Enjoy!
- standard letter size paper (it is a good idea to practice on cheap copy paper first!)
- PDF of twist octahedron crease pattern (CP – see discussion of CPs here)
- an exacto knife OR if you want to do it all slick-like (and save a lot of scoring and cutting hassle), access to vector drawing software and a laser cutting machine. I made this at the TechShop (www.techshop.ws), which has both CorelDRAW and Epilog Lasers; you will also need a USB stick to transfer your files.
- fast-drying glue (ZipDry is great for quickly gluing paper to paper)
1. Download the PDF of the twist octahedron CP included with this Instructable. Note that the red lines are valley folds (they will fold “down”) and black lines (except for the outline and the rectangular border) are mountain folds (they will fold “up”); check out standard origami nomenclature if you are not familiar with these terms. Also note that the image does not fill the entire page, there is a border around the shape, which will become important when we use the laser for this project.
2. Using whatever vector art software you have, create your vector art using the PDF as a guide. Remember, in order for the lasers to interpret your work as vector art, you must use the “hairline” pen width in Corel; the color just helps you to keep things straight when you are looking at the image. Use separate layers for the valley folds, mountain folds, and outline of the image.
3. You will be flipping the paper over in the laser cutter, so you need to create a new layer that is the horizontal *mirror* of the valley folds.
4. You also need a way to ensure that the image is registered when you flip it over (the laser guides are not nearly as accurate as you need them to be), so you need to create a new layer that is a rectangle that defines the border around the image (mine is 0.25” on all sides).
5. Setting up on the laser, you will want some way to hold the paper down such that it doesn’t move around in the process. Either use tape or weights to hold down the edges. The bottom edge is most important to pin down because of the air flow, but you will want to keep at least three sides of the paper border firmly in place, as it creates the registration for the front and back images. Also, keep in mind that the laser will be cutting close to the edge of the paper – don’t laser the weights!
6. Now you can start laser scoring and cutting. Exact settings will vary by the thickness of paper and the specific laser that you are using, but scoring is similar to cutting (which you learned in the TechShop SBU) only a lot lighter on the power setting. Additionally, there is a threshold power setting below which the paper will not be scored at all. This makes it easy to determine your scoring level, as you can start with a power setting of, say, 2, and work up from there if you aren’t getting any visible mark on your paper (stop the process, change the power to 3, and try again; if that didn’t work, try 4; etc.) Unless your paper is fairly thick, you shouldn’t have to go above a power setting of 5 to get a score mark. All of this is done at a speed of 100%. Jot down the settings that work for that type of paper in case you need to make another (folding these nicely takes some practice).
7. First *score* the *reverse* valley folds that you made above.
8. Adjust the laser settings and *cut* out the rectangular border around the image. Be sure that the cut is clean all the way around the edge. Carefully pick up the cut rectangle so as not to disturb the border which is now providing the registration.
9. Turn the paper over as you would turn the page of a book (mirrored horizontally, not vertically), and set it back down into the border that is still on the laser bed. Tape or weight the paper firmly in place for the next set of scoring and cutting.
10. Now adjust the settings back, and *score* the mountain folds that you made.
11. Adjust the settings a final time, and *cut* the outline of the image. You are finished with the laser!
12. Now you have the paper as shown in the photos. Pre-crease all of the folds *away* from the score lines, making sure you don’t fold past the actual crease lines. Now you are done with the easy part!
13. Gather your patience together and start folding the octahedron. For those of you new to twist folds in origami, it may be worthwhile to practice a triangle twist fold on a plain sheet of paper, just to understand the concept; videos can be found on YouTube for this. Because this pattern involves creating several folds that will ultimately form a 3D shape, it is particularly challenging. Work from the outside in (the twists will be easiest on the triangles that stick out of the sides and those on the ends), and don’t expect to get any one triangle twisted until most of the shape is starting to collapse on itself.
14. Once the shape is folded, glue the tabs in place on their mating edges (the last side is particularly tricky, but using a toothpick behind the tab to help hold it in place while the glue dries can save you some grief).
15. Voila! The twist octahedron!
Obviously, the PDF can be scaled up to make a bigger octahedron from a bigger sheet of paper, and you can use fancy art papers to make it more decorative. It will get substantially harder to fold with thicker paper, so keep this in mind when selecting your materials. Enjoy!

