

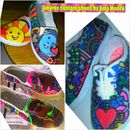
Introduction: Custom Designed Shoes Galore!


The possibilities are endless! Use your imagination!
Step 1: Buy and Prepare Your Shoes and Supplies

Buy a pair of canvas shoes, and prep the surface best by putting them through a clothes washer with a little detergent, and then the dryer. The style of the shoes is up to you...slip-ons, lace ups, I've even customized clogs... but I do strongly suggest using canvas shoes over any other material (white shoes are probably the easiest to use, but any color will work). When you choose your shoes, think about the imagery you want to incorporate and how it will best be displayed on the shoes, and then buy the style you think will accommodate your ideas best. The supplies that I suggest for this project are:
*canvas shoes
*white acrylic paint
*water
*fabric markers
*several small paint brushes including a very small detail brush
*a pencil
*graphics and images for reference
*acrylic spray paint sealer
*a ruler
*scrap paper for practice drawing(s)
Step 2: Layout and Design


Probably the MOST time consuming step of creating custom shoes is the layout and design. Before adding any permanent colors to your shoes, it's best to sketch lightly with pencil and/or draw/print out small pictures to get an idea about 'what goes where!' I try to keep my reference images close to my work space so I can reproduce and compare them for accuracy. After lightly sketching my design out onto the canvas, I like to 'fill in' the shapes that I will be drawing with thinned down white acrylic paint. By doing this, the colors that you ultimately add to the canvas will be bolder and brighter, and you'll end up using less of them, which is great because they're not very cheap!
Step 3: Add the Colors


This is a personal preference really... you can create an awesome pair of shoes by featuring just one or two colors... or, you can incorporate a whole spectrum of colors! If I'm replicating character or item from a well-known theme or concept, I test my markers first on scrap paper to accurately color match them with my reference material. Be sure that the white paint on the shoes is completely dry before you try to add the colors and details!
(☆ Here are a couple insider tips about fabric markers... Always test your markers on a piece of fabric or on the inside of your shoes BEFORE using them!! Some of them claim to be made just for fabric, that they're 'permanent' and/or 'waterproof', but they LIE! I've been burned a few times by claims of durability and reliability only to have the ink from the markers 'bleed' terribly on the fabric and ruin the art on the shoes!
☆Also, there are a lot of markers you can use with super cool colors and effects, like black light reactive, glow in the dark, etc...)
Step 4: Detail and Seal Your Work!


Fine tune your artwork with outlines paying attention to the utmost details! Once you feel like you've incorporated all of the design elements that you want to, SEAL your artwork with a 'clear' acrylic spray sealer... you can use a matte, satin or glossy finish, it's up to you, but be sure to use two coats at the very least, that way if your shoes get dirty you can actually wash them on gentle in the washer and the art won't be affected!
Have a great time creating and wearing your one of a kind shoes! There are no rules when it comes to doing this!! Remember that you can start with simple patterns and/or color palettes if you're trying this out for the first time...just take your time and have fun!


