

Introduction: DIY Ice Cleats


I was inspired by an Instructable of something like this with the bottom plate made with a 3D printer. I don't have a 3D printer, but I do have plenty of scrap metal and tools, so today, off the the shop I went. I would give him credit for inspiring me, but I cannot find his 'ible now. Sorry.
This could have been made out of steel, but it would rust. Plastic was probably not durable enough to keep the pop rivets from pulling out. This extruded aluminum seemed like a logical choice.
I like this design because I can keep them in a zip lock bag in my vehicle, they are easy to put on and easy to take off
SUPPLIES USED:
6 Foot piece of extruded aluminum 1.25" wide Cost $0.00
2 - 30" bungee cords w/hooks on ends Cost $0.00
10 - 1/8" pop rivets, medium length Cost $0.00
TOOLS:
I cut it to 7" lengths with a chop saw, but I could have used a set of metal shears or hacksaw.
I rounded off the ends with a bench grinder and a belt sander, but it was not all that necessary.
I drilled the 1/8" holes and the 5/16" holes with a drill press, but could have used a hand held drill.
I installed the pop rivets with my Craftsman pop riveter.
I fastened the bungee cord pieces with .040" stainless steel wire using my pop riveter to tighten the wire. (See 'ible:https://www.instructables.com/id/Wire-Hose-Clamp/) (this could have been accomplished by binding with a piece of electrical tape or some good adhesive like super glue)
Step 1: LET'S GET STARTED


Cut the metal or plastic the width of your shoe plus 2", 1" on each end to attach bungee cord or whatever you use (such as paracord. and tie the ends like shoestrings)
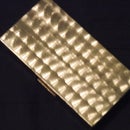
Drill the holes for pop rivets (or use small bolts & nuts or screws) The pop rivets are for traction on the ice.
Drill holes in the ends for the bungee cord (or paracord). Make the holes a little larger than the cord. My bungee cord was 1/4" so I drilled holes 5/16".........3/8" would have been even better.
Install pop rivets (or small bolts & nuts or screws)
Fold up ends using a vise and a hammer. This helps keep them centered on your shoes.
Attach bungee cords or paracord. This is a hit and miss step you have to experiment by tightening the anchor point and holding it with a clamp of some kind like Vise Grips.until you get the right amount of tension on the cords.
Step 2: TRY THEM ON & HEAD FOR THE ICE


I made one end of the cord longer so I could wrap it around my heel and hook the ends together in front. Equal lengths would have put hooks behind my heel.
We don't have too much ice here in Oklahoma, but I was unprepared last year, so I wrapped some solid core 12 gauge electrical wire around the front of my shoes. It did pretty good, but not very easy to remove and put back on. These should grip better and be easier to remove and put on.
I'm just a 78 year old retired firefighter having fun. Thanks for reading. Hope it helped you. Vote for me and maybe I'll win a 3D printer and make some cool stuff.

Participated in the
On a Budget Contest

Participated in the
Protected Contest


