

Introduction: DIY: Motorcycle GPS Tracker Install With Remote Engine Disconnect


Some say that there are only two types of motorcycle riders: Those who have crashed, and those that are going to crash. Others have a similar saying regarding motorcycle theft. Just mention on any forum that you park your motorcycle outside of a condo at night and wait for the comments to pour in on how you are uselessly reckless. I disagree, but that doesn't mean that there aren't steps we can take to tilt the scale in our favor.
But I'll be honest with you. Even being experienced enough in automotive and electronic work, installing a feature-packed alarm on a modern car is downright impossible these days. The electronics are way too complicated to be able to do it without the car's own electronics throwing a hissy fit. Thankfully, for the moment motorcycles are still somewhat accessible and simple enough to make installing an alarm feasible. And given how motorcycles are much more prone to theft, it certainly is a project worth doing.
During this project I'm going to try to walk the reader through the basics of what types of alarms there are, what features they may have, if those features are worth it, and if so, how to implement them. It's more than most people would ever need (so feel free to skip steps), but hopefully that enough answers are provided so anyone can feel confident enough to do this project on their own.
Given how comprehensive this guide is, it may be updated over time. To see the latest version in case there are any changes, click here.
Project Specs
Difficulty: 2-4 out of 5
Tool Requirements: 2-3 out of 5
Time - Simple Install: A few hours for some, a committed weekend project for most
Time - Full Featured Install: 15-20 hours depending on your experience and the vehicle's complexity
Cost: 10-80$
Note - This is a comprehensive guide
This Instructable is going to be purposely long, and include much more information than would be necessary to simply guide the reader on how to install a specific alarm on a specific motorcycle. Though if the length demotivates you, this probably wouldn't be the type of project you'd be willing to undertake anyway.
Basically, I'm writing a summary of sorts with most of the information I've learned over the course of installing multiple alarms on multiple motorcycles, and gathering the info that I would have liked to have available when I was considering installing a unit for the first time. Since it's longer than it has to be, feel free to jump over whatever doesn't apply in your case.
Disclaimers
I'm a self-appointed internet expert. Which means you can assume my free, subjective and biased opinion is worth just about as much as what it cost you.
Working on any vehicle can be risky to both yourself and the vehicle. No warranties or guaranties, explicit or implicit, are made or implied regarding the compatibility, suitability or effect on any current warranties. All modifications should be made within the reader's capability and under their own exclusive responsibility.
A bit of motivation to keep making instructables always helps. I'm a participant in the Amazon Services LLC Associates Program as well as eBay Partner Network, affiliate advertising programs designed to provide a means for creators to earn fees by linking to their sites, at no extra cost whatsoever to you.
Step 1: Should You Install Your Own Alarm?

First of all, ask yourself the following questions:
- Do you know how to change your oil, and do so at least occasionally?
- Do you know the normal voltage of the battery in your vehicle?
- Do you know what resistance (ideally) there is between your chassis and your battery's negative terminal?
- Do you know how to solder wires?
- Do you have a multimeter and know how to use it?
- Do you have somewhere to leave the bike if this project takes a week or two?
If you've answered yes to all of those questions, or at least have a general grasp of all of them, then you should be able to pull off this job. However, let's not kid ourselves. While this isn't the most complicated project, it is very intimidating for anyone who hasn't installed an alarm before (or a few, for that matter). It isn't intuitive, and it isn't a fun process. But once it's done it's rewarding. Or at least more rewarding than still paying for the loan on a bike that was stolen. That's why I'm going to try to give all the details I reasonably can so anyone, anywhere, can install an alarm on any bike if they've got the motivation to do so.
Step 2: What You'll Need

What you'll need will depend greatly on what bike you have, what alarm you want, what features you want, your experience level or simply how you like to do things. I'm just going to list the components, tools and supplies I used in case it's of any use to anyone who wants to take on the project. Items within parenthesis mean useful, but optional.
Main Components
A Vehicle - I'm going to center this DIY around the 2015 Kawasaki Ninja 300 ABS, and perhaps some references to the 2016 or 2017 Kawasaki ninja 650 (they are different models). You'll need a motorcycle, though not necessarily those motorcycles, to follow along. If this component is missing, than you might as well stop reading this and go do something more productive...
- An Alarm- Personally, my current favorite alarm is the Coban GPS303G (also known as TK303G) and it's generic rebranded versions. Later on I'll explain why, and also what other options are available.
- A SIM Card - If you're buying a GPS Tracker, regrettably you'll need a SIM card if you want to take advantage of all it's benefits. Currently the only cheap, prepaid option for SIM cards suitable for GPS Trackers is the SpeedTalk Mobile Prepaid SIM Card. Later I'll explain why other options on the market won't work. Of course, if you aren't installing a GPS equipped alarm this is unnecessary.
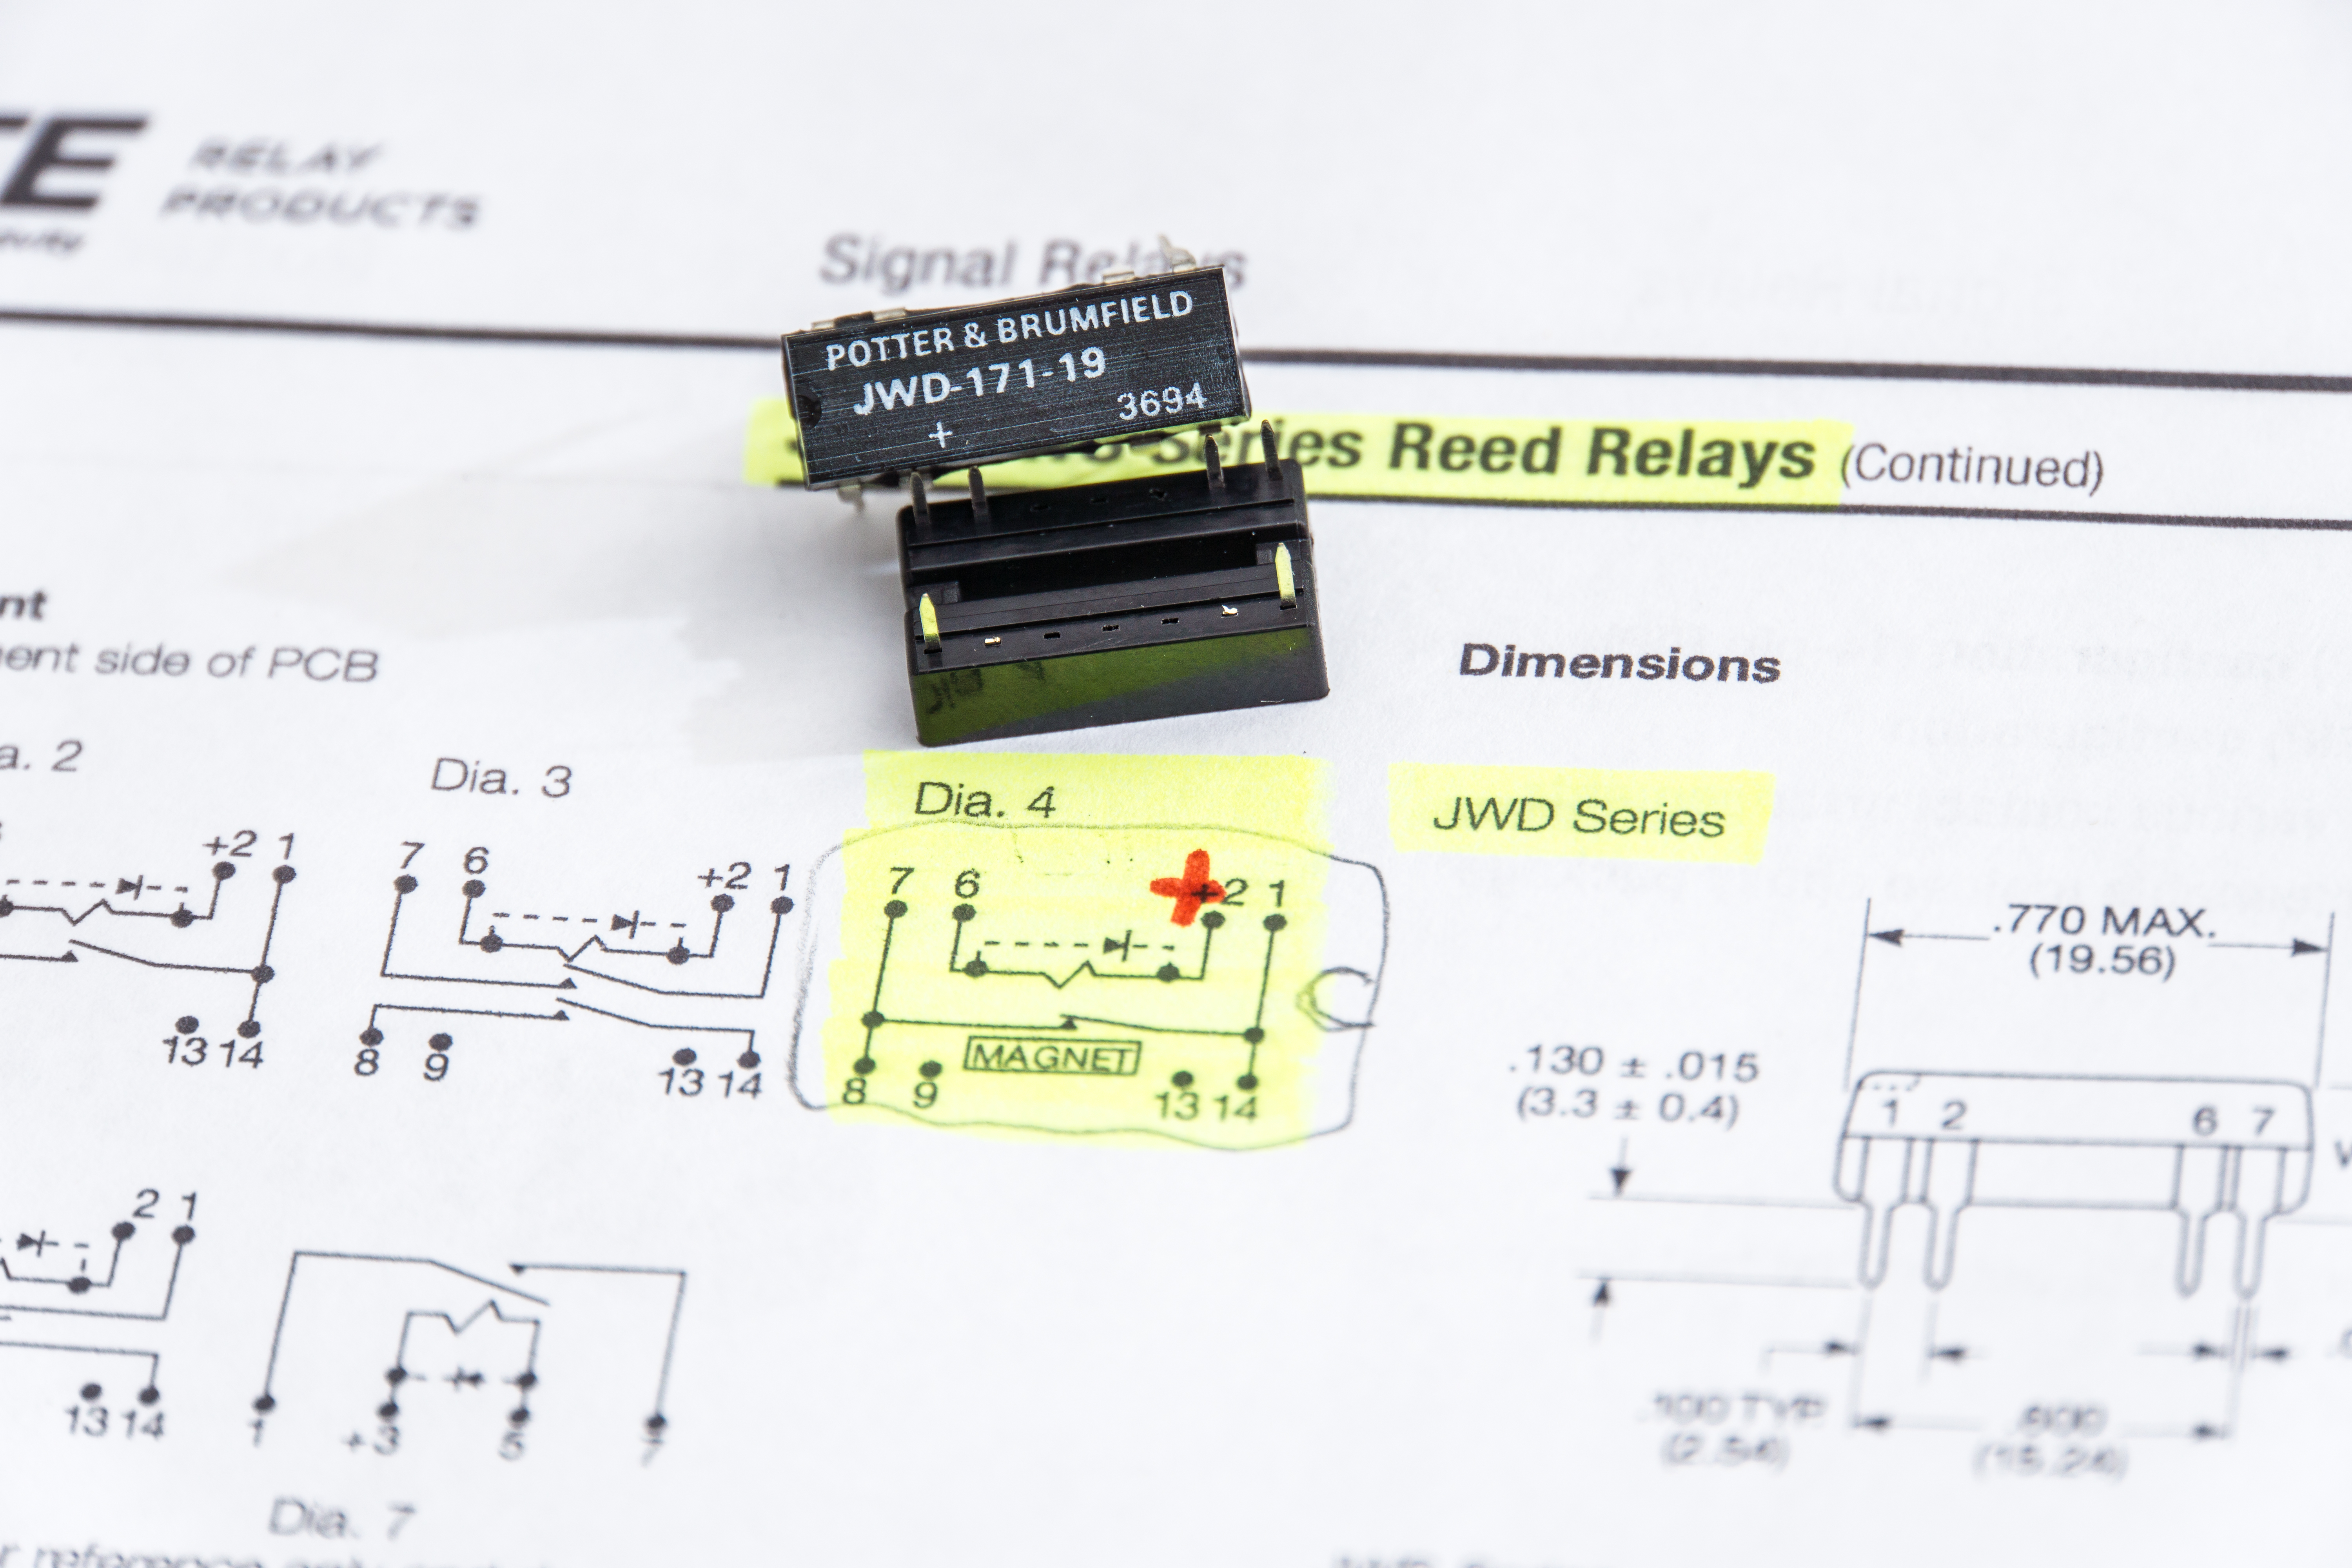
- A Normally Closed (NC) Reed Relay - JWD-171-19 (or a suitable substitute) - If you want to be able to make use of the Engine Disconnect feature from the alarm above on a motorcycle, you'll need a relay. I'd highly recommend using a 12v NC Reed Relay with sufficient current capacity like the JWD-171-19 for it's low current draw.
Tools
Soldering Station- An adjustable soldering and rework station like this budget 898D+ makes any electronics project go smoother, even if it isn't precision work. The hot air gun does wonders with heatshrink, and the adjustability allows for temperatures suitable for any task.
- Multimeter - A staple in any automotive electrical project. I happen to be pretty satisfied with this one for quick work like this.
Flush Cut Pliers - Essential for any electronics work. I always have a pair laying around somewhere.
Ratcheting Terminal Crimper - This is a must-have for automotive electrical work. It's the only right way to crimp terminals. If you get one, make sure it includes multiple jaws. The one I used (albeit a little more expensive - but worth it) is this one.
(Soldering Iron) - For "on vehicle" work where I can't use my soldering station I really like this unit because of the long cable, adjustable temperature, and On-Off switch.
Wire Stripper- An automatic wire stripper like these makes working quick a whole lot easier. There's something gratifying about stripping a bundle of wires, and the stripped portion being equally long on all of them. Simpler models like this Irwin Wire Stripper/Crimper/Cutter will also do fine of course.
(Glue Gun) - And glue sticks too, of course. It will be used for adding weight to the decoy alarm. If you don't intend to install a decoy alarm, it won't be necessary.
Hobby Knife- For stripping fine wires that give the automatic wire stripper trouble.
Supplies
(Rosin Core Solder) - The rosin core helps solder dirty wiring.
(Liquid Electrical Tape) - Use it if you really want to help make the bare stripped wires corrosion and humidity resistant. It's a great thing to have in your tool box. On vehicles, I use it on all soldered wires or bare connections these days. Pro tip - Toothpicks are the best application tool.
Electrical Tape- A staple in any DIY.
(Adhesive Heat Shrink) - Wire corrosion on motorcycles is a big issue. The adhesive heat shrink helps seal the cable. Still, I like to apply liquid electrical tape under it.
(Electrical Connectors) - For jobs like this, I prefer the 2.8mm Electrical Connectors. The "way" (2 Way, 3 Way...) indicate the number of wires the connector accepts. You can buy them in small (or large) quantities on Ebay for dirt cheap if you're willing to wait two weeks or so for it to get to you. As such, I tend to have a variety of 2 way and 4 way connectors already in stock for when projects like this come up.
(Epoxy) - For sealing connectors, shaping components, adhesion, or whatever. I always know I'll end up using epoxy sooner or later during any project.
(Epoxy Pigment) - I discovered this product a few years ago, and it's been helping me embrace my OCD ever since. I always appreciate how professional things look when the epoxy matches the material it's put on. They have black, white, or most other basic colors.
(Epoxy Filler) - When I want to thicken epoxy, or make it take up more volume without adding weight or wasting epoxy, I use these glass sphere fillers. It makes the epoxy much more like a paste, making it great for filling voids or encapsulating things.
(Epoxy Mixing Cups) - Boy is it nice not having to find a clean piece of cardboard to mix epoxy. It certainly makes getting proportions right a lot easier.
(Epoxy Mixers (Makeup Spatulas)) - Same as above. By no means necessary, but for the price I absolutely appreciate it.
(16 Pin IC Socket) - Only needed if using the Reed Relay for the Remote Engine Disconnect. It makes the Reed Relay replaceable if defective, and makes damaging the chip a lot less likely during soldering.
(Test Breadboard) - Only needed for testing the Reed Relay. I personally like the transparent ones. It's always useful to keep 2 or 3 of there around when doing any electronic work.
(Wire assortment) - High quality wire in the right gauge makes a huge difference reliability wise on motorcycles where corrosion is a big issue. Be aware that not all cables are the same.
(Dielectric Grease) - For protecting electrical connections from humidity. Put a dab in all the electrical connectors.
(Alarm System Decal) - For the decoy alarm. For what it costs, I like sticking an "Alarm System" decal on the decoy alarm if it doesn't have one saying so already. Just to make it clearer. If you buy a decal, don't buy one that says "GPS Tracker" or anything of the sort. The decoy alarm does not look like a GPS tracker. You don't want the thief to even suspect you have a GPS tracker on the bike. My favorite decal is this one.
Step 3: Types of Alarms

I guess it might be appropriate to discuss what types of alarms there are, the functions they have, cost, and how difficult they are to install. If you already have an alarm, or know exactly what you want, skip this.
Level 1 - Brake Disk Lock + Alarm
- Protection: 2/5
- Installation Difficulty: 0/5
- Cost: 60-100$
This is the easiest option since it does not require installation. It's simply a clamp-on brake disc lock with an integrated alarm siren. I wouldn't really consider it a true motorcycle alarm (though it perfectly functions as such), but it is an excellent security upgrade for any motorcycle. With or without an alarm. The main advantage is that it actually keeps the wheel from rotating, making riding away (or pushing) the bike effectively impossible. And the alarm feature makes sure you don't try to ride away with it on either (many have damaged their bike this way). There are uses for one of these even if you already have a standalone alarm. I always keep a Xena XX10-SS unit under the seat of my bike.
The Xena models are among the most recommended units, and their customer service is great. I've had a few and I've always been happy with them. They work on just about any bike with a disc brake. There are several models, so the summarized purchase guide is to measure the diameter of the holes in your brake disc, and buy the model with the biggest pin that will fit (the number after the XX is the size of the pin in millimeters).
- XENA XX6-SS Stainless Steel Disc-Lock Alarm
- Xena XX10-SS Stainless Steel Disc-Lock Alarm
- Xena XX14-SS Stainless Steel Disc-Lock Alarm
Level 2 - Simple Alarm
- Protection: 1.5/5
- Installation Difficulty: 2.5/5
- Cost: 10-30$
The second option is a "simple" motorcycle alarm. These are the alarms that require only two wires to install. You can even wire it directly to the battery terminals if you like, making messing with the motorcycle's wiring unnecessary. In some case there may be a third wire (ACC) that you can install if you'd like, which only serves to let the motorcycle know that the bike is turned on. You can skip it if you really want to. Another option is to buy a "higher quality" alarm with more functions (and hence wires), but simply not hook up the extra wires. The alarm should work fine anyway.
To see an example of such alarms, take a look at this simple model or these search results for Motorcycle Alarms on Ebay. I'm talking about the units for sale between 7-15$ which include a remote or two, and are hardwired to the bike. They should all work decently and pretty reliably. Nonetheless, a better option would be the BlueFire Motorcycle Alarm System. At least you can expect better quality control from it, and you can simply cut off the extra wires that you won't be using (or leave them so you can complete the installation later).
Level 3 - GPS Tracker Alarm
- Protection: 3.5/5
- Installation Difficulty: 4/5
- Cost: 30$ + 5$ Monthly for Cell Service
*There are many types of GPS Trackers, ranging from 20$ to 900$. I'm going to talk about the one I personally like, which is the Coban line of GPS Trackers which are models that cost in the 30$ range, but do as much or more than the 900$ models (I actually suspect that the internals may very well be the same in some cases).
This is currently my favorite alarm system for motorcycles. They are made (or designed) by Coban, but are ubiquitously rebranded so pay attention to the model number, not the brand. My current favorite model for motorcycles is the GPS303G (also known as TK303G). They can be purchased for around 30-40$ (both in the USA and from abroad), and have all the features you could ever want. The big advantage of this model in particular is that it allows for "sleep mode", allowing the unit to fall into a low battery consumption mode when the vehicle is parked and not moving. GPS Trackers have a notoriously high battery drain (relatively), so this is a must for motorcycle GPS trackers.
Some of the biggest benefits of a GPS Tracker are receiving alerts on your phone if the vehicle is moved, being able to track the vehicle remotely, checking on the state of the bike, using your phone as a remote, and even being able to shut off the engine remotely if your vehicle is stolen. It does cost 3-5$ a month (the tracker requires a working, prepaid SIM card), but I think it's worth it considering how cheap the GPS tracker and what that cost is. It even has a microphone that allows you to listen to whoever is near your bike!
Regarding installation, since it doesn't have connections for the turn signal lights (which would have been two extra wires), on the simple side it just requires power, ground, and ACC. On the complicated side it can remote disconnect the engine.
Level 4 - GPS Tracker Alarm + Remote Engine Stop - Decoy Alarm
- Protection: 4/5
- Installation Difficulty: 4/5
- Cost: 40$ + 5$ Monthly for Cell Service
This is the upgrade over simply having a unit that allows the bike to be tracked. Personally, I prefer a GPS Tracker and Alarm in a single unit, in order for there to be only one unit that can break, and only one unit draining the battery. However the issue with doing so is that if an alarm siren sounds on your bike, the thief is going to know there is an alarm, and rip it out just because he can. Even if they don't know the vehicle has a GPS Tracker, trying to remove the alarm they will find it and destroy it. If you don't install a decoy alarm, you are relying on a thief to not bother looking for the alarm. Which on a tiny motorcycle requires the bare minimum of effort. Like they say, hope is not a strategy.
The highest level of security is also installing the circuit for Remote Engine Stop, allowing you to kill the engine remotely. That way the bike cannot be simply ridden away, even if they steal the key off you. You can just kill the engine once they've gone down the block. However correctly installing it isn't necessarily for novices.
Note - My Take on just installing a GPS Tracker
A tempting option is to have installed a LoJack unit (not DIY installable) or get a standalone GPS Tracker. Personally, I'm not a fan. Having a GPS tracker no means guarantees getting your bike back. With many vehicle GPS trackers you have only a few hours to track your bike once the battery is removed. And sure, having a GPS tracker may help you get your bike back if stolen, but it does nothing to keep your bike from getting stolen in the first place.
Also, some can only be tracked by the police with a special antenna that is only available to the departments of large cities. If they don't give your bike priority in the first few hours, your bike is gone anyway.
My opinion on the matter (and I'm not alone in this) is that when the general population installs GPS trackers (that are only GPS trackers), the ones who benefit are the ones who don't spend the money or effort on GPS trackers since the result is less brazen thieves. This is because vehicles with GPS Trackers don't tend to advertise this, so when a thief goes "shopping", they are essentially playing Russian roulette. I say that because LoJack and similar units are very expensive, and most bikes don't get stolen to begin with. After all, spending 900$ on a GPS Tracker for a 8000$ bike that never gets stolen means you simply wasted 900$. A better choice is a GPS Tracker and an Alarm on the same bike, but that's double the battery drain. The best option, in my opinion, is a GPS Tracker Alarm (with a decoy).
Note - My Take on 2-way Paging System Alarms
I've had a few, the latest of which being a Spy 5000m 2 Way LCD Motorcycle Alarm System, and while the alarm works fine and the concept is great, in practice they are virtually no better than a "normal" one-way alarm. The 2 way function just doesn't work.
Just in case someone doesn't know what I'm talking about, the whole point of this type of alarm is that it is "2 Way". This means that besides you being able to turn on and off the alarm with a remote, the motorcycle alarm can make the alarm's remote beep and vibrate whenever the alarm is triggered. This is the paging feature. It sounds great, of course. But in practice, the range and reliability is horrible. You cannot count on the remote alerting you unless you have direct line of site with the vehicle, and if you do, the paging system is unnecessary. In essence you end up with an over-complicated alarm with a bulky remote, that does no more than a regular alarm remote can do and leaves you with a false sense of security.
It's not a bad idea, it's just that GPS Tracker Alarms work so much better in practice, and are much more reliable, which is why they are my go-to alarm right now.
Step 4: My Take on Remote Start

When looking at the installation diagram for your alarm, you're likely to see the "Remote Start" wire and wonder with a grin, "should I?". Most alarm systems these days allow that function. But the question still is whether or not it is a worthwhile function.
After installing quite a few alarms on quite a few motorcycles, and much thinking on the matter during each different install, my conclusion is no, it's not worth it. Even if you are a mod-addict, or you can get it installed for free, it just isn't worth it.
For one, most modern motorcycles come with some sort of anti-theft protection whose whole purpose is to keep the motorcycle's ignition from being bypassed. That system ranges from simply shielding the ignition wires physically, to using resistors so that a certain ohm reading has to be detected (opposed to a short circuit or 0 Ohms), to using a key with an immobilizer chip. Of course, all of them would have to be defeated (which could be done), reducing the security of your bike. That said, the security point is almost moot, because if all bikes out there the same model as yours have an immobilizer, the thief is going to treat your bike as if it has an immobiliser even if you've deactivated it. As such, you benefit from the vast majority who don't disable it.
There are other issues however. Most of the time you have to hold in the clutch to start the engine, and this isn't a feature you want to disable. It is something you want working properly just to avoid silly accidents. And if you indeed do pull of the remote start, it would certainly void all warranties and be a possible failure point when having running issues (depending on how you implement the solution). I would hate to have to argue at the dealership that my unnecessary, gimmicky upgrade isn't causing the bike to have a rough idle, even if it is totally unrelated.
All in all, my conclusion is that while it can be done, it is a function with no use, which implies a ton of work and electronic knowledge to do, reduces the security of the bike, and that you will never use in a useful manner. If you have a practical, real-world usage scenario, please let me know below, but I can't think of any convincing one. Not one where the bike can be remote started and left unattended. At most, warming the engine in a real cold environment in a closed patio could maybe be one, but with today's multi-viscosity oil that isn't as important anymore. Perhaps for cars it is more useful thanks to locked doors and air conditioning, but as far as I am concerned, it's just another cable in the wiring diagram you can completely forget about.
Step 5: My Take on Remote Engine Stop / Cut-off / Kill Switch / Disconnect

In the previous step I mentioned how useless I thought the Remote Start function was. And besides useless, how it's complicated installation could cause a whole host of problems. A remote kill switch, on the other hand, while also potentially problematic, if done right, can be extremely useful and easy enough to implement.
What is a remote engine cut-off, you ask? Well, I'm glad you asked. It's blatantly obvious how vulnerable motorcycles are to theft. Both the 'pick up and toss in a van' type of theft, as the 'jacked at a red light' type of theft. When you're at the business end of any type of threat or weapon, it's good to have options. One such option is knowing you can count on a bike with remote engine disconnect. Let the hoodlum take the bike, kill the engine before they've made it more than a few thousand feet away, and have the cops take care of it from there.
Among the benefits of a GPS tracker is being able to send (as well as receive) text messages to your alarm, and hence your motorcycle. Normally that will simply be a request to check the status of the bike, or to arm/disarm the alarm if you've forgotten the remote. But you can also request the alarm to cut off the ignition to the engine, turning your bike into an expensive paperweight. On a car this typically requires cutting the fuel pump wire, or messing with complicated electronics. Thankfully on a motorcycle it is much easier (if done smartly).
Given the dangerous nature of a motorcycle, there are plenty of electrical circuits that will shut off the engine. Let the bike tip over? The fall sensors cut the engine. Hit the kill switch? The engine turns off. Put the bike in gear with the kickstand down? The engine dies. Some of those cables are relativelylow risk, low current wiring (though some are more suitable than others). And by low risk I mean that you aren't messing with any wire carrying a high current or a digital/analog signal whose value matters. I'm referring to wires that are either 12v, or 0v. Or either open circuit, or closed circuit. Basically it works or it doesn't with no gray areas. This opposed to tampering with the main Ignition, fuel pump, or other such wires carrying a signal or high current, which will leave you second guessing your work every time the engine is acting weird.
The conclusion is that if you want a remote disconnect, and you are competent enough to follow the steps in this DIY to pull it off, the feature can be low risk and low cost enough to be worth doing, if done right.
Step 6: Features and Specs of the GPS303G


As of now, September 2017, my favorite budget alarm if the Coban GPS303G. The correct model name is supposedly "GPS303G", but don't worry if you see "TK303G". They are the same item. Also, completely disregard the brand, since Coban seems to allow anyone to rebrand their unit. As far as I've heard, they are all the same. The only thing you have to be careful with is the letter after the numbers. The "G" in the name refers to this particular model being waterproof and having a remote, which are features you want.
In functionality, it is almost identical to the Coban GPS103G, an ubiquitous car GPS Tracker Alarm, but in practice this model is vastly superior for motorcycles because it is smaller, waterproof, has integrated antennas, and can be put into sleep mode for greatly reduced battery consumption.
It's main features are:
- Controllable by either remote, text messages or apps
- Receives both GPS and GPRS signals to find it's position
- Can disconnect the engine remotely
- Waterproof
- Integrated antennas for less components to install
- Microphone to listen around the bike
- Internal slots for a Micro SD Card (position log) and SIM Card
- Speed Alarm messaging
- Fuel level input
- SOS button
- Low Battery Alarm messaging
- Position Fencing and other position-dependant features
Which makes it an incredible device for the price. Personally, I don't believe in installing 900$ alarms on 7000$ bikes. It makes no sense to pay that money up front for something which isn't supposed to happen anyway. Comprehensive insurance will typically be a much better deal. Especially considering that having an expensive GPS tracker by no means guarantees you will get you bike back if it is stolen. I see much more utility in installing a feature-packed 30$ GPS Tracker alarm yourself, which you will take advantage of regardless of whether or not the bike is stolen. They may not be as user friendly or bug-free like the more expensive units, but they work good enough to make them a no-brainer for the price.
Some features are useful, and some aren't, admittedly. To this day I still can't come up with a practical use for the SOS button on a motorcycle, so I always cut it off at the plug. It's simply a button that, when pressed, will send SOS text messages to a prespecified list of people. That's all. For a car, installed under the dash it's probably more useful (think carjacking), though you're still relying on the person receiving the SOS to read the message and care enough to do something. Others like the fuel level input certainly would be interesting if they could be implemented easily. The issue is that it requires an extra (expensive) fuel sensor (unfeasible for bikes). It may be possible to connect it to the OEM Fuel sensor by simply wiring it in parallel, but no one seems to have tried before and I don't want it enough to be the first.
The low battery alarm is useful, as in it will send you a string of text message alerts when the battery drains down. The problem is that it only sends the message when the GPS Tracker's battery is dead (or that's what I've figured out so far), meaning that it will only text you just after your battery died, and not before. It sucks that it is not configurable, but it's better than nothing I suppose. Take note, Coban! This alarm would pay for itself in saved batteries if it could send me a text message to charge the battery before it got damaged from a full discharge.
The speed Alarm is simply amusing. I love it! I set up my unit to text me whenever I go above 100mph. It's always fun to step off the bike only to find my Ninja's texted me while I was riding. No practical use for it (unless your son took your bike for a ride...), but I enjoy having it.
The vehicle's position can also be tracked online, where you can set up GPS Coordinate fencing, as well as a number of other features. However the setup is complicated and I couldn't get it to work the last time I tried.
The microphone feature is either a novelty, or a lifesaver, depending on what happens to the bike. The unit has a mic, and given that it also has a prepaid SIM card (with corresponding cell phone number) you can actually call your bike to hear what's happening around it. If your bike is ever stolen that may be useful to help find out if the bike is alone, how many people are with it, or other such information (before you go full-Rambo into that dark warehouse). But if isn't, you'll probably never use this feature. I suppose there is no harm in having it though.
One good thing that separates this alarm from other automotive, permanently installed models is that it has integrated antennas. Many GPS trackers out there have a separate GPS and GPRS antenna to hide, making installation a chore as well as adding more connections to corrode and vulnerable components to damage. I've had several antennas fail in the past from the horrible combination of humidity, heat and vibration. Having the MicroSD and SIM card in the interior also makes the unit totally waterproof, a godsend for motorcycles.
And finally there's battery life. The sad reality is that all GPS trackers (and automotive alarms in general) are battery hogs if they check your position frequently. It's only worse if it's on the cellphone network (in order to send and receive texts) like this one. You can expect this unit to have somewhat better battery life than your smartphone running GPS, which is not a lot. You will need to put your bike on a battery tender regularly with any motorcycle alarm you install, GPS-equipped or not, though that's a general recommendation for any motorcyclist anyway. For reference, this unit only has a 500mAh battery itself (your average cellphone has three times that), so it relies heavily on the motorcycle's battery. While operating at full functionality it consumes about 60-100mA, but thanks to this unit having sleep mode, that can drop down to around 10mA or even less, depending on how you configure it. That's what your typical cheap auto alarm consumes. Essentially it can turn off the GPS if it detects the bike isn't moving, vastly improving battery life. The takeaway is that motorcycle's have tiny batteries, and all motorcycle alarms will abuse it. Whatever motorcycle alarm you choose, you should assume the bike's battery will drain down if it goes up to two weeks without riding. Simply make a habit of plugging it into a battery tender.
These units are so complex that it is impossible to go through all of the specs and features (which leaves me amazed that they can be sold so cheaply). Hopefully that's enough (I suspect too much) of an overview to leave most people without any major questions about this unit.
Note:
These alarms only come with one remote. If you lose it, you'll have no recourse but to buy a whole new unit with a new remote. I highly suggest buying an extra remote or two and keeping the original remote as a spare, before you need it. They only cost a few dollars and can easily be configured. I actually made a DIY on that topic just so it would properly be documented somewhere on the interwebs:

Step 7: Remote Engine Disconnect - How to Implement (Theory)


A "Remote Engine Disconnect" is a common feature on all but the most basic vehicle alarms this days. However they are not all created equal, and many work in very different ways. The ideal implementation of this would be, in my opinion, a latching relay. That is, a relay (read "high" current capacity, when compared to transistors) which only requires current to switch its position, but not to maintain the relay in that position. The benefit of that is that even if the alarm isn't receiving power, the engine is still disconnected. Also, it doesn't drain the vehicle's battery to have the relay "activated". I suspect something like that is what is used in the SPY 5000m 2 Way LCD Motorcycle Alarm System. I have a strong preference for how that alarm worked, in that the ignition was always disconnected whenever the alarm was armed, and as far as I know, it didn't take extra current to do so. However since it did not specify what type of relay was used, and the circuit was internal, it is mere speculation.
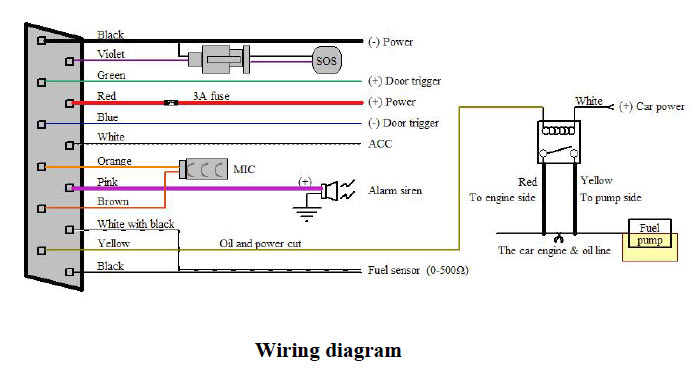
For the Coban GPS303G used in this Instructable, implementation is a bit more complicated. The "Oil and Power Cut" wire (engine disconnect wire) is simply a wire that is grounded when active. That is, it is supposed to serve as the negative connection of a separate relay. The issue with that is that automotive 12v relays draw around 160mA (0.160A) which is a lot of current draw for tiny motorcycle batteries. Especially when running the GPS tracker simultaneously (another 60-120mA). The result is that you have very little time to actually use the GPS tracker to find your vehicle if stolen (if the vehicle battery is removed or disconnected), and once the alarm's battery is drained the relay deactivates and the engine could in theory be started. I wasn't too happy with that. But it's the best option available for the moment.
While the "ideal" solution would have been to create some sort of exterior latching relay circuit, it would have been bulky and impractical to use on a motorcycle. I went with a satisfying compromise. A Reed Relay. Reed Relays are very efficient, very reliable, and very long life versions of "normal" electromagnetic coil relays. They are actually very similar (wiring is essentially identical). But in exchange for the prior advantages, they tend to have a much smaller current carrying capacity. In this case that won't be an issue, making it the perfect simple solution.
The type of relay required is a NC, or Normally-Closed relay. Like the name suggests, the contacts are normally closed and when the GPS Alarm triggers the remote disconnect, the contacts open disabling the engine. The specifications we were looking for are 12v, Normally Closed, as much current capacity as possible, and as low current consumption as possible. The best I could find was the JWD-171-19 Reed Relay from Tyco/Potter & Brumfield.
In contrast to the 150-200mA of current consumption for normal automotive relays, this reed relay consumes only 10ma with its 1200 Ohm coil. They cost around 5 to 10$ per unit, and seemed to be perfectly suitable. The spec sheet can be found here. However any similarly specced reed relay would also be suitable. I chose that model based on availability and price. If anyone knows of a more suitable, cheaper model, post it below. Also, I'd imagine that doing this with transistors would also be possible, but it wasn't something I had enough experience to feel comfortable with.
Now one of the biggest questions remaining is what to wire the (reed) relay to. These were the options that came to mind when first thinking about the issue, and what I found out on further inspection:
Ignition Fuse
This is the go-to option for most people. Just wire a relay inline with the ignition fuse wiring. I've done this method before, but I'm not all that fond of it. The ignition wire is fused by a 10 amp fuse, which at 12v isn't an insignificant amperage. Given the importance of this wire (it directly feeds the spark plug coils), tampering with it effectively voids the warranty on the whole bike, and if the engine starts acting up, you will be suspicious. If you take the bike to a mechanic with an engine running issue, they will blame it on that even if it's totally unrelated (normally it is the weekend mechanic's fault, after all). When I had issues with my Power Commander's firmware (I didn't know it was it's firmware at the time), I was suspicious of the remote engine disconnect wiring. After all, Guardian Bells can only do so much when it comes to electrical gremlins. So while the Ignition Wire is an option, it isn't really the ideal option. The Ignition Wiring Diagram is attached if you want to see how the ignition fuse is wired.
Engine Stop Switch (on the handlebar controls)
When I was considering methods to kill the engine, I originally supposed that the kill switch on the handlebar would be sending a signal to the ECU to kill the engine, opposed to actually being a part of the ignition system. I was wrong. The engine stop switch is inline with the Ignition Fuse, and as such has a 10 amp fuse ("carries up to 10 amps"). It also feeds the ignition coils directly. In case you're wondering, I haven't found an exact figure for how much current the ignition coils consume at 12v, but it's around the 5 amps range (less than I suspected).
In any case, wiring the remote engine disconnect to the engine stop switch is effectively identical to wiring it to the ignition fuse, giving it the same disadvantages of a "high" current wire.
Vehicle Down Sensor
This was a bit "outside the box", but given that most modern motorcycles have a vehicle down sensor that when tripped, turns off the bike, it was an option.
The way it works is that if the bike's ECU detects it has been dropped, it kills the bike until you turn off and on the engine with the bike upright. If you could trick the bike into thinking it's laying on it's side perpetually, you could in theory keep the engine from running. However after studying the service manual, I found out this isn't an "either 12v or 0v" sensor. The vehicle down sensor's output works on 5v, and it's output varies between 3.55-4.45v when the bike is upright, and 0.65-1.35v when the bike is down. I would guess that substituting that output for ground may very will suffice to trick the bike into thinking it's down (or you could simply feed the correct voltage with a voltage divider), but I was beginning to realize that it wasn't going to be the best option.
Another issue I had with this method is that the ECU may very well store a counter of how many times the vehicle down sensor has been triggered. Or it might use the angle value for other type of metrics (ABS perhaps?). It's mere speculation on my part, but regardless, messing with it proved to be an unnecessary hassle.
Kickstand / Sidestand Switch
Personally, I ended up going with the kickstand switch. It was easier and less current-carrying than the kill switch, and it would be horribly nightmarish for a thief. Even if you introduce some resistance because your connections aren't that great, you're never going to be able to make the ECU read the wire as the other state. In other words, it won't affect how the engine runs, nor give you problems. If your bike starts, the remote disconnect circuit is working. If it doesn't at all, then you might have an issue.
If you wire a relay to the the kickstand switch, making the alarm simulate the kickstand being down, it will allow the thief to start the engine in neutral, but it will kill the engine as soon as he puts the bike in gear. If they put it into neutral again, it starts, but then it will die again once in gear. Imagine how incomprehensible that would be when you're nervous and racing against the clock! I'd also like to think that by allowing the bike to run in neutral that would at least give a few more minutes of runtime to the GPS alarm by allowing it to charge. Not much, but it certainly doesn't hurt.
So that's why I ended up going with the Kickstand Switch for the Remote Engine Disconnect. It was the best choice. It was also the closest to where I installed the GPS Alarm, so I'd need the least amount of wire to hide. Another reason was that I thought how amusing it would be if someone stole the bike, somehow hotwired it, but then could get it to start but every time the vehicle was put into gear, it would turn off. That would be extremely weird from the perspective of any thief.
*Note to self: While this tutorial was written regarding a 2015 Kawasaki Ninja 300, it was written while installing a similar alarm on a 2017 Kawasaki Ninja 650 (for which no shop/service manual was yet available). Comparing the shop manual of the 2013 Kawasaki Ninja 300 and the 2013 Kawasaki Ninja 650 (shop manual years, not vehicles), some differences in wiring were noticed between both models, which could have been presumed to be similar. In the 2013 Kawasaki Ninja 300, the fuel pump relay is triggered by the ECU, whereas in the 2013 Kawasaki Ninja 650 it is triggered by the Ignition fuse/Engine Stop Switch. This means that the shop manual of your specific motorcycle should always be consulted prior to making any assumptions, since the circuit may be different even for similar models from the same brand.
Step 8: Remote Engine Disconnect - How to Assemble


Step 1 - Get Together the Components
First of all, gather together the components. You can decide what you'll need, I'll just tell you what I used. For the complete list, visit Step 2 where I go over every component, tool and supply used in detail.
Step 2 - Prep the IC Socket
The first step is to prep the 16 Pin IC Socket. Looking at the pinout of the reed relay, you'll notice that it only uses a few pins. Since they aren't necessary, remove the extra pins (3, 4, 5, 9, 10, 11, 12, 13). Whether you want to bridge 7/8 and 1/14, or remove one of each pair, will depend on your soldering skills. It probably is better to bridge them (for current reasons, albeit minimally), but by no means necessary. Using pliers, push the unnecessary pins out from underneath, or simply trim them with flush cutting pliers.
Removing them reduces the chances of short circuits once the soldering is done.
Step 3 - Solder the connections
To the Soldering Station! Solder the connections, making sure you pick the right pins. The little dent on the IC Socket will be next to pin 1, so wire it accordingly. Remember to remove the relay before soldering to protect it from the heat. I connected the Red wire (+12v) to pin 2, the Black wire (Alarm output) to Pin 6, and Blue wires to Pins 8 and 14. Remember that the alarm triggers the ground for the relay, not the +12v!After soldering, check each pin against each other pin for short circuits using the continuity mode on your multimeter (there should be infinite resistance between all pins).
Step 4 - Test the Reed Relay
Once you have wired up the relay, but before you have sealed it up, you would probably be best off testing the setup. Simply rig up a little test circuit on one of these cute little breadboards along with a 12v LED (T10 LEDs for car interiors are great for this). For power, I highly recommend one of those cheap adjustable tattoo power supplies. Just remember that the black wire goes to ground, that applying or removing 12v to the red wire is how you trigger the relay, and that the blue wires are simply the input and output of the "switch". Also, this is purposely a Normally Closed (NC) relay, so the LED should shine when the relay is not active, and turn off when the relay is powered.
Step 4 - Waterproof
Once you've made sure the unit works properly, encapsulate the connections to protect against vibrations and short circuits. I just used a dab of liquid electrical tape on any bare metal, and then some epoxy to encapsulate it. To make the epoxy black, I used a drop of epoxy pigment. To give the epoxy more volume, as well as make it thicker and more paste like so it wouldn't drip everywhere, I used some epoxy filler (basically just micro glass balloons).
Quick tip, epoxy is always a pain to use since it requires preparation beforehand and cleanup afterwards. Using disposable mixing cups and makeup spatulas just makes life easier. They cost next to nothing considering that a unit of each will last most people a decade. Plus the measurements on the mixing cups make it a lot easier to get the proportions right.
Once the epoxy is dry, use some adhesive heatshrink to seal the chip in. For heatshrink this large I'd definitely recommend a heat gun like the one the rework station has, since a lighter isn't going to do a nice job without burning the tube. While the stuff is still hot, crimp the ends with some pliers.
Step 5 - Add a Quick Connector
I like it when manufacturers make components serviceable and replaceable, so when I do any automotive work, I try to return the favor. Thanks to the wonderful, wonderful world that Ebay is, you can get bulk packs of most electrical connectors for just a few dollars. I always try keeping a few on hand in the most typical sizes given that prices are cheap, but shipping does take a few weeks.
In this case I used a 4 way electrical connector. You can check the images to see what pinout I used, and how I wired it. To install it you'll need a wire stripper and some decent terminal crimpers with the right jaws. You might want to add some solder to the connections after crimping since you already have your soldering gear out. However keep in mind that soldering on vehicle wiring can create issues, compared to crimping. You should always consider whether it is best to crimp or solder. An added advantage of using a connector is that if you ever want to remove the relay, you can make yourself a bypass plug and simply substitute the relay. This is great for making engine diagnosis easier.
All done. One thing less to do on the list.
Step 9: Prep the Alarm for Installation


You're going to need to do a few things before you install the alarm in the bike, so you might as well do them now.
If you still have a power supply out from the reed relay testing, you might as well charge the internal battery on the GPS tracker. Simply flip the switch inside the tracker (to connect the tracker to battery power) and hookup the positive and negative wires (check diagram) to a 12v power source. The middle LED indicator will turn from "red" to "off"once it's charged (a few hours). Then you'll want to flip the switch off again for the time being.
Next, you are going to need a working SIM card if you want to be able to both send and receive messages to and from your bike. One quirk this alarm has is that it was obviously designed years ago, and as such it only works on 2G networks. Given that it's just a semi-sophisticated car alarm, that wouldn't be an issue if it weren't because almost no mobile operators in the USA today (September 2017) work on 2G networks any more. In other words, if you use a (3G) card from AT&T or T-Mobile, your alarm isn't gonna get a signal. It just won't work. But there are other options.
Today, the cheapest card that I know of that works on 2G networks is the SpeedTalk Mobile Prepaid GSM SIM Card. There's no contract, it's just a prepaid, pay as you card. You can buy it for under 10$ and it will come preloaded with 5$ credit. You can register the card online after your receive it and use it immediately. The cheapest it will cost you monthly is 5$, and not because you will be using up that whole amount. The issue is that you have to add (at least) 5$ credit each month to keep your account active. But that still means only 60$ a year to track your bike, which is as cheap as it comes. If you set up the Auto-Refill feature, you won't have to look at it again. For reference, I tend to only use 2-3$ of credit a month.
Once you've bought, activated and installed the SIM Card (just unscrew the back cover with the supplied screwdriver to put it in), you might wanna consider filling in the MicroSD Card slot. I probably wouldn't bother buying a card for this purpose, though there are cheap cards available. The thing is that you probably have some 1, 2, or 4GB MicroSD Card that's been laying around for years somewhere that you don't have any use for, so this is the time to dust it off and put it to use. As I understand it, the function of the SD Card is simply to log the location of the vehicle, though I've never gotten around to use it.
Next, you'll want to decide which wires you'll be using, and which you won't. Remove the wires that you have no need for. I personally pushed the pins out from the plug (if you do this, be very careful), and then used some epoxy (from when I was encapsulating the reed relay) to seal the plug against water or debris. You should check the diagram, but the wires I removed was the SOS button (Violet), the (+) Door Trigger (Green), the (-) Door Trigger (Blue), and the Fuel Sensor (White/Black). You can also remove the Remote Engine Disconnect (Yellow) if you won't be using that feature. That leaves you with just 5 wires to connect, which isn't all that bad.
You might want to shorten the microphone wire for the "proper" length for your application (in my case I needed around 6 inches, not 4 or 5 feet). Simply shorten it and add a new 3.5mm plug, or cut the wire and reattach the original 3.5mm plug. The red wire from the microphone goes to the ring, and the green wire to the tip (if I recall correctly). You should measure an open circuit between both red and green wires once the plug is added to make sure you didn't short circuit the connections while soldering.
Now that that's taken care of, let's proceed.
Step 10: Wiring the Alarm - Installing the Alarm on a 2015 Kawasaki Ninja 300 ABS


Step 10.1: Remove side fairings, Seat and Gas Tank
The first step is to gain access to the battery area. It's located under the seat. Remove the side panels and front seat to begin.
Them remove the two bolts holding the gas tank with a 10mm socket. Lift that tab up and place a 2" block of wood (or something equivalent to prop it up. Disconnect the Fuel Line (just pull up the tab with a screwdriver) and the fuel pump connection (lift a tiny tab). You'll also want to disconnect the vent line on the left side. Once you've done that simply pull the tank out back and up.
Step 10.2: Stick on the GPS Tracker
You can do it now, or later, your choice. Put some double sided tape on the back of the GPS Tracker (Always use adhesion primer where it's hot and humid, like a bike - Adhesion Primer) And stick the alarm in place on top of the air box as pictured. The other choice is to attach it with Heavy Duty Velcro. It's better to use velcro since it's not permanent. If you go with double sided tape it's extra important to make sure you inserted the SIM and turned on the switch inside the GPS Tracker before sticking it in place.
Step 10.3: Identify the right wires on the ABS Pump Module
On this bike, the easy choice was to wire the main power wires for the GPS alarm directly to the adjacent ABS Pump. So that's what I did. Double check your wiring, but I wired the +12v Power Wire to the big Red wire on the ABS Pump Electrical Connector, and the ACC wire (+12v on Ignition) to the Brown/White Wire. Electrical Diagram attached.
One tip to help identify the wires is to stick a sewing pin or needle in the connector on the front side so you can tap your multimeter probe on it. It's useful where you can't insert the multimeter probe tip into the connector directly like here.
Step 10.3: Wire +12v and ACC wires on the ABS Pump Module
Once you've identified the right wires, connect them. Don't cut the wires leading to the ABS pump. Simply remove a bit of insulation and connect the wire to it. I like stripping a 1cm section of insulation, sticking an Xact Knife between the wire strands to separate them into to bunches, stick the stripped wire I want to connect through the middle, and wrap the wire around the wire I'm tapping into. Bonus points if you use liquid electrical tape to waterproof the connection. Then just wrap it with electrical tape. Regrettably you can't use heatshrink here.
One benefit of wiring it to the ABS Pump connector (and not adding another connection to the battery terminals on the bike) is that as long as the bikes power wires are connected, the alarm is receiving power.
I added a waterproof mini fuse holder instead of the non-waterproof fuse holder that came with the alarm. I'd recommend you do the same, but if not at the very least wrap it with some electrical tape and squirt a bit of dielectric grease in.
Step 10.4: Install the Ground Wire
Once that's done, install the ground wire. I simply attached it to the bolt on the ABS pump bracket. Make sure some paint is removed so you have a good connection to ground.
Step 10.5: Install the Microphone
If you want to install the microphone, just run it into the front headlight housing, or near the ignition switch. That way you can listen to what's happening around your bike if it get's stolen and you're about to find it. It's not a feature I'd pay for, but given that the alarm includes the microphone, it's worth having.
Step 10.6: Test it
At this point the alarm should be working already. Test it to make sure. Connect the alarm siren temporarily to see if you can arm and disarm the bike. Try turning on and off the ignition to see if it detects it. Send "Check123456" to the SIM card's number to receive the status of the bike, etc. Play around with it.
Step 10.7: Install the Tank and the Siren
If you intend to install the Engine Kill Switch, skip this step for now.
Once you've made sure everything works properly, install the tank connections again (don't forget the vacuum tube on the left side) and double tape the alarm siren in place. Be smart and remove the original white foam double-sided tape from the alarm - It's junk. It always ends up falling off. Hopefully before you've reassembled the bike. Remove it and install some quality double sided tape (I like 3M's Heavy Duty Outdoors Double Sided Tape) using an adhesion promoter, and then apply the adhesion promoter to the underside of the gas tank (see pictures) and install it there.
One Tip - This goes for both "normal" and GPS alarms, but double for GPS alarms with Dummy Alarms. You want any thief to take as long as possible to reach the alarm control unit. Once more thing you can do to tip the alarm in your scale is to install I-Torx bolts on the gas tanks. Those little funky starry allen keys with the pin in the center. They aren't all that hard to defeat, but they certainly will take time, tools and effort to do so. All of which give you more time to track down that bike. For the 2015 Kawasaki Ninja 300, you'll need two "M6x1.0mm, L: 30mm" Bolts to replace the original bolts. Ideally stainless steel for corrosion resistance. Click the link to see them. For under 5$ to upgrade security, it's worthwhile.
Step 11: Wiring the Alarm - Installing the Alarm on Other Bikes

If you've never installed an alarm before, and you aren't experienced in electronic or electrical work, it's daunting. I'll be the first to admit it. If someone isn't telling you exactly which wire to connect where, it will feel like an impossible task. I can't tell you how to install an alarm on your bike, but I can give you a few tips.
Install the black (negative cable) either directly to any bolt on the chassis (the whole chassis of the vehicle is "0v", as it's essentially a huge wire connected to the negative terminal of the battery), or directly to the negative terminal to the battery. Once cable less.
You can connect, or leave disconnected the ACC wire. It's only purpose is to let the alarm know that someone has turned on the bike (including you), and if the alarm is armed, to sound the siren even if the bike hasn't been moved. This will happen to you every so often when you forget to disarm the alarm before starting the bike. If you do want to connect it, simply probe around your bike (just stick a multimeter probe in the electrical connectors from behind) until you find a wire that is 12v with the bike on, and 0v with the bike off. To do that put the red probe from the multimeter on the wire you're resting, and touch the black probe on any bare metal on the chassis, like a shiny bolt head. Once you've found it, connect the (white) ACC wire there.
Install the Red +12v wire to either the batteries +12v terminal, or to any 12v power wire you find around the bike. Look for thicker than average wires since that tends to mean it's a current carrying wire that can cope with added current. Follow the wire to make sure it's going to some big component that won't mind the extra load. Some options are the ignition cable, the ABS Pump, the Fuel Pump, the Headlight, etc.
To connect the siren, connect the black wire coming out of it to ground (0v). Any place where you could have connected the black negative cable will suffice. Connect the red wire coming out of the siren to the pink wire coming out of the alarm. Done.
If you haven't ever installed an alarm before, and feel uncomfortable with all this, I probably wouldn't recommend installing the engine disconnect since it may be more trouble than it's worth in such a case.
And that's all it takes. I recognize this will probably day a whole day if you feel uncomfortable with these types of jobs, but it sure is satisfying once it's done!
Step 12: Adding a Decoy Alarm


While having a GPS Tracker on your bike is definitely an advantage worth having if your bike is ever stolen, the point is moot if your friendly neighborhood thief rips out the GPS tracker and smashes it with a hammer shortly after stealing your bike. An alarm siren definitely makes a bike harder to steal unnoticed, but it does guarantee that the first thing the thief is going to do is pull out that alarm. If that alarm is also a GPS Tracker, that's a problem if you want to keep receiving GPS coordinates from the stolen bike.
At this point, if you want to decrease that risk you have two options. The first is installing a discrete GPS tracker alongside a standalone alarm, presuming they simply won't find the GPS Tracker. There are a lot of downsides to that, one of the biggest being double the drain on a tiny motorcycle battery. The better option is installing a decoy alarm through which the GPS Tracker siren is wired. This is my favorite choice. Plus, it's just plain cool.
Using the diagram above you can see the wiring diagram on how to wire a decoy alarm to your GPS Tracker alarm in such a way that if the decoy alarm is removed, the GPS Tracker still remains connected to the vehicle's battery (reporting GPS coordinates), but the siren is deactivated and will no longer work. The point of this is to give the thief the instant gratification of thinking he's removed the alarm, and stoping disassembly (for the meantime) there.
This is the short version. If you want to know all the dirty details, I also wrote a full-blow DIY on how to wire the decoy alarm that you can visit clicking the following link:
Step 13: Wiring the Remote Engine Disconnect


Having done most of the work previously, now it's pretty simple.
Find the kickstand switch (on the 2015 Kawasaki Ninja 300 ABS it's on the left side above the front sprocket) and wire the two blue wires from the Reed Relay inline with the Kickstand switch. Test it out.
Step 14: And Bob's Your Uncle!


All done. Finally! I bet you can count with both hands how many people have made it this far. If you're one of them congratulations! Really. You deserve it.
Anyway, thanks for reading my Instructable! Check out my profile to see what other projects I've been up to — here are some others you might like:

Participated in the
Wireless Contest


