

Introduction: DIY Video Game Using Arduino (Arduboy Clone)


There is an 8 bit, credit card sized gaming platform called Arduboy, that makes open source games easy to learn, share and play.
You can enjoy 8-bit games made by others on this device, or you can make your own games. Since it is an open source project and uses arduino, I decided to make my own version of it.
My goal was to design a PCB which is easy to make using toner transfer method. So I made the tracks and pads as large as possible. If you don't want to etch the PCB, you can make one on a breadboard or a Perfboard.
Step 1: Gather the Components
You will need:
- Arduino Pro micro (NOT Pro Mini. Pro micro the one with ATmega32u4 chip)
- 7 Pin SPI OLED Display
- 4 Pin Momentary Push Button (12x12x7.3mm)
- Copper clad (If you are making PCB) or you can use Breadboard / Prefboard.
- Slide Switch
- 3v Button cell and holder
- Female Header Pins
- Piezo Electric buzzer plate
WARNING: You have to make sure that you have a ATmega32u4 based pro micro and 7 pin old display, otherwise the project won't work.
After completing this project i realised that, the 3v button cell can only power the game for less than a minute. Since I'm using a USB cable to power mine, i didst bother to recreate the PCB files. So consider using much more powerful battery if you want complete mobility.
Step 2: Making PCB


You can etch a custom PCB using toner transfer method, or you can solder components to a pref board using the schematics.
Download the PCB files from here and etch it.
Link : https://github.com/B45i/Arduboy-clone
I've tried to make this PCB as DIY friendly as possible. It has big traces and wide pads. That will make the etching process and soldering easier. If you have no experience with PCB etching before, follow these tutorials.
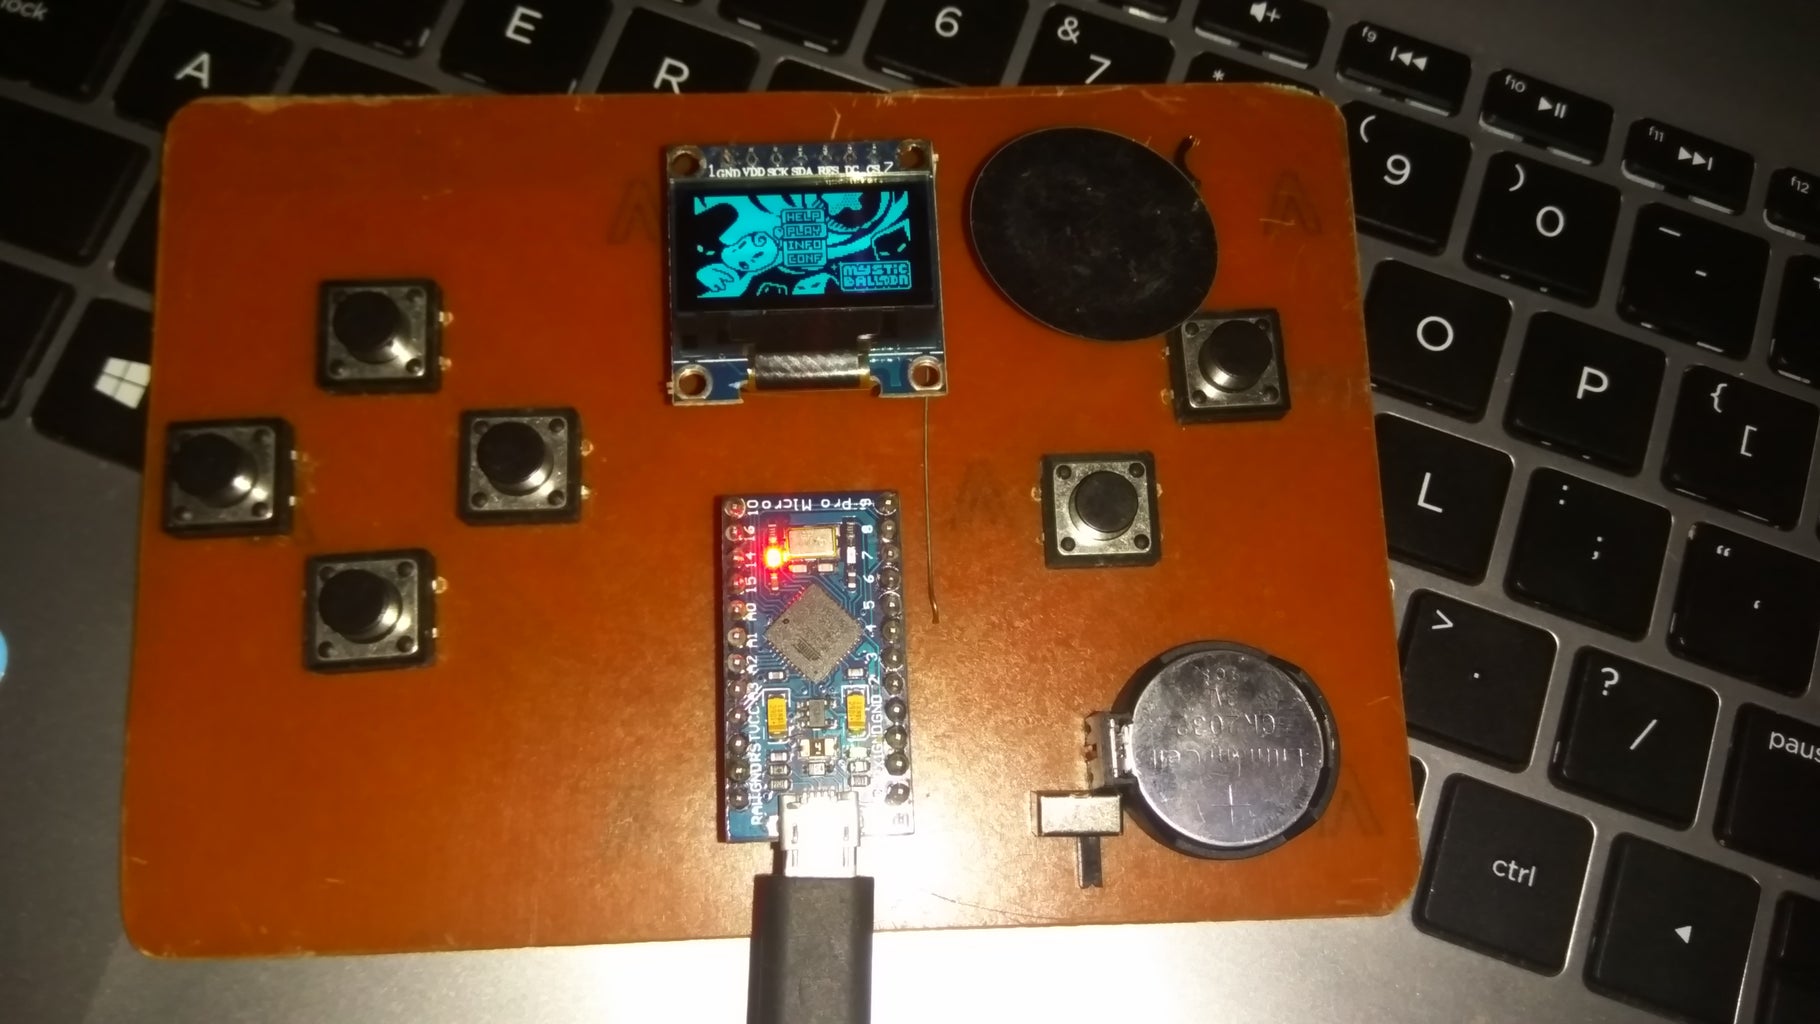
Step 3: Solder the Components


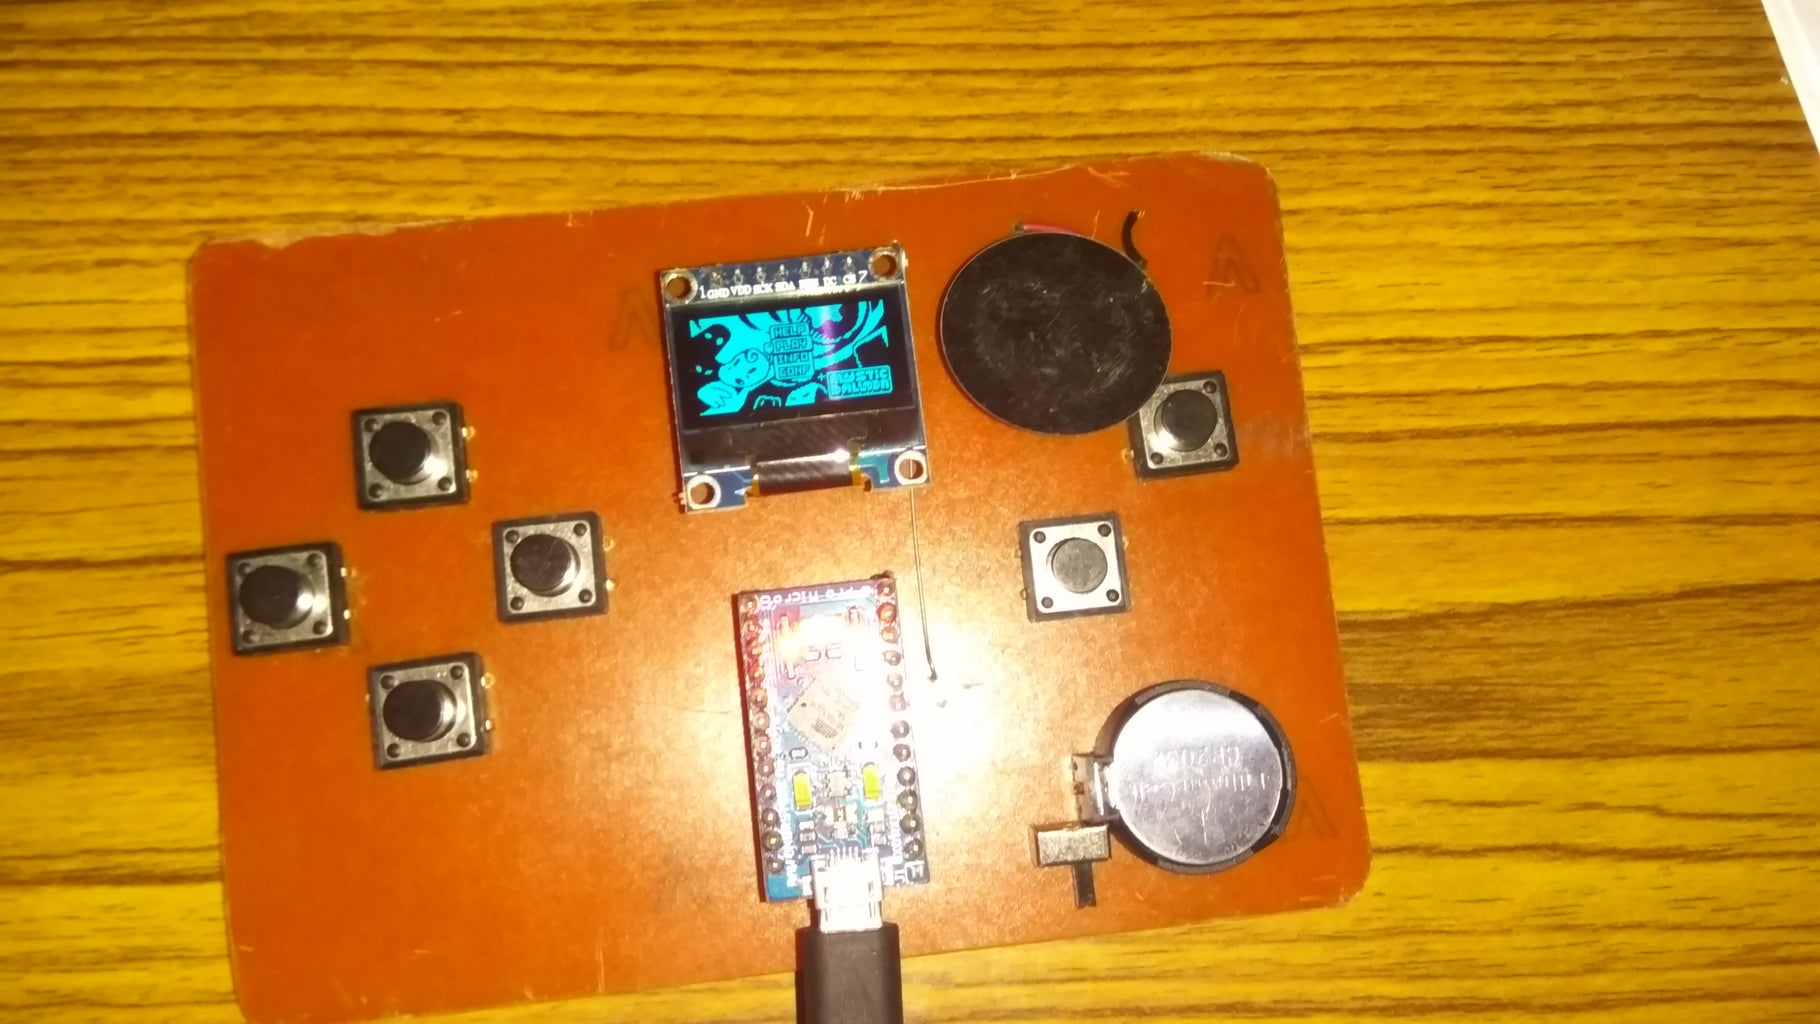
Solder the 6 Push buttons, slide switch and battery holder to PCB.
(If you are going to power the game using USB cable then you don't need the battery.)
We are not directly soldering the arduino and oled display to the PCB, as we can use them for some other project in future. Solder the female header pins to the PCB first and attach the oled display and arduino to headers. This will increase the thickness of our arduboy but we can remove these parts if we want.
There is a jumper wire going to the speaker. It is denoted in red color in the PCB files. Use a piece of wire to make this connection.
To connect the piezo electric buzzer, solder two wires to the buzzer plate and solder that wire to PCB. Attach the buzzer plate to PCB using a double sided tape.
Attach arduino and OLED display to corresponding header pins.
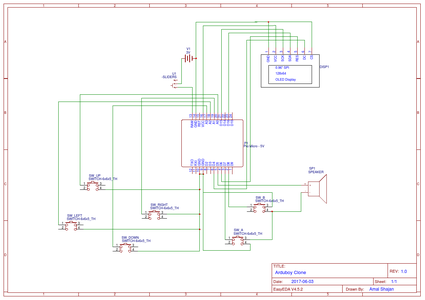
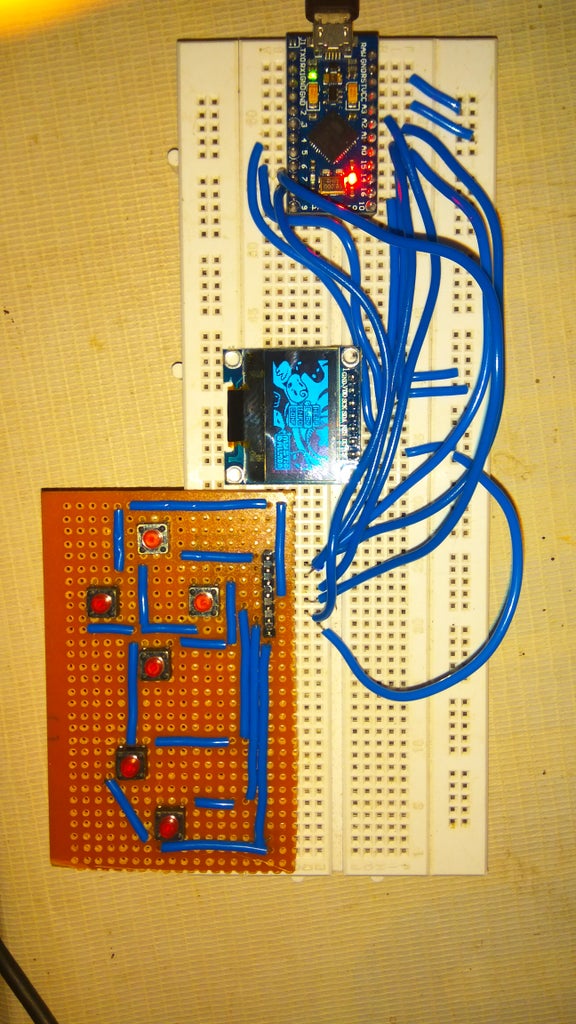
If you are making this project on a breadboard, then all you need to do is just connect the components as specified in the schematics. Here I made a separate joystick using 6 buttons and attached them to the breadboard.
The Connections are:
Connect All buttons to GND of arduino.
BUTTON_UP -> Pin A0 of Arduino
BUTTON_DOWN -> Pin A3 of Arduino
BUTTON_LEFT -> Pin A2 of Arduino
BUTTON_RIGHT -> Pin A1 of Arduino
BUTTON_A -> Pin 7 of Arduino
BUTTON_B -> Pin 8 of Arduino
Speaker -> Pin 5 of Arduino
OLED pin GND and CS -> GND pin of arduino
OLED pin VCC -> VCC of arduino
OLED pin SCK -> Digital pin 15 of arduino
OLED pin SDA -> Digital pin 16 of arduino
OLED pin RES -> Digital pin 6 of arduino
OLED pin DC -> Digital pin 4 of arduino
Step 4: Downloading the Arduino IDE
You have to download and install arduino IDE in order to upload games.
You can download the arduino IDE from the link below :
https://www.arduino.cc/en/main/software
Download and install arduino IDE for your computer from the above link.
Step 5: Installing Libraries


To compile and upload game to your arduboy you have to install some libraries.
I will list some of the important ones below.
https://github.com/Arduboy/Arduboy
https://github.com/MLXXXp/Arduboy2
https://github.com/MLXXXp/ArduboyTones
https://github.com/TEAMarg/ATMlib
https://github.com/Arduboy/ArduboyPlaytune
https://github.com/igvina/ArdBitmap
Click on Clone or Download button and click Download ZIP
Go to these links and and click on clone or download and download zip. Open arduino IDE and click on
Sketch > Include Library > add .ZIP library
and select the downloaded zip file. Repeat this for all the files.
Alternate method:
Instead of downloading and installing .zip files, you can also install the libraries using the Arduino IDE Library Manager:
Sketch > Include Library > Manage Libraries
then enter library name in the Filter your search field.
Step 6: Uploading Games


To check whether the hardware is working properly, go to :
File -> Example -> Arduboy -> ArduBreakout
and click upload. If everything is working correctly you can play breakout game on your arduboy.
Make sure that you have selected the board as either arduino Leonardo or Arduino/Genuino Micro
You can find more games for your arduboy from these sites:
https://community.arduboy.com/c/games
http://www.team-arg.org/games.html
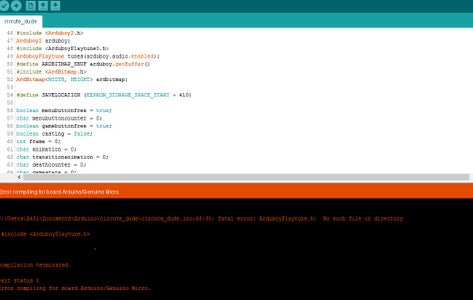
Sometimes you may run into an error like :
fatal error: ArduboyPlaytune0.h: No such file or directory
#include
^
compilation terminated.
exit status 1 Error compiling for board Arduino/Genuino Micro.
while uploading games.
To fix this error, search the missing library name on http://github.com/.
Download and install the library as we have done before.
Here is the video : https://youtu.be/F9ElDo-wLUA
Step 7: Enjoy !!
NOTE:
I've connected the second speaker pin to ground, instead of Arduino pin 13 as the real Arduboy does. Therefore, the sound for some games won't work properly.
I haven't included the RGB LED that a real Arduboy has. Therefore, games which make use of the RGB LED will be missing the LED effects and might be more difficult to play.
Huge thanks to MLXXXp from arduboy community for pointing out the mistakes.
This is my first indestructible, So its not perfect. If you need any help with this project please let me know in the comments.


