

Introduction: DIY Wall Mount Display Cabinet - Free Plans!


Learn how to make a wall mounted display case for challenge coins or other keepsakes. This display case features adjustable shelves and an inset french cleat system so that it hangs flush to the wall. If you enjoyed the video please hit the thumbs up button and leave me comment! Also, let me know in the comments section if you have any questions.
If you like this video please click here to subscribe to my channel!
Also check out my website for more great stuff!
Cut List:
- Four sides are 27 ¼ " x 2 ½ " ( ¾ “ stock) (Each side has 45 degree miters on both ends and a 1/4" wide dado set 3/4" off the back edge)
- Back panel is 26 ¼" x 20 ¼" (¼" plywood)
- Shelf's are 19 ¾” x 1 ¾“ (Each has a ¼ “ dado for the coins to rest in)
- Door Styles are 27 ¼” x 1 ½”
- Door Rails are 18” x 1 ½”
Supplies
Full list of the tools the I use
Tools Used during this build (affiliate):
Step 1: Cut the Sides to Length With 45 Degree Miters


First I cut all four sides of the display box to rough length on the miter saw and to width on the table saw. I had some cherry laying around the shop that I used for this project and it was about 3/4 of an inch thick which worked out perfect. Next I cut the sides to final length with 45 degree miters on each end. I used my table saw for this but you could easily use your miter saw instead.
Step 2: Cut Dados for the Backer


The display box will have a 1/4” plywood back panel. The back panel will fit into groves cut into all four sides of the box. Using my table saw I made my first pass 3/4 of an inch in from each edge. After the first pass I moved my fence slightly, making a pass each time until the grove was wide enough to fit a test piece.
Step 3: Drill Shelf Pin Holes


Using my Shelf pen jig And a scrap piece of wood as a spacer I drilled two sets of equal spaced holes the entire length of the two side pieces of the box.
Step 4: Assemble Display Box and Cut Rails and Styles for the Door


After cutting the 1/4” back panel to size you can assemble the display box. An easier way to do this would be to use painters tape on each of the miters to help hold them in place while you clamped it together.
While the case is in the clamps, I cut the rails and styles for the cabinet door to width and length. After that I headed over to the router table and using my Ogee router bits I cut the groves in both the rails and styles. If you prefer a shaker style door, or don’t have these type of bits, you can make these cuts on your table saw.
Step 5: Assemble the Door


Using a sheet of plexi glass I assemble the cabinet door. I use small Brad nails through the back side of the door to hold the rails and styles together so that I don’t have to leave them in clamps until the glue dries.
Step 6: Cut Mortises for the Hinges


I cut my mortises to inset the hinges with a trim router and a straight bit. I stopped just shy of the marking line and finished it with my chisel. Once the door was installed there was a slight over hang so I used a flush trim bit to even things out.
Step 7: Finish and Hang the Cabinet


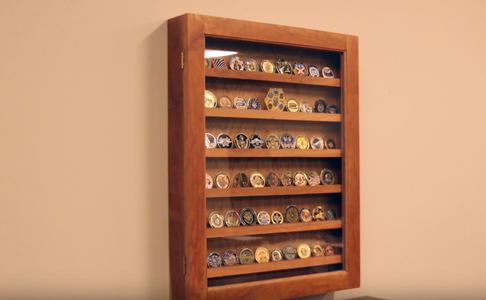
Once the shelves where cut to size I made a grove on the table saw to hold the coins. I mounted half of the french cleat to the back of the cabinet. Then, after mounting the other half of the French cleat to the wall I was able to hang the cabinet and install the shelf pens and shelfs. I used this cabinet to display challenge coins but you could use it to display any sort of small collectables.
If you want to see more details on this build you can check out the full build video here:
If you want to see more woodworking and DIY videos please subscribe to my channel


