

Introduction: Distance Measurement Using Arduino


- Introduction
Here we learn how to assemble non contact type of devices used in measurement. In this tutorial we learn about how to design the Distance measuring devices using arduino and some other component. we design the very simple devices with the help of Arduino uno and ultrasonic sensor. you can use this devices in various place like measure the water in the tank or measure the level of any type of liquid (explosive, corrosive etc) in the tank.
Step 1: Required Material

The components required for this build are:
- Arduino uno R3
- Breadboard- 840 pin
- Male to male jumper wire
- Ultrasonic sensor module HC-SR04
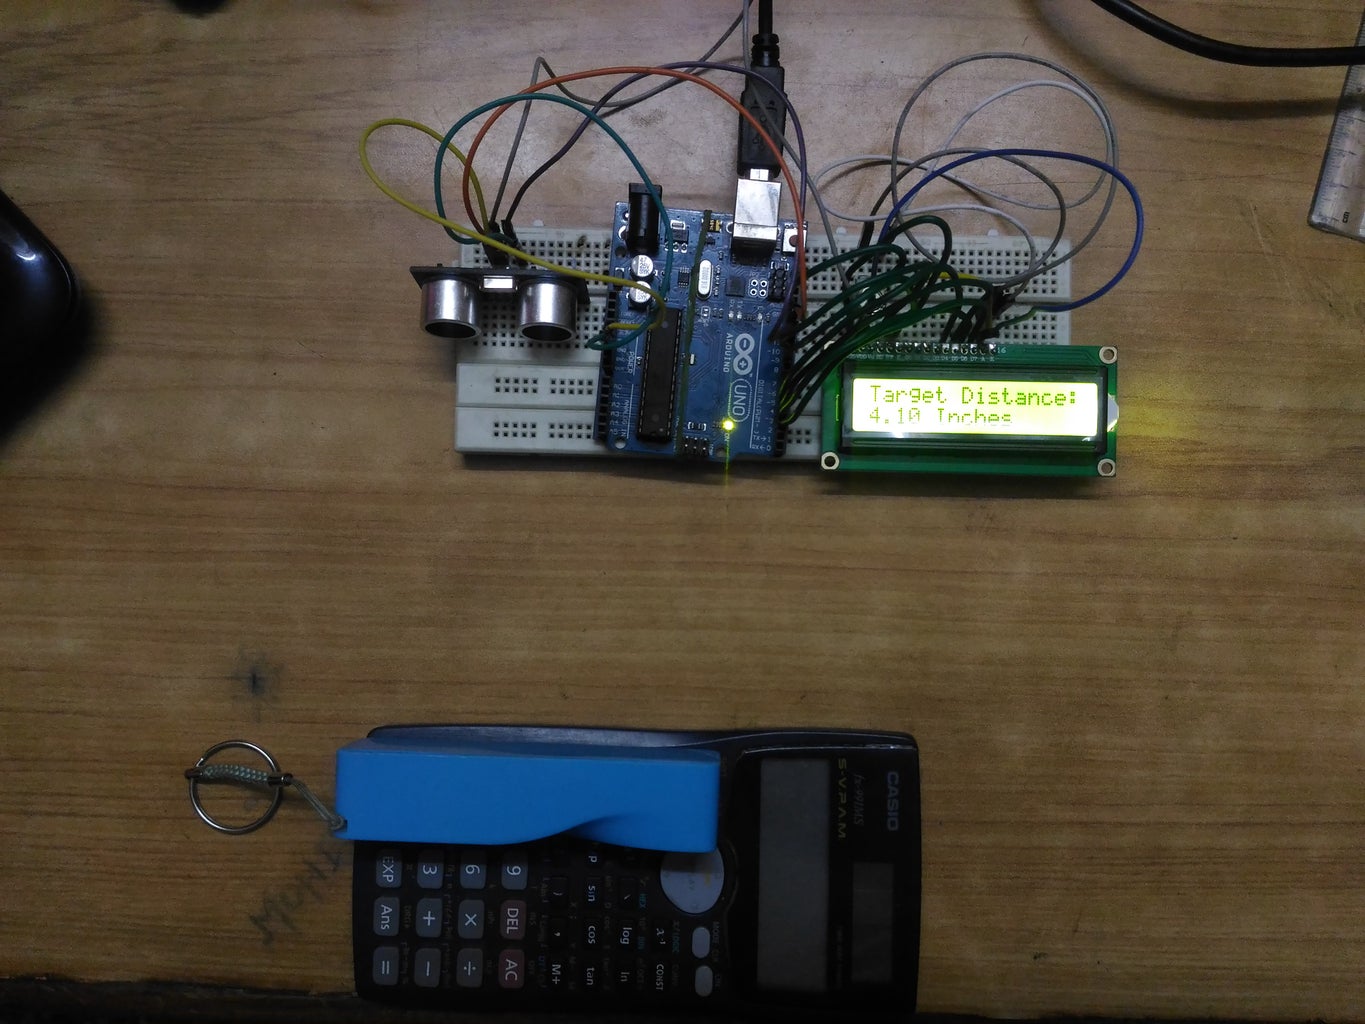
- 16*2 Binary LCD
- 1K pot
- target object
Step 2: Connections
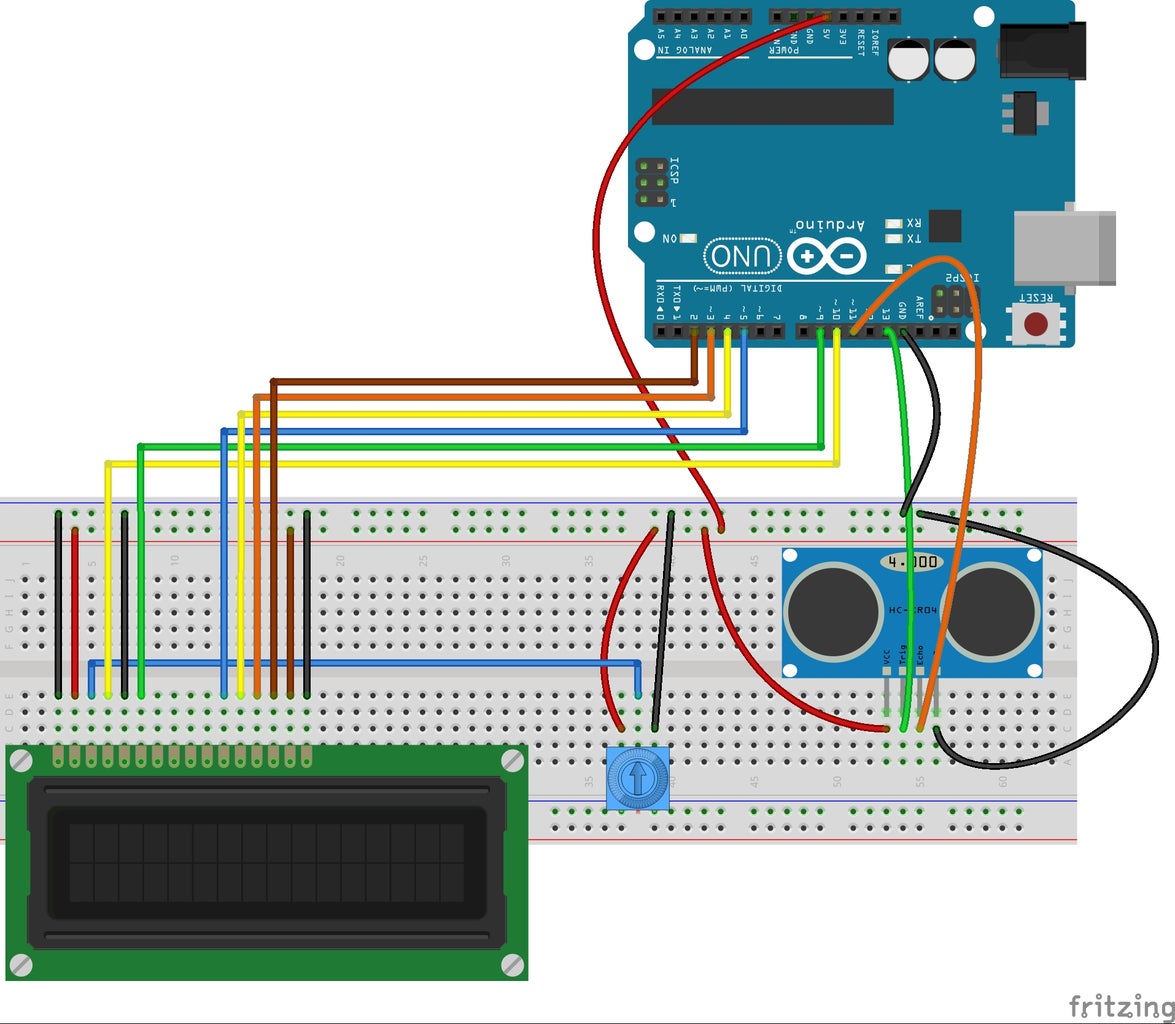
Proper connections is very important for complete working of the devices which is assemble. here we do all the connection in the breadboard by the help of male to male jumper wire.
- Connection of Breadboard
Breadboard is very important material of doing connection for assembling the component for temporary uses, here we use 840 pin breadboard, connect the power rail of breadboard to the arduino power out pin 5 volt and GND pin.
- Connection of ultrasonic sensor HC-SR04
Here we use HC-SR04 ultrasonic senor module to measure the distance of target up-to 4 meter and minimum distance for measurement is approximate 2 cm. This sensor does not measure the distance directly they measure distance in indirect way. the working of sensor is when sensor receives high pulse then sensor emit sound wave(ultrasonic) when wave is received at the sensor after striking the target and reflect , then counter counts the time between the transmitting and receiving in the multiple of microseconds. There are 4 pin available in the sensor module which is VCC, TRIG, ECHO, GND. connection of the pin is given below.
VCC - connect to the 5 volt
GND - connect to the ground
ECHO-Sensor echo pin connected to Arduino pin 11
TRIG- Sensor Trig pin connected to Arduino pin 13.
- Connection of 16*2 Binary LCD
we use LCD display to display the distance of target or display the level of liquid. Do all the connections of the LCD very carefully, In 16*2 binary LCD have 16 pin . the pin connections of LCD are given below.
LCD Pin - - - - - -LCD PIN NAME - - - - - - - Arduino Pin
1 - - - - - - - - - - - - - - VSS - - - - - - - - - - -- - - - -GND
2- - - - - - - - - - - - - - -VDD- - - - - - - - - - - - - - - +5V
3- - - - - - - - - - - - - - - V0- - - - - - - - - - - - - -Pot centre Pin
4- - - - - - - - - - - - - -- -RS- - - - - - - - - - - - - - - -pin 10
5- - - - - - - - - - - - - - - RW- - - - - - - - - - - - - - - -- GND
6- - - - - - - - - - - - - - - -E- - - - - - - - - - - - - - - - - pin 9
7- - - - - - - - - - - - - - - -DB0- - - - - - - - - NOT CONNECTED
8- - - - - - - - - - - - - - - -DB1- - - - - - - - - NOT CONNECTED
9- - - - - - - - - - - - - - - -DB2- - - - - - - - - NOT CONNECTED
10- - - - - - - - - - - - - - - -DB3- - - - - - - - NOT CONNECTED
11- - - - - - - - - - - - - - - -DB4- - - - - - - - - - - - - - - -Pin 5
12- - - - - - - - - - - - - - - -DB5- - - - - - - - - - - - - - - -Pin 4
13- - - - - - - - - - - - - - - -DB6- - - - - - - - - - - - - - - -Pin 3
14- - - - - - - - - - - - - - - -DB7- - - - - - - - - - - - - - - -Pin 2
15- - - - - - - - - - - - - - - -Backlight LED +V- - - - - - +5 Volt
16- - - - - - - - - - - - - - - -Backlight LED GND - - -- - - -GND
- Connection of 1K pot
In previous connection , we connect the centre pin of the 1K pot. Rest pin of pot is connected to the power that means one pin is connected to the GND and one pin is connected to the 5 volt. the use of pot provides contrast to the display
Step 3: THE CODE
After completing all the connections of hardware then go to the software part. Here you write the code in the arduino IDE in the assembly language. Copy the code into arduino IDE and upload it into the arduino uno.
code
#include <LiquidCrystal.h>LiquidCrystal LCD(10, 9, 5, 4, 3, 2);
int trig=13;
int echo=11;
float time;
float dist;
void setup()
{
pinMode(trig, OUTPUT);
pinMode(echo, INPUT);
LCD.begin(16,2);
LCD.setCursor(0,0);
LCD.print("Object Distance:");
}
void loop()
{
digitalWrite(trig, LOW);
delayMicroseconds(1000);
digitalWrite(trig, HIGH);
delayMicroseconds(30);
digitalWrite(trig, LOW);
delayMicroseconds(10);
time = pulseIn(echo, HIGH);
dist= time*0.0346903/2; // conversion into centimetre
LCD.setCursor(0,1);
LCD.print(" ");
LCD.setCursor(0,1);
LCD.print(dist);
LCD.print(" cm");
delay(250);
}
after successful uploading the code into arduino you will get result in the term of distance which is displayed in the LCD display.
Thank you
