

Introduction: Do It Yourself Adjustable Trekking Poles (for About $15)


This Instructable describes how to build a set of fairly light weight adjustable trekking poles. The inspiration for this project came from a short trip I took with a friend last year. He was using his REI poles and he had an extra pair that I could use. I had never used them before but i thought, "what could it hurt"? It turns out I loved using them. Especially when going down hill, and while crossing rivers. When we got back I though I would get a pair, that was until I saw the price tag. Poles range from $50(for crap) to more than $150 for nice ones. That was and still is out of my price range, especially in this economy. I did some research and found several plans for the do-it-yourself'ers out there, but I did not find anything that I really liked. I wanted them to be adjustable so they would be comfortable for all situations; up hill, down hill, ect. I tried to come up with a way of doing this for a while and it finally came to me, it has been done before, let's see how the pros do it. This also gives us a chance to recycle!
Step 1: Gather Materials


1. Aluminum Downhill Ski Poles, (Thrift store - $3.99)
2. Fiberglass Cross Country Ski Poles, (Thrift store - $4.99)
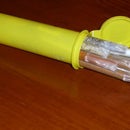
3. 18mm replacement "expanders" (Outdoor Equipment store - $4.25)
4. 2x 5" M8 bolts, (Hardware Store - $2.50)
5. Epoxy Putty (I already had this), (Hardware Store - $?)
The replacement "expanders" were the trick, I might still be scratching my head if I had not found these.
Step 2: Cutting the Poles to Size


The measurements in this step will be different for every one, since everyone will use different poles and will likely not all be 6'2" like myself. Thus I am not going to bother with that.
What you want to have is a top section that is able to telescope and collapse over the top section while leaving at minimum 6" between the end of the top section and the adjuster.
When you are on level ground the poles should be at a height so that your forearm is parallel with the ground. From there there should be enough sustainability to give adequate reach when descending typical trails.
The ones I build can be adjusted between 44" to 59". This wide range lets either my wife or I use them in all foreseeable situations.
Step 3: Preping the Bolts


The "expanders" work by having a threaded shaft with a point screw in to them (see pictures). To accomplish this I simply cut off the head of the bolts and ground them to a point.
As the pointed shaft is threaded in to the "expander" it forces the sides outward. When inserted in the upper section of the poles this will bind with the wall and be held in place with a surprising amount of force.
When grinding the point, take care not to damage the threads as the "expanders" are plastic and if the threads are damaged it can wear out the plastic quickly.
Also be sure to make the point quite steep. The steeper the point the more gradual the expansion for easier adjustment.
Step 4: "Gluing" the Bolts
Here I used Epoxy Putty. There is probably a hundred different ways to do this, but I like the stuff and what's more, I already had it in the garage.
If you use Epoxy Putty, just break off about and inch and work it in your hands until it is uniform in color, as this will insure the catalyst is properly integrated. Next, wrap the end of the bold and insert it in to the bottom section of the poles. Work it in as much as you can to take up the space between the bolt and the inside of the fiberglass pole, then smooth out the top and let it harden. I made it so the bolt was exposed by about 1.5"
Don't forget to mark the max length on the poles so they don't bend on you. Have fun!
That's it, you are done.
Step 5: Notes


Here are a couple suggestions I have if you plan on building a pair of these for yourself.
Hand Grips:
Look for hand grips that are comfortable for you. When you can find them look for a set that you can add adjustable wrist straps to. Addition of the wrist straps takes the strain off of your fingers for gripping the poles, after hours on the trail a death grip on poles can really hurt. If you have the wrist strap, all of the strain is transferred to the back of your wrist and a light grip is adequate for great stability.
Upper pole section:
Look for a pole that has plenty of length with none to very little taper near the top. This is for the "expander". There is a limited amount that the "expander" can expand, if there is too much taper in the pole the "expander" may not be able to grip tightly in all positions.
Expanders;
there are several sizes of "expanders" be sure to pick the size that is appropriate for your use. Too small and there will not be enough clamping force, too big and it will not fit in the tube.
Bolts:
this may sound like a big "duh!" but be sure to get the correct size and thread. I almost purchased the wrong thread because I thought the plastic was just tight. The bold should thread in with very little force and bottom out in the "expander"


