

Introduction: Electronic Giraffe Puzzle


This puzzle incorporates a design created on inventor that when all of the pieces are together LEDs light up. Each piece has a photocell sensor, powered by an arduino, underneath it and when the puzzle is completed with a border of LEDs lights up. This idea is fun and can be used to entertain people of all ages who enjoy simple, children friendly puzzles.
Step 1: Materials and Tools


The materials needed to create the puzzle:
Arduino
4 photocell sensors
1K ohm Resistor
4 LEDs (green)
Wood
Wires
Paint
Googly eyes
The tools needed to create the puzzle:
Laser cutter
Computer with Inventor software
Step 2: Create Puzzle Design

Use Inventor to create a puzzle design and upload it to the laser cutter. For this project, a small giraffe was outlined in inventor, and four puzzle pieces were designed within it. Once the design was uploaded to the laser cutter, the laser cutter cut out the image on a piece of wood that we selected that was an ideal width and length and as a result came the giraffe puzzle and its frame cut-out. This was then attached to a thicker back frame.
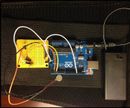
Step 3: Adding LEDs and Sensors


Plan out the circuit. This circuit should consist of a 10k resistor, 4 LEDs, and 4 photocells. A breadboard can be used initially for easy set-up. First, the LEDs can be arranged in parallel, each with a jump wire connected back to the digital pins on the arduino. The photocells similarly can be arranged in parallel, however each jump wire to be connected back to the analog pins on the arduino as indicated in the images above. One wire should be connected to the 5V pin on the arduino and supplied to the circuit for power. A jump wire should be attached from the joint of the parallel circuit LEDs with the 5k resistor and connected to the GND pin.
Step 4: Programming the Arduino


The code depicted in the images above corresponds to what is needed for the circuit to work. Copy this code so that when all photocells detect darkness from the presence of a puzzle piece on top of them, all four LEDs will light up at once.
Step 5: Putting the Puzzle Together


Using a small drill bit, drill four holes within the frame of where the puzzle pieces would go. These four holes will contain the wires attached to the photocell. Also, drill four holes on the edges of the frame. Take a bigger drill bit, and drill over the four holes just drilled, only a little bit so that when the LED is placed inside, it will be able to sit. Place the components on each of the puzzle electrical pieces(LED and sensor). On the back side of the frame will be the electronic components, attach these to the corresponding areas indicated in an earlier step on the arduino.
After circuit is completed and the LED's work, you can put the puzzle together.
Once the pieces are assembled on the giraffe puzzle the LED's will light up, indicating that the puzzle is complete.
Step 6: Decorating the Puzzle


Once the puzzle is all put together and you know it works, then you can decorate and add finishing touches to the puzzle. You can paint the puzzle and add googly eyes or you can add a style of your own!


