

Introduction: Five Nights at Freddys Nightmare Cosplays


Hello!! My name is Makenna and these are my lovely Nightmares from Five nights at freddy's 4.
They are huge and spooky bears that i poured my creative soul into to have them come to life.they took me a very long to make and i hope you enjoy my Instructables in how i made these guys!
Im a 5'1 lady with a love for monsters and horror! I'm not big on cosplaying generic things for woman so i love the look of shock on peoples faces when they see a small woman in this giant bear with 100 teeth.
My sister is the one in Nightmare Fredbear ( golden one) but i made both costumes.
enjoy!!
Step 1: Concept Sketches and Art


The first thing that i do before making any creation is i always draw it out first. It helps me come up with ideas how I'm going to sculpt and layout the design and imagine what it would look like on my body and taking a 3D video game character to real life costume. I draw how I'm going to make the head and the hands to the feet and belly and torso. I even drew a little marker art of my character to get me more in the mood and get a feel for character I'm about to make. I didn't do any for Nightmare Fredbear cause they are made the exact same way so i didn't draw any sketches for him. But i did for Nightmare who is the one I'm wearing while my sister is the Nightmare Fredbear.
Step 2: Cutting Out the Base for the Head


For how i planned to make Nightmare i wanted to wear him like a bike helmet and see through the mouth, since he is such a large character i wanted to give him that height. So the first thing i do is i take my helmet that i bought that fits my head size and draw with a sharpy on the foam. I use regular couch foam for the sculpting, and draw the shape of his head out around the helmet for how big he is gonna be around. then cut it out with scissors.
Materials i used for this part!
.Bike helmet
.Couch foam
.Hot glue ( LOTS OF IT!)
.scissors and a knife
.sharpy/marker
Step 3: Start to Build His Facial Features


Now draw on the foam the front part of his face and using a reference start to build the face with foam pieces. i usually go bulky at first that i sculpt and shave the shape as i work. I made sure to make his muzzle a thick block and build the dome for top of this head and build around the helmet and add the cheeks as well. The top of the helmet is his top jaw and head.
Step 4: Start to Sculpt and Add Features


Now that i got the base and the basic shape of his head done now i can go in with sharpy and start to draw his rips and tears. I do this as i work cause it gives me a guideline and a draft and what it will look like as i sculpt.And i add foam for his gums underneath where his teeth are going to go. I always do this with scissors or a knife for the big block to cut.and cut out the eye holes for the LEDs. I always layer my foam with about 2 to 3 layers so there is depth to his face.
Step 5: Add More Sculpting and Shaping of the Face


With scissors i add even more detail and shape to the face so he is more like the character. Nightmare has a more round face and nose so it took me a few times get this shape. I literally had to rip off his snout and start over to get the perfect shape. I also added the gums and glued them along the edges of the mouth so the teeth with follow.
The fake teeth are made form craft foam along with the eyes just to show how it will look like. Like before its just a guidelines.
Step 6: Ears!


Next i just sculpted ears out of the foam and used chop sticks for the endo details.Then hot glued them into the head. I always make sure to use a ref of Nightmare so he is accurate.
Step 7: Lower Jaw!


Now after the top of the head is complete ( or at least in a decent position) I can now start on the lower jaw. First i took the top half and put in on a sheet of foam, and trace it so the lower jaw matched the top half. I always make sure that its a few layers thick so then i can cut it out and sculpt it and add the endo gums inside the mouth. Once you got it sculpted to how you like it, not to connect the jaws together! For this i used PCV pipe to connect the two together. It also works that way cause that is how his jaw connects in the game. Use tons of hot glue to make sure it is firm in place. I always try it on to make sure it looks right.
Step 8: Hat, Wires and Elastic for Movable Jaw!


Now the next step if to make the hat! How i made the hat is that i made the base out of foam and sculpted it to be the shape of his hat. Then i bought a yellow folder which had a great texture to it and laid it on top covering the whole surface.Then i painted a black strip on paper and glued it around the base for the stripe. Last just hot glued it to the top of the head!!
Next part is for the movable jaw!
what i did is i took some elastics and hooked it to the top and bottom of the jaws on both sides. i used a few strips on both sides since he has a pretty big and heavy jaw. After gluing the top parts and take the elastics and pull them tight to the bottom half which should shut the jaw closed and glue it down. I used heavy amounts of hot glue for this part so it could stay! once in place the jaw moves when i open my mouth when i wear him as my chin is on the bottom jaw.
Wires are just thick wires from the craft store and i just glues them in their place on his face.
Step 9: Bow Tie and Start of Hands


I made the bow tie out of yellow craft foam by folding it and gluing it together. i made it big enough for his big body.
Along with the start of his paws which is small size gloves and added foam on the top to build the shape.
Step 10: Claws and Paws


Now to make the claws and hands of this bear, I used foam to add the shape and a sliver and balck felt fabric to make the different colors. I made the claws out of model magic and stuck them on the tips of the last finger so at my finger tips, then it will appear that my hands are bigger with those big bear claws. After they are hardened i covered them in paper mache to protect them for a while. I will eventually cover them in worbla for the final product.
I always try it on to see what the draft looks like.
Step 11: Teeth!


Now to make the teeth for his large Nightmarish mouth! In total i sculpted one by one about 80 teeth and paper mached every one after that so they get hard and protected so they aren't so fragile. This part took the longest on these guys.
Step 12: Putting in the Teeth and Paint Job!


Once all the teeth were dry and ready to go i used my scissors to sculpt the gums for every tooth to fit snuggly inside the jaws. I used hot glue to glue them in one by one till the whole mouth was full of teeth, even the endo mouth on the inside.
When all the teeth are in i start on the paint job. First painting them all white then going in with the red and pinks to give it that nice subtle tone. The paint i used was acrylic and hand painted and go around every tooth till they are all colorful :).
Step 13: Eyes!


Now for the eyes! How i made the eyes is a bought a plastic half sphere from the craft store and made sure they were the perfect size for his eye holes. Once the sizing was right i drew with sharpy how the eye pattern went. After the drawing was done i used grey felt to make the endo around the eyes to give him a nice creepy robot look and painted the black and detail right on the felt to give it a more rusted and dark color. Then used white acrylic to paint the details of eyes. After it was all dry i used a sharp nail to make a hole in the center for that is where the LED will be for his red eyes.
Step 14: Fabrication


I used black felt for his fur detail cause it is very thin and easy to work with. It was also my very first time very fabricating anything so it was the easiest and cheapest fabric they had at the craft store. I just followed along the shapes of his face and cut out the pieces of felt and hot glued them right onto the mask. Fabricating everything from his ears to jaws. This was alot of trail and error but im happy how my first time turned out!
Step 15: Head Finished!!


After weeks of work the head is finally complete! The last thing i added was just added texture to the gums and added the LEDs.
the LEDs i used were just simple small bolb red lights that use a 9V battery and i hid the battery in the mask in between the eyes.
Step 16: Stomach Sculpting!


Now to make the belly of this big bear! what i did is i used chicken wire to shape the belly around a long sleeved shirt, so i could make him sorta like a light fat suit. once i was good on the shape of the belly i covered him in foam and started to sculpt and build the bulk and size. I used the bow tie as a guidelines to help me shape it and how it will fit on the belly. I just simply hot glued pieces together and used scissors to shape and sculpt the body.
Step 17: Fabrication, Buttons and Paint Job


Fabricating this big belly was quiet a feet! I used the same fabric as the head (black felt) and cut out shapes for the pattern and hot glued it onto the body. I also made sure to cut out all the withered and rips and tears in his body hot gluing around them to they stick out more and using acrylic paint and hand painting all the details using a silver metallic paint. After all the details were on i hot glued on the bow tie onto the belly.
Buttons!
How i made the button is i just drew and cut out the buttons from craft foam and added an extra piece around the edge to give it shape and depth. Then just simple painting and big drops for the dots, and mod-podge to hardened and seal it when they are dry.
Now for the belly teeth! I made teeth earlier for the mouth and i made extra to go on the belly. Just glue them on the edge and paint them just like the teeth with the red and pink shade.
Step 18: Arms


For the arms all i did was a took the foam and wrapped it around my arms for the size. I have smaller arms so i needed to make sure they they fit me. one my arm was measured i cut out the long rectangle of foam and glued it together to make a tube shape.
After they are all glues together i add the rips and tears using my scissors to cut out the shapes< then fabricate them with the black felt.
after all that, i glue them onto the sleeves of the shirt.
Step 19: Pants


I made the pant or bottom part out of foam and hot glue. I made a underwear pattern and just kept building it to it matched the belly so they match together. It feels like i have a beer gut but very low on my body.
i drafted the endo with felt for the added details for his legs.
Step 20: Fabricate Bottom Half and Leg Endo Detail


Now that i got our bottom half all sculpted out i take my felt and i fabricate the whole thing. i tried to just get it in to one piece so there are no marks and imperfections. i Glue it all together with hot glue.
for the endo detail i just hot glue pieces of grey felt onto the tights to the pattern of his endo on Nightmare's legs and i cut then felt into strips and wrap it around my legs until it looks the way i want it too. The after i go back in with shiny silver duct tape ( looks like metal) and go over all the grey felt with it to have the endo-skeleton look shiny like metal.
Step 21: Legs


now fort he legs which are made the same ways as the arms. I took a long rectangle of foam and warped it around the thigh and calf of my legs to get the right measurement. then i just hot glue the pieces together to make a piece of leg. Then i folded in the tops so they have that nice round shape on the top of the legs.
After go back with your black felt and cover the whole piece to fabricate it with your hot glue. I made sure to stick some on the insides as well to help cover the white foam so nothing shows.
Step 22: Feet!


For Nightmare's feet it was a challenge since he is a broken animatronic he had some endo toes showing through the rips on his feet.
the first step was i took an old shoe that fit me and cut out the laces and the tongue so that will leave room for my feet.
Next i get out my foam and sculpt out the feet, making the endo part first then laying on top the outside of the foot, this will give it depth and size so my feet are bigger like his.
then i go over the endo part with grey felt then the black felt for the outside making sure to cover the whole foot. and add paw pads at the bottom for detail.
then i got with acrylic paint for the finishing touches of black and silver.
Step 23: Few Extra Details and Complete!


Now that i have all the pieces now i can put him on all the way and see what he looks like. For a girl who is 5'1 with him on i can almost touch my ceiling with his hat on his head lol.
lastly i add some endo details and wires and even go back to his nose and gums for some adding carving to have him really stand out! And Nightmare is done!
Now for Nightmare Fredbear!
Step 24: Nightmare Fredbear!


Now to start on Nightmare fredbear who is made the exact same way as Nightmare, he was just a bit more of a challenge for his many details and colors.
the the first thing i do is go back to step 1 and 2 and use a helmet to draw out his face and sculpt.
i used nightmare's head as a reference for size cause i wanted them to be the same.
Nightmare is the shadow of fredbear so they are the same bear just different color pallet.
Step 25: Carving Out Jaw and Details!


Now i used the same technique as i did for Nightmare but this time i added color to mark where his patterns are gonna be, and added the withering on his ears with the chopsticks for the endo like before.
i used black foam for the gums and nose to give me a visual and added the nose detail this time in the beginning.
i was learning from my mistakes with my first Nightmare and this guy was faster to put together.
Step 26: Fabrication and Wiring


After i was happy with my sculpt i can now go back in and start to fabricate. I used the same type of material ( felt) just like for Nightmare cause its thin and has texture to t and is easy to paint on since he is gonna need alot of paint work.
I also add in wires for the details by his eyes, mouth, head and ears.
i used about 4 different shades of felt for this guy.
dark brown,yellow,gold and light brown.
he is the most detailed in the game so i really wanted him to pop with color and his details to stand out.
The fabrication is all Hot glued on like before with Nightmare.
Step 27: Fabrication Part 2


More fabrication!!
I used 3 colors for his lips and detailed his gums to show me where the teeth will go.
And i used pleather for the nose to give it a nice shiny dog look
Step 28: Now for the Paint Job!


After the fabrication is done now to go in with the paint job!
I used acrylic paint to hand paint him to give depth and shadows and give him a nice withered look. I used black for the rips on his lips and face and around the spot to pop out his colors, while with bright yellow and orange to brighten him up a bit.I just followed the felt colors for where i would hand paint the details on.
i used craft foam for the fake teeth for a visual of him with them on.
Step 29: Hands and Claws!


I used the same technique from before for Nightmare to make Nightmare Fredbears paws, just needed more details and withering.By gluing foam onto a glove and making the claws out of model magic.
i used felt for the hands and followed the character reference for his colors and patterns.
then hand painted on the details just like the head and put worbla over the claws with silver metallic paint to have it shine.
Step 30: More Teeth!!

another round of teeth for his mouth! I did not paper mechay them this time to see how they will turn out without it, and use Mod podge to harden and seal them.
Made out of model magic and let them dry before hand painting with the red and pink details.
Step 31: Eyes and Teeth in Along With the Hat!


I put in the teeth and eyes the exact same way on Nightmare since they are carbon copies. All hand painted and fabricated! I made the hat the same way by sculpting with foam and covering it with craft foam. He is opposite colors from Nightmare so he has a purple hat as apposed to yellow.
gluing in the teeth with hot glue and started to paint the gums with metallic paint.
Step 32: Body and Bowtie With Buttons!


I made the body and bow tie the same way as Nightmare's. I used the same process by crafting a fat suit and covering it with felt and making the patterns for him. from details to the belly and cutting out the broken holes of his body and even making the belly teeth and hand painting just like Nightmare.
he just looks fatter cause its really hard to make an exact copy, but to be honest i really like how Nightmare Fredbear came out better then Nightmare. I guess practice make you get better so i got better at the way i made these cosplays the second time around.
i also made him for my twin sister who is taller then me so i had to make him ab it bigger so he fit her.
buttons and bow tie made from craft foam and hand painted to buttons with acrylic. his are opposite of Nightmares from black to white instead of white to black.
Step 33: Nightmare Fredbear Complete!!


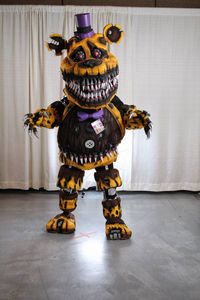


Sadly i didn't take anymore progress pics of his bottom half and feet getting done but other then the different colors he is made the exact same way from his feet to his lower half and details.
But here he is!! I am very happy with how they both look next to each other like they are similar but they don't look so the same that they don't have individual personality. I added the LEDs to Nightmare fredbear and gave him a night pop for his paint job!
This guys all together took me about a year to complete with procrastination. If i took the time to sit down and make these without my job and distractions these guys but took me about 4 months a piece.
I'm the one in Nightmare while my twin sister is the Nightmare Fredbear and we look perfect together! I was hard work but worth it.
Step 34: Video of Our Cosplays!
Skip to 5:24 for my Nightmares, I go first then my sister in Fredbear.
Me and my sister and my cosplay crew made these guys! i helped make the Nightmare Foxy yet Nightmare and Nightmare fredbear are mine and i made them myself.
while my friend from Creature complex made the Nightmare freddy and Nightmare Bonnie.

Participated in the
Halloween Contest 2017


