

Introduction: Fix a Hole in Drywall (Sheetrock)


Fix a Hole in Drywall (Sheetrock) and use a Hot Glue Gun to Do It!
Whether it's the doorknob whacking a hole in the wall.
Your hot-tempered friend punching his fist through it.
Or, in this case, the hole that remained after an unwanted electrical box from a relocated HVAC control was removed...
Patching a hole in a sheetrock wall is not hard at all.
There are several instructables on sheetrock repair (here is one) but I wanted to put my own spin on things. In this Instructable I'll hot glue a piece of wood to the backside of the wall to close off the hole and provide structure to mount the replacement sheetrock 'plug'. No screws, nails or tape!
.
MATERIALS:
Sheetrock (gypsum wall board) large enough to patch the hole
Scrap of Wood (that fits through the opening you're patching - sideways)
Hot Glue
Wallboard Joint Compound
String
Sanding sponge / sandpaper
(Ultimately Paint)
TOOLS:
Glue gun
Utility knife
Drill motor and bits
Putty Knife
Saw
Step 1: Prepare Your Wood and Test Fit


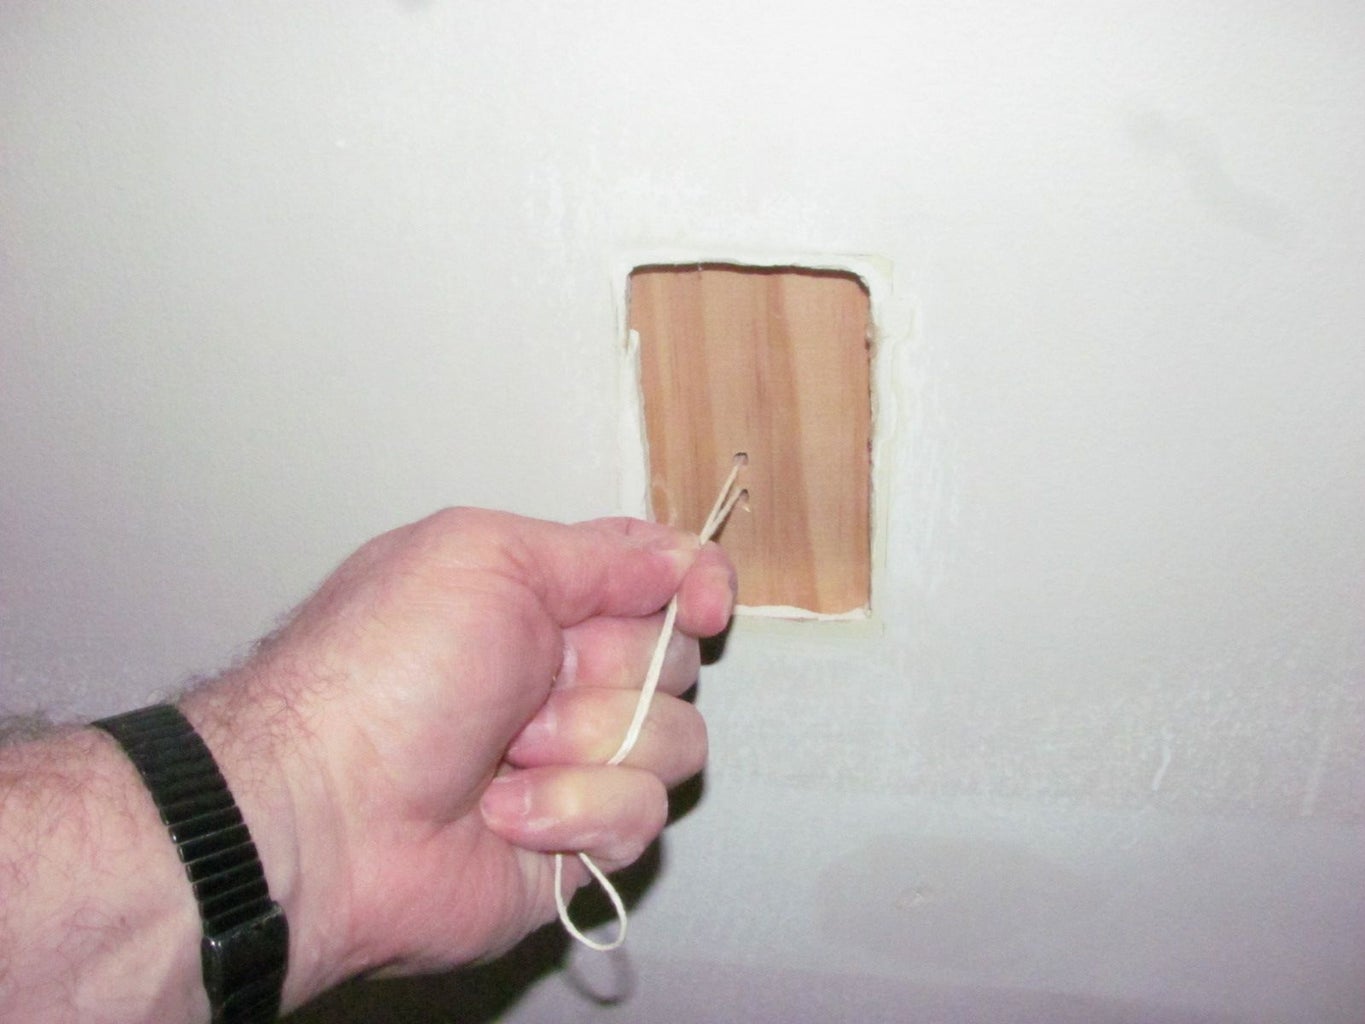
Locate your piece of wood. This will be the part that actually 'plugs' the hole. Cut the wood to size so that it has a long and a short side. The short side should just fit through the opening with the 'long side' long enough to contact the sheetrock on either side of the hole. This wood will be inserted into the hole and pulled snug against the back of the sheet rock when its time to glue it in place.
Drill two holes adjacent to one another in the center of the wood. Thread a piece of string through the holes so that you can hold the piece of wood by the string.
Before the next step, clean up the edges of the hole in the wall so that there are no stray bits of sheetrock paper sticking out and test fit your piece of wood to make sure you can easily get the wood through the hole and pulled snug up against the back side of the sheetrock.
Step 2: Apply Hot Glue and Quickly Move Into Position


Apply hot glue to the side of the wood that will be facing you; the side that will be snugging up against the backside of the sheetrock wall. After applying the glue, quickly insert the wood piece through the hole in the wall and snug it into position, pulling on the string to hold it in place.
The hot glue will cool and fasten the piece of wood in place closing off the hole and providing structure to finish patching the hole.
Cut the string and pull it out. It served its purpose.
Step 3: Cut a Sheetrock 'Plug'

Take a scrap piece of sheetrock and cut a small piece just smaller than the hole's opening. You are reating a sheetrock 'plug' to fill the space in front of the board you just glued into position.
Step 4: Hot Glue the Sheetrock 'Plug' Into Place


Test fit the piece of sheetrock to make sure it fits all the way down into the hole until it bottoms out on the board.
Apply hot glue to the back of the sheetrock 'plug' and put it into position and hold it in place until the hot glue cools. If the surface of this sheetrock 'plug' protrudes a bit more than the surrounding wall you may need to remove the paper off of the sheetrock 'plug' in order to reduce the level of its surface to that it will be flush or slightly below the surface of the surrounding wall.
Step 5: Fill the Remaining Gaps With Joint Compound


Take your joint compound and fill all the gaps between the sheetrock 'plug' and the surrounding sheetrock.
Step 6: Sand the Dried Joint Compound


After the joint compound has dried thoroughly sand it down with sandpaper, a sanding sponge or drywall sanding material. You may have to go back and apply a thin layer of joint compound, let it dry and sand again, then repeat this process until you get a smooth surface that blends with the surrounding wall.
Paint and you're done!
Enjoy the now invisible 'hole in the wall'!

Participated in the
Remix 2.0 Contest


