

Introduction: Forced Patina With MUSTARD


A couple weeks ago I watched a video from one of the YouTube knifemakers i'm subscribed to. (Jake'sCustomKnives He is an excellent knifemaker, and has a ton of videos. If you are into knifemaking I would highly recommend you check out his channel.)
It was a pretty interesting video, detailing the process of making 3 different knives from 3 files simultaneously. Here's the link, if any of you want to watch it: https://www.youtube.com/watch?v=PuJbd26bbTM&t=1s
Anyway, towards the end of the video he showed a quick trick to put cool lines on the blades, using, you guessed it; Mustard.
This method of creating lines in steel really intrigued me. Especially when I realized you could create a line that looked EXACTLY like a japanese hamon.
A cheater's hamon.
With no work. In fifteen minutes.
Oh yeah.
Side Note: This will only work on blades made of high carbon steel, as stainless doesn't rust, and this is basically just controlled rusting.
Step 1: Clean the Blade

The first step is both simple and important. The blade must be clean and free from any kind of oil residue. Wipe it down first with some denatured alcohol.
Step 2: Fake Hamon Line- Apply Mustard


Literally as simple as it sounds. Apply mustard to the blade in whatever pattern/design you want, and it will etch dark lines into the metal.
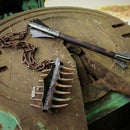
Here I am going for an artificial hamon line, so I first laid out a squiggly line of mustard along the middle of the blade, matching what in my mind looks like a decent hamon. Plenty of activity.
Then I covered the rest of the bottom part of the blade, including the edge. That seems funny until you remember that the mustard will create lines only on the edge where the steel and mustard are in the presence of oxygen (more on that later). If I just left one line of mustard down the middle of the blade, I would get two dark lines (one on both sides of the mustard), instead of just the one I need to look like a hamon. By coating the bottom and edge of the blade in mustard, I prevent air from getting to the steel and it won't oxidize.
Step 3: Fake Hamon Line- Leave on Mustard


Once you have applied the mustard in the desired pattern, leave it on for about 15-20 minutes. I put the handle of my knife in a clamp so that I could set it down without messing it up.
After a few minutes, you will see the dark line appearing along the line of mustard. How long you leave it on depends on how thick or dark of a line you want.
I don't think I left it on quite long enough for this knife, and consequently my hamon looks like it has been on a diet.
Step 4: Fake Hamon Line- Wipe Off Mustard (very Complicated)


You can tell by now that this Instructable is very complicated.
Yeah.
Just wipe off the mustard. Make sure to get it ALL off pretty quickly, as the parts that were under the mustard will begin to oxidize now that they are exposed to the air. I used some alcohol to make sure I got it all.
There was some minor rust spotting here and there, so I went over the blade lightly with some very high grit sandpaper. Just buffing it, really. Be careful as the hamon line itself is only superficial, and can easily be sanded right off.
I was quite impressed. That line looks pretty convincing.
So I went ahead and did it on a couple more knives.
Step 5: Tiger Stripe Pattern


On my Bushcraft knife (which you might remember), I decided to try a tiger stripe pattern. Super easy, just running several mustard stripes horizontally across the blade and spine.
Turned out fairly nice. Not my favorite look, but I was tired of it the way it was :)
I left the mustard on it a few minutes longer than I did for the RR spike knife, so the lines are a bit thicker.
Step 6: Weird Snake Pattern (sort Of)


I also did it to this knife I forged out of some rebar. I just ran a line of mustard down the middle of the blade (vertically this time). Turned out with a bit of a snake like pattern. Pretty cool.
Step 7: How Does This Work?

So what exactly is going on here?
Well, mustard contains vinegar. Actually, mustard is nearly all vinegar.
Vinegar is acetic acid (usually about 5%), diluted with water. When applied to the blade, the acetic acid begins to (slowly) eat into the steel. This opens it up so that the water (in the vinegar) can rapidly oxidize (rust) it.
However, the oxidation only occurs when the water and metal are in the presence of oxygen, which is why it etches a line on the edges of the mustard, where it is exposed to air, and not everywhere the mustard is applied.
You could go deeper into the chemistry of this reaction, but an explanation in English works pretty well for me.
Basically, we are selectively rusting parts of the blade to create some sort of pattern or design.
Step 8: What the Difference? (for New Knifemakers)


By this time some of you (the newbies) are probably wondering what the difference is between this hamon-looking-line I just created, and the real deal. Well, the difference is actually pretty big. A real hamon line is created during the heat treatment of the steel. Japanese smiths would coat the spine and the back of their blades with a clay mixture which, when quenched, caused the part of the blade coated with clay to cool down much slower than the bare metal. The blade would end up with a very hard cutting edge, and a soft spine and back. The change of hardness in the metal is visible in a dark line running across the blade; the hamon.
In other words: Part of the blade is harder than the other part, and the intersection point between hard and soft steel is marked by a very classy looking line.
The main visual difference you can see between my fake and the real hamon is the depth of the line. Mine is rather thin in comparison. That is because I didn't leave the mustard on quite long enough. You can see that the lines on my bushcraft knife are much thicker, because I left the mustard on it for a longer period of time.
(And yes, I know that my hatchet does not have a real hamon. However, it's deferentially heat treated, which creates a hardness line similar in appearance.)
Step 9: Enjoy the New Look


Bask in the beauty............
I really like this mustard trick. It is a super quick and easy way to upgrade the look of your knives, and I think the results are pretty dang good. I can see myself doing this to a lot more of my knives.
See you next time,
Jake
Website: http://www.jakemakes.net/
YouTube: http://www.jakemakes.net/


