

Introduction: Getting Arduino Data to a Web Page


Being new to Arduino I was a bit overwhelmed by the different ways to do things. So this is what I came up with!
I am using an Arduino UNO R3 clone but the connections I believe are the same for most Arduino’s or can be easily modified for your particular model. This project is the beginning of a UROV that I am building from the ground up and this is my first attempt to work with Arduino. I do not want to turn my UNO into a webserver if I can avoid it because of the shortage of memory and this project is just a few of the sensors that I want to use for my project. I am going to start out by using the premise that my project will eventually use RS485 to communicate serially from my UNO to the PC via a tether.
Based on this I am going to base all my efforts on Serially retrieving the data and processing it through comma separated variables (CSV). As I am just learning to use the Arduino I will start by figuring out how to retrieve data from a sensor and then start adding motors and other gadgets but this is my first step. I am going to start with the BMP 180 with the HMC5883L magnetometer for my project. I have included the sample code that should be easy to follow and modify for your projects. Like most people starting to use the Arduino it can be a little overwhelming with the amount of information on how to do different things with the Arduino so I fell back on some of the things that I am familiar with PHP, HTML, MySQL but Arduino and Processing is all new to me so some things could have probably been done more efficiently. I will say that knowledge of all of the software is a plus in any case. I am also using WAMP server but you can use any web development platform that includes a MySql database engine and PHP, I have been using WAMP for several years and accustomed to it.
Attachments

Step 1: Connecting the Hardware

Connect the VCC pin to a 3.3V power source. The V1 of the sensor breakout cannot be used with anything higher than 3.3V so don't use a 5V supply! V2 of the sensor board has a 3.3V regulator so you can connect it to either 3.3V or 5V if you do not have 3V available.
Connect GND to the ground pin.
Connect the i2c SCL clock pin to your i2c clock pin. On the classic Arduino Uno/Duemilanove/Diecimila/etc this is Analog pin #5
Connect the i2c SDA data pin to your i2c data pin. On the classic Arduino Uno/Duemilanove/Diecimila/etc this is Analog pin #4
Link to wiring diagram: https://learn.adafruit.com/bmp085/wiring-the-bmp085
Software for the BMP085: https://learn.adafruit.com/bmp085/using-the-bmp085-api-v2
Step 2: The Arduino Sketch
The code has been modified for readability and this application. I want the flexibility to use the data for most general applications so I am going to retrieve it with Comma’s following the serial output for each reading. This will allow me to save it to a MySql database, CSV file or .txt file. Doing this will allow me to breakup or separate the serial data in Processing as well as PHP and most other programming and scripting languages very easily. The BMP085 software from Adafruit was used to read the sensor since it was the most complete example I could find and I posted the links above. You will have to import the library in your sketchbook folder. I would also like to note that I wanted my readings in units that I am most familiar with so I modified the code to read in “inHg” of mercury for Pressure, Fahrenheit and Feet. The original code was in Hectopascals, Celsius and Meters.
Sketch file:myurov_database-2.ino
#include
#include
#include
#include
// -----------------------------------------------------------------------------------------
Adafruit_BMP085_Unified bmp = Adafruit_BMP085_Unified(10085);
HMC5883L compass; //The BMP085 has been replaced with the BMP180 but the code still works.
int error = 0;
void displaySensorDetails(void)
{
sensor_t sensor;
bmp.getSensor(&sensor);
delay(500);
}
void setup(void)
{
Serial.begin(9600);
compass = HMC5883L(); // Construct a new HMC5883 compass.
if(!bmp.begin())
{
while(1);
}
displaySensorDetails();
error = compass.SetScale(1.3); // Set the scale of the compass.
if(error != 0) // If there is an error, print it out.
error = compass.SetMeasurementMode(Measurement_Continuous); //Set the measurement mode to Continuous
if(error != 0); // If there is an error, print it out.
}
void loop(void) {
sensors_event_t event;
bmp.getEvent(&event);
if (event.pressure)
{
int pressure = event.pressure;
float mercury = 0;
mercury = pressure * 0.029529980164712; // Convert hectopascals to in of mercury.
Serial.print(mercury); // inHg
Serial.print(","); // csv seperator
float temperature;
bmp.getTemperature(&temperature);
int temp2 = temperature * 1.8000 + 32;
Serial.print(temp2);
Serial.print(","); // csv seperator
float seaLevelPressure = SENSORS_PRESSURE_SEALEVELHPA;
int alt = bmp.pressureToAltitude(seaLevelPressure, event.pressure)* 3.2808;
Serial.print(alt); // in Ft
Serial.print(","); // csv seperator
}
else
{
}
delay(1000);
MagnetometerRaw raw = compass.ReadRawAxis();
MagnetometerScaled scaled = compass.ReadScaledAxis();
int MilliGauss_OnThe_XAxis = scaled.XAxis;// (or YAxis, or ZAxis)
float heading = atan2(scaled.YAxis, scaled.XAxis);
float declinationAngle = 0.0526; //0.0457
heading += declinationAngle;
if(heading < 0)
heading += 2*PI;
if(heading > 2*PI)
heading -= 2*PI;
float headingDegrees = heading * 180/M_PI;
Output(raw, scaled, heading, headingDegrees);
}
void Output(MagnetometerRaw raw, MagnetometerScaled scaled, float heading, float headingDegrees)
{
Serial.print(raw.XAxis);
Serial.print(","); // csv seperator
Serial.print(raw.YAxis);
Serial.print(","); // csv seperator
Serial.print(raw.ZAxis);
Serial.print(","); // csv seperator
Serial.print(scaled.XAxis);
Serial.print(","); // csv seperator
Serial.print(scaled.YAxis);
Serial.print(","); // csv seperator
Serial.print(scaled.ZAxis);
Serial.print(","); // csv seperator
Serial.print(heading);
Serial.print(","); // csv seperator
Serial.println(headingDegrees);
}
Attachments
Step 3: Preparing for the Database and the Processing Sketch
One of the first things I always do is build a database connector file to cut down on writing the code in the main files and must be included in the main directory.
My Sql Database connector file: db_connect.php
This is the Processing file it is the workhorse of the project! I do three things in this file file that will help me visualize what is happening. I initially see my data in the Sketch (draw) window and then I print out the serial data with it’s label before I send it to the MySql database but this is merely for troubleshooting and can be omitted once you have it working correctly. You will notice that I breakup the data into an Array before sending it to the MySql database. I also left in the code to send it to either a CSV file or text file by merely changing the “.txt” to “.csv” extension and adding the “output.print” statement to the array elements. Once I got the MySql working properly I no longer needed to create the csv or txt file. You will also notice the use of the De.Bezier MySql library in which I added a link to and it must be installed in order for this sketch to work.
http://bezier.de/processing/libs/sql/
Processing Sketch: mysql_write_1.pde file
// This is a modified file originally written by Tom Igoe
// I have modified the code to adhere to my application.
// Tom if you see this, thank you! for your great examples.
import processing.serial.*;
import java.util.*;
import java.text.*;
import de.bezier.data.sql.*;
PrintWriter output;
DateFormat fnameFormat= new SimpleDateFormat("yyMMdd_HHmm");
DateFormat timeFormat = new SimpleDateFormat("hh:mm:ss");
String fileName;
Serial myPort; // The serial port
String inString; // Input string from serial port
int lf = 10; // ASCII linefeed
PFont font;
MySQL dbconnection;
void setup() {
size(600,100);
// println(Serial.list());
myPort = new Serial(this, Serial.list()[1], 9600);
myPort.clear();
//Clear the database table
String user = "root";
String pass = "";
String = "myurov";
dbconnection = new MySQL( this, "localhost", database, user, pass);
if (dbconnection.connect() ) {
dbconnection.query("truncate aptc"); // clear all of the table data
dbconnection.close();
}
Date now = new Date();
// fileName = fnameFormat.format(now);
fileName = "readings";
output = createWriter(fileName + ".txt"); // save the file in the sketch folder in either “.csv” or “.txt” form
myPort.bufferUntil(lf);
}
void draw() {
background(0);
text("received: " + inString, 10,50);
}
void serialEvent(Serial p) {
delay(1000);
inString = p.readString();
String timeString = timeFormat.format(new Date());
output.print(timeString);
output.print(",");
output.println(inString);
// Here I either output the code to a File or to the Screen
// To go to the file I would add the “output.” to the beginning of the “println” statements
// I also take the serial data and break it up and create an array of the data.
println("Message received at " + timeString + ": ");
// println(inString);
String readings = (inString);
String[] list = split(readings, ',');
println("Barometric Pressure = "+list[0]+" inHg");
println("Temperature = "+list[1]+"\u00B0 F");
println("Altitude = "+list[2]+" Ft");
println("Magnetometer Raw X Axis = "+list[3]+" ");
println("Magnetometer Raw Y Axis = "+list[4]+" ");
println("Magnetometer Raw Z Axis = "+list[5]+" ");
println("Magnetometer Scaled X Axis = "+list[6]+" ");
println("Magnetometer Scaled Y Axis = "+list[7]+" ");
println("Magnetometer Scaled Z Axis = "+list[8]+" ");
println("Magnetometer Heading = "+list[9]+" ");
println("Magnetometer Heading Degrees = "+list[10]+"\u00B0 Degrees");
// special char for degrees "www.ascii-code.com/" u00XX = HEX //
// Note: the last line of the println statements will do a line feed after the list variable.
println();
String user = "root";
String pass = "";
String database = "myurov";
// connect to database of server "localhost"
dbconnection = new MySQL( this, "localhost", database, user, pass );
if ( dbconnection.connect() ) {
// now send data to database
dbconnection.execute( "INSERT INTO aptc (pressure, temperature, altitude, rxaxis, ryaxis, rzaxis, sxaxis, syaxis, szaxis, heading, hddegrees) VALUES ('"+list[0]+"','"+list[1]+"','"+list[2]+"','"+list[3]+"','"+list[4]+"','"+list[5]+"','"+list[6]+"','"+list[7]+"','"+list[8]+"','"+list[9]+"','"+list[10]+"');" );
dbconnection.close(); // without this I received a “too many connections” error after about 4 minutes.
// there are several ways to handle database persistence errors this is just simple.
}
}
void keyPressed() {
output.flush(); // Writes the remaining data to the file
output.close(); // Finishes the file
exit(); // Stops the program
}
Step 4: MySql - Create a Table
Database: `myurov`, table structure for table `aptc`
You must create the database and add the following table. You will notice in the “dbconnect.php” file that I am using the user “root” and it does not have password. This is not always a good idea! If your familiar with MySql you can copy and paste the code in the “Run SQL query/queries on database” tab after you have created the database.
CREATE TABLE IF NOT EXISTS `aptc` (
`id_aptc` int(10) NOT NULL AUTO_INCREMENT,
`data` timestamp NOT NULL DEFAULT CURRENT_TIMESTAMP,
`pressure` varchar(6) DEFAULT NULL,
`temperature` varchar(4) DEFAULT NULL,
`altitude` varchar(4) DEFAULT NULL,
`rxaxis` int(4) DEFAULT NULL,
`ryaxis` int(4) DEFAULT NULL,
`rzaxis` int(4) DEFAULT NULL,
`sxaxis` varchar(8) DEFAULT NULL,
`syaxis` varchar(8) DEFAULT NULL,
`szaxis` varchar(8) DEFAULT NULL,
`heading` varchar(6) DEFAULT NULL,
`hddegrees` varchar(6) DEFAULT NULL,
PRIMARY KEY (`id_aptc`)
) ENGINE=InnoDB DEFAULT CHARSET=latin1 AUTO_INCREMENT=2 ;
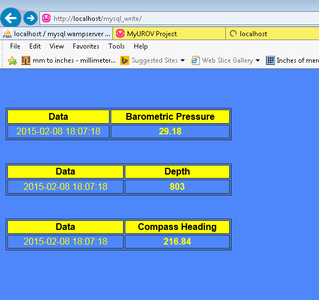
Step 5: PHP and HTML So I Can See My Project at Work!
I am going to be viewing these readings on my laptop and running WAMP as a web server hopefully by a lake somewhere. This file will allow you to see your data that you have saved to the MySql database. I have included only three fields here, Pressure, Altitude or Depth, and Temperature that I need for my project but you can add all of the rest of the fields in exactly the same way. I chose PHP because of my knowledge of PHP but you can use any scripting language that your familiar with. You will notice that I chose to use the Meta refresh to continually update the data but there are other methods of doing this that you can experiment with.
HTML file: index.htm
<!DOCTYPE HTML PUBLIC "-//W3C//DTD HTML 4.01 Transitional//EN" "http://www.w3.org/TR/html4/loose.dtd">
<!-The line below continually refreshes the page with the new data -->
<Meta HTTP-EQUIV="Refresh" Content="10; URL=http://localhost/mysql_write/index.htm">
<html>
<head>
<title>MyUROV</title>
</head>
<body bgcolor="#4e87fa">
<center><strong><font color="#ff0000" face="vivaldi, verdana" size="7">MyUROV</font></strong></center>
<!-- Main Body Table -->
<table>
<tr>
<td>
<center>
<?php
include "db_connect.php";
mysql_select_db($database) or die("Impossibile to select the database.");
$query = "SELECT * FROM `aptc`";
$result = mysql_query($query) or die("Couldn't execute query");
$num = mysql_num_rows($result);
mysql_close();
/*Display the Data table*/
echo "<table width = 400 border = 1 cellspacing=2 cellpadding=2>"; /*border = "1" cellspacing="2" cellpadding="2"*/
echo "<tr bgcolor=#FFFF00>"; /* bgcolor="#FFFF00" */
echo "<th width = 175><font face=Arial, Helvetica, sans-serif> Data </font></th>";
echo "<th><font face=Arial, Helvetica, sans-serif> Barometric Pressure</font></th>";
echo "</tr>";
$i = $num - 1;
$data = mysql_result($result,$i,"data");
$value = mysql_result($result,$i,"pressure");
echo "<tr>";
echo "<td align=center><font face=Arial, Helvetica, sans-serif color = #FFFF00>$data</font></td>";
echo "<td align=center><b><font face=Arial, Helvetica, sans-serif color = #FFFF00>$value</b></font></td>";
echo "</tr>";
echo "</table>";
?>
</center>
<br><br>
</td>
</tr>
<!-- ------------------------------------------------------------------------------- -->
<tr>
<td>
<center>
<?php
include "db_connect.php";
mysql_select_db($database) or die("Impossibile to select the database.");
$query = "SELECT * FROM `aptc`";
$result = mysql_query($query) or die("Couldn't execute query");
$num = mysql_num_rows($result);
mysql_close();
/*Display the Data table*/
echo "<table width = 400 border = 1 cellspacing=2 cellpadding=2>"; /*border = "1" cellspacing="2" cellpadding="2"*/
echo "<tr bgcolor=#FFFF00>"; /* bgcolor="#FFFF00" */
echo "<th width = 200><font face=Arial, Helvetica, sans-serif> Data </font></th>";
echo "<th><font face=Arial, Helvetica, sans-serif> Depth </font></th>";
echo "</tr>";
$i = $num - 1;
$data = mysql_result($result,$i,"data");
$value = mysql_result($result,$i,"altitude");
echo "<tr>";
echo "<td align=center><font face=Arial, Helvetica, sans-serif color = #FFFF00>$data</font></td>";
echo "<td align=center><b><font face=Arial, Helvetica, sans-serif color = #FFFF00>$value</b></font></td>";
echo "</tr>";
echo "</table>";
?>
</center>
<br><br>
</td>
</tr>
<!-- -------------------------------------------------------------------------------- -->
<tr>
<td>
<center>
<?php
include "db_connect.php";
mysql_select_db($database) or die("Impossibile to select the database.");
$query = "SELECT * FROM `aptc`";
$result = mysql_query($query) or die("Couldn't execute query");
$num = mysql_num_rows($result);
mysql_close();
/*Display the Data table*/
echo "<table width = 400 border = 1 cellspacing=2 cellpadding=2>"; /*border = "1" cellspacing="2" cellpadding="2"*/
echo "<tr bgcolor=#FFFF00>"; /* bgcolor="#FFFF00" */
echo "<th width = 200><font face=Arial, Helvetica, sans-serif> Data </font></th>";
echo "<th><font face=Arial, Helvetica, sans-serif> Compass Heading </font></th>";
echo "</tr>";
$i = $num - 1;
$data = mysql_result($result,$i,"data");
$value = mysql_result($result,$i,"hddegrees");
echo "<tr>";
echo "<td align=center><font face=Arial, Helvetica, sans-serif color = #FFFF00>$data</font></td>";
echo "<td align=center><b><font face=Arial, Helvetica, sans-serif color = #FFFF00>$value</b></font></td>";
echo "</tr>";
echo "</table>";
?>
</center>
<br><br>
</td>
</tr>
</table>
</body>
</html>
I hope you enjoy this as much as I did creating it!!


