

Introduction: Giant Camera Obscura Sun Observer


I am amazed by the results of this project because it is such a simple, but powerful setup. If you are at all interested in astronomy, I strongly suggest that you build this for yourself because it's a great first, tenth, or 137th step in learning more about astronomy and our closest star!
For the August 2017 Solar Eclipse, I built a camera obscura in my basement. When I first finished this project, I thought that I would only be able to see a basic view of the eclipse (i.e. the moon's profile slowly engulfing the solar disc), but I built something that turned out to be much more powerful. By tuning the aperture and focal length of my setup, I was able to see sunspots on the solar disc that matched the sunspots reported by NASA astronomical labs and SolarHam (see pictures).
This project can be done in any room that has a window on the ground floor, and other windows that are easily covered. As long as you have a music stand, a mirror, aluminum foil, water, cardboard, and a used gift card, you can totally build this.
Step 1: Super Important Safety Information

DO NOT UNDER ANY CIRCUMSTANCES LOOK DIRECTLY AT THE SUN.
- You will permanently damage your vision (New imaging finds crescent-shaped eye damage in woman who viewed eclipse
- You won't look very smart doing it... (reference)
DO NOT USE YOUR REFLECTOR FOR EVIL. You should treat your reflector with the same respect as a laser (shining a laser at an airplane is Federally Illegal)
In this project you will be creating a lightpath outdoors that can shine into the eyes of others. Do not point the reflector at anything other than into your camera obscura (that includes at friends, family, drivers, planes, into other people's houses). You can get into huge trouble for this and it's really not cool. Also the lightpath that you create indoors will still be a beam that is as bright as direct sunlight. Under no circumstances should you put your eyes in the path of this light, you will severely damage your eyes.
Disclaimer: The author of this educational material (Instructables Username: "pemby") claims zero responsibility for any injuries, damages, or legal action resulting from the construction of anything contained in this publication or anything inspired by this publication.
Step 2: Materials and Tools
For this project, I used:
- A ground level window
- Other windows that can be covered in the room
To cover windows:
- Aluminum foil + Water in a spray bottle
- Cardboard
To make reflector:
- Music stand (adjustable angle) -- ~$16.50
- Mirror from Goodwill (my mirror measured 12"x16")-- $10
- Clamp, binder clip, or 2 large rubber bands -- <$5
To make aperture:
- Corrugated cardboard (at least the size of your window)
- Used gift card (I used a chipotle gift card)
- 1/16", 1/8", and 1/4" drill bits with drill
To make the viewing screen:
- Any white printer paper or the back of a poster
Miscellaneous
- Knife to cut cardboard
- masking tape
- Duct tape
- Duct tape
Step 3: Blacking Out Unused Windows

- Measure your window height and width and get aluminum foil sheets that will cover these dimensions
- e.g. if your window is 4'x5', and your aluminum foil is 1' wide, then you will need 4 pieces of foil that are 5' long.
- Try really hard not to crinkle or crease the foil -- the flatter your foil the better!
- Spray your window with a fine mist of water
- Place your foil onto the wet window
- The foil should stick to the window easily
This wikiHow article is a good guide for doing this procedure (https://www.wikihow.com/Wrap-Windows-with-Aluminum).
If you have air bubbles, don't worry about it, just make sure that you cover the entire window with the foil to completely block light from coming into your room (except where we want it to...see next step).
Step 4: Making Your Aperture


For your viewing window, you will repeat the same procedure that you performed on the other windows, but this time leave a hole the size of a quarter in the foil in the center of the window covering.
Then cut a piece of cardboard to about the size of a post card, and put a hole in the center that is about the size of a golf ball (this will act as our rough aperture).
Tape the cardboard piece you just made over the hole in the foil on the window so that the two holes line up.
Carefully make a .5cm diameter hole in your used gift card with a drill bit (the more circular this hole, the clearer your image will be). This will act as our fine aperture.
Use a small amount of tape to stick the gift card to the cardboard so that the .5cm hole lines up with the two quarter sized holes.
Alternatively you can tape a magnet to your cardboard (on the window side) and then use another magnet to sandwich your fine aperture and your rough aperture together. The magnet method makes it easy to quickly change between apertures.
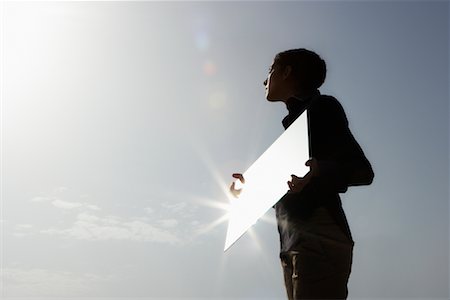
Step 5: Setting Up the Reflector

Go outside with your medium size mirror, attachment tools (clamp, clips, rubber bands, or tape), and your music stand.
Place the mirror on the shelf of the music stand and attach the mirror firmly to the music stand with the attachment tools.
Change the elevation (altitude) and rotation (azimuth) of the stand so that you can catch sunlight and bounce it at the quarter sized hole in the foil on your ground floor window (i.e. reflect sunlight off of your mirror and aim it at your aperture).
Go inside to see if you are projecting light onto the wall opposite your aperture.
You will likely need to change the height of the music stand, your elevation angle, and your rotation angle of the mirror to get the sunlight to project just right through your aperture. The goal is to get a projection of light onto the opposite wall with respect to your aperture.
Step 6: Setting Up the Screen
If your walls are not perfectly flat, or if they are not white, then you'll likely want to use a screen to view the image of the sun that you created. You can use any white flat surface as your screen including paper taped to the wall, the back of a dry-mounted poster, or even a projector screen if you have one.
Step 7: Checking Out the Sun!


With this setup you will be able to easily view the sun in a safe way.
Some pointers:
- Changing your aperture size can help to focus your solar viewer. You can drill holes of different sizes in your fine aperture and experiment to find what works best for you!
- Clouds will pass over the sun and obstruct your view sometimes, so it's best to set this up on a cloudless day
- You will need to reposition the reflector every 2 minutes or so depending on how large your mirror is. As the earth rotates, the angle of the reflected light beam will change. Just go outside to reposition your mirror and you'll be looking at the solar disc again in no time
- Photographs of sunspots are extremely difficult to capture due to the bright light of the sun's projection, but the best way I've found to share your images is to take a video of your projection so that others can see the static darker spots on the sun.
- Remember to be safe with this project
I hope this project helps others learn more about astronomy. Good luck building it, and let me know if you have any questions in the comments!
Thanks!

Participated in the
Optics Contest


