

Introduction: Homemade 3 in 1 Multipurpose Workbench: Table Saw, Router Table and Inverted Jigsaw (Free Plans)


In this Instructable I’m going to show you how I built my 3 in 1 multipurpose workbench.
I’m going to show you how I turned my router into a router table, my circular saw into a table saw and my jigsaw into an inverted jigsaw. Also, I’m going to show you how I collect the dust from these tools. And at last I’ll show you how I connected and wired everything.
On my website you can find free plans with all the details included.
There you can also find some accessories that I plan to make in some of my next videos like: Table Saw Fence, Crosscut Sled, Miter Gauge, Featherboard and Push Stick. I’ll upload free plans for the accessories when I build them.
I dedicated almost a month in designing and building this multipurpose workbench that will ease my future projects. So, let’s get started!
Here are the materials I used:
- 2 sheets of plywood 122 x 244 cm, 21 mm thick (your local hardware store)
- Full overlay cabinet hinges http://amzn.to/2wWw1lP
- T-nuts http://amzn.to/2fqvbCS
- Pocket hole screws http://amzn.to/2wYIfp7
- Caster wheels http://amzn.to/2xLcYdy
- Wood glue http://amzn.to/2fshgMw
- Paint http://amzn.to/2yHdBmh
- Walnut wood stain http://amzn.to/2wXruea
Types of tools I used:
- Jigsaw http://amzn.to/2xH1Lu9
- Circular saw http://amzn.to/2fRs8nD
- Router http://amzn.to/2xAOiCh
- Cordless drill http://amzn.to/2frP8MD
- Random orbit sander http://amzn.to/2fqHQJ3
- Pocket hole jig http://amzn.to/2wXsq23
- 90 degree angle clamps http://amzn.to/2sJHkac
- Wire strippers http://amzn.to/2wrmZtb
- Forstner bits http://amzn.to/2wXcg91
- Rasp http://amzn.to/2xH2fQL
Step 1: Measuring and Cutting.


For this project I used 2 sheets of plywood, 122 x 244 cm, 21 mm thick. First I marked all dimensions. I used a wooden strip as a fence and clamped it down. Also, I placed the sheets onto 2 tables to prevent the wood from splintering.
I cut all the pieces that I need for this project: the top, the bottom, the sides, the inner panels, the doors and the frame.
Step 2: Assembling the Workbench.


I’ll start with the bottom, and I’ll attach the sides to it.
To make the sides perpendicular with the bottom I’m using corner clamps. On the bottom of the table I’m marking the points where I’ll drive the screws in, and then I’m drilling some pilot holes in there.
After I made the pilot holes, I decided that it is much better to strengthen the joints with a wood glue, and then to drive the screws in. I’m using 5 cm long screws with 4 mm diameter. I repeated this process with the other two panels which are parallel with the first one.
Now I’ll attach the shelves. To do this, I’ll make pocket holes with a pocket hole jig on each shelf. This is the most appropriate way to give the table a cleaner look.
I spent some time measuring and clamping them down with corner clamps, and then I drove the screws in. For these joints I’m using 4 cm long screws.
I can move on to attaching the other two panels which are perpendicular with the other panels that are already attached to the bottom of the workbench. One more thing I need to do is to attach the last shelf with pocket hole screws as well.
Step 3: Turning the Router Into a Router Table.


The first tool that I’m going to attach is the router. I measured the size of the opening, found its center, and drew a square on the panel that I need to cut with a jigsaw.
Making the Opening.
Then I drilled out four holes, one in each corner to pass the jigsaw blade through. These holes will be starting points for the jigsaw. While cutting you should try to stay as close to the line as possible.
I’ve cut the opening and used a rasp to remove all the extra wood that I couldn’t cut with the jigsaw.
Next, I need to make a rabbet for the insert that will hold the router from below. I’m drawing the perimeter of the square that I need to cut. To follow the line of the perimeter I clamped down a few pieces of scrap wood.
I’m using a straight 12 mm bit to route this section out, but I set the depth of the cut on 5 mm, so I need to pass twice on the same surface to get the 10 mm depth.
Creating the Inserts.
Now I need to make the inserts for the tools. The rabbet that I previously made can fit 10 mm thick insert. The problem is that I don’t have 10 mm thick plywood, so I need to find a way to solve this issue.
The only reasonable solution was to turn the 21 mm plywood board into 10 mm board with a router. So, I did it. I removed 11 mm off of the plywood. Although I was all covered in dust, I finally got 10 mm board which was one of the most important parts of the project.
The easiest way to get 10 mm thick plywood is, of course, to buy it, but I wasn’t able to do that, so this solution wasn’t bad at all.
Before cutting the inserts, I sanded the board down to make it nice and smooth. Then I cut the insert for the router and used a sandpaper to make round edges.
Attaching the Router onto the Insert.
Next, I removed the base of the router and I used it as a template to mark the mounting holes.
Then I drilled the holes out. First I used a countersink bit to drill out the holes just enough to get the screw heads to sink below the surface of the wood. That’s because I need the insert to be flush with the surface of the table. For the router, I made holes with a 4 mm bit, and for the insert I made 6 mm holes. Also, I used a 35 mm Forstner bit to drill out the center so that I can easily move the router bit up and down.
The last 4 holes I drilled with an 8 mm bit into the corners of the rabbet. I installed the T-nuts below the surface, so that I can secure the insert in place. I’m going to use a clamp which will pull the T-nut inside the wood.
And that’s it. I’ll attach the router onto the insert, and then I’ll attach the insert onto the table.
Step 4: Turning the Circular Saw Into a Table Saw.


Now, I can move on to the second tool, and that’s the circular saw. Here, I need to pay much more attention to the squaring. The saw has to be squared up with the front edge of the workbench, so I need to measure twice before cutting.
Making the Opening.
Then again, I drilled 4 holes for the jigsaw blade to pass through and made an opening as big as the circular saw. The rasp corrected all the imperfections.
Then I made a rabbet with the router, and this time I set the depth of the cut on 10 mm, so that I can remove the extra wood all at once.
Fortunately, now I have 10 mm thick plywood for this insert. So, I cut the insert to size, and rounded the edges with a sandpaper.
Mounting the Circular Saw onto the Insert.
To attach the circular saw to the insert I’m going to utilize the existing holes, two in the front, and two in the back of the saw. You may have to drill new holes in your saw base if you can’t use the existing ones.
I marked the places where I need to drill holes in the insert.
After that, I drilled all the holes I needed. I’m going to use bolts with 4 and 5 mm diameter, two of each, and also I’m going to use 4 bolts with 6 mm diameter to attach the insert to the table.
I installed the T-nuts with an F-clamp, one in each corner of the opening.
Making Cuts on the Insert.
Now, I’ll place the circular saw below the top and at this point I need to make 2 cuts, one at a 90 degree angle, and another at a 45 degree angle. Before making the cut I have the blade guard clamped out of the way so that I can see what I’m doing.
So, I’ve turned the circular saw into a table saw.
Step 5: Turning the Jigsaw Into Inverted Jigsaw.


Next, I can focus on the third tool, and that’s the jigsaw.
Making the Opening.
The process is pretty much the same here. In each corner I drilled 4 holes and slowly passed the jigsaw through, following the lines. Again, all the imperfections are corrected with the rasp.
Then, I clamped down 4 pieces of scrap wood, and they will act as a guide for the router. I routed the section out with a 12 mm bit.
Attaching the Jigsaw onto the Insert.
After that, I need to attach the jigsaw to the insert. And to do that I need to drill new holes in my saw base. I drilled two holes in the front, and two holes in the back of the jigsaw. To do this I’m using 5 mm metal drill bit.
Now that I have 4 new holes on the jigsaw, I can make the appropriate holes on the insert, and on the opening, and to install the T-nuts. Also, I made a 15 mm hole with a Forstner bit for the jigsaw blade.
I can now attach the jigsaw onto the insert, secure the insert onto the workbench and put the blade in place, to check the squaring. You may have a different jigsaw, so you may need to use a different method to attach it to the workbench.
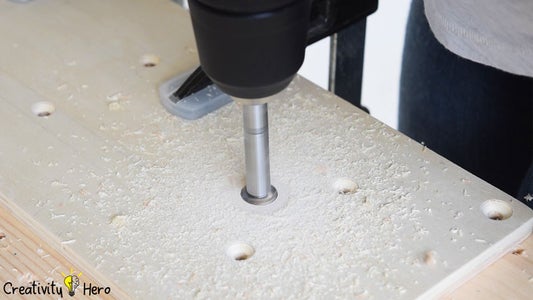
Step 6: Making Holes for the Caster Wheels.


After I drew some lines, I can mark the points for the screws and drill 4 holes on each corner. I’m using caster wheels with brakes, because this way I can easily move the workbench, and I can secure it in place while I’m working.
Step 7: Attaching the Top to the Table.


To attach the top to the table I’m making pocket holes on each side for which I’m going to use 32 mm screws.
Then I’m applying a decent amount of wood glue and I’m driving pocket hole screws in each hole.
Step 8: Making a Frame Below the Top.


I apply wood glue on the first stripe, clamp it down and drive screws from the inside. For the rest 3 stripes I drive screws from below.
Step 9: Preparing the Doors.


Now it is time to work on the doors. I’m marking the points where I’ll place the hinges, and I’m making holes using 35 mm Forstner bit. I’m marking the points for the screws, and then I drill the holes.
Step 10: Painting the Workbench.


Before painting, I’m sanding the entire workbench, first with 120, and then with 220 grit sandpaper, and wipe the dust off.
I decided to finish it with a combination of stain and paint, so I stained the top, the inserts and the doors with walnut stain, and I painted everything else with white paint. What I most like about the stain is that it emphasizes the edges of the plywood wonderfully.
When it comes to the paint, first I applied one coat of oil-based primer, left it to dry out, and then sanded it with 120 grit sandpaper. After that, I applied one coat of white oil-based paint, and left it to dry for at least 24 hours before doing anything else.
Step 11: Mounting the Caster Wheels.


I mount the caster wheels on the bottom with 8 mm bolts, and secured them well.
You can see that the bottom isn’t painted, instead I applied transparent finish, because it dries so fast, so I didn’t have to wait another 24 hours for more paint to dry out.
Step 12: Electrical Work.


Now, I can move on to the fun part of this project: The electrical work.
So I’ll put 3 switches in front of the workbench which will control the three power outlets for each tool, according to the circuit schematic. I’m using 3 core 1.5mm cable and I start by cutting it to size and stripping off the wires inside.
I connected the hot and the neutral lines, in my case the brown and the blue wires, to the switch in a way that they are connected to each other when the switch is pressed, and disconnected when the switch is not pressed. I attached the switch boxes to the workbench using screws, inserted the other end of the cables through the holes where my junction box will be located and assembled the switches.
On the other side, in the router compartment, I marked the position where the junction box will be placed and attached it to the side panel using two screws.
In similar way, I connected the three power outlets with the cables appropriately, attached them in each compartment and assembled them.
What’s left is to connect the main power to the junction box. I did that by using 3 m long cable on which I attached a power plug and then brought the cable to the junction box. At the end I connected all the wires together in the junction box according to the circuit schematic.
Step 13: Dust Collection.


I’ve previously made squares with holes in the middle that will fit all the hoses needed for this workbench. I screwed one square above and one below the shelf, and this way I’ll connect the hoses from the tools and the hose from the vacuum cleaner.
Step 14: Attaching the Doors.


I’m using full overlay hinges. Also I made door knobs out of plywood which I mounted with screws. I kind of like the exposed look of the screws.
Mounting the doors on the workbench is easy, you just have to follow one simple rule. I like the mechanism of the hinges, they are easy to install and adjustable, which is pretty good for people who are using them for the first time.
Step 15: Putting the Tools in Place and Testing Them.


At the circular saw, instead 4, I put 6 screws to attach the insert to the top. This is because the surface of the insert warped for some reason, which I couldn’t fix, and I thought 2 more screws in the middle will solve this problem. And I was right.
At this point I’m done with my workbench. I’m very satisfied with how it turned out. I really like its appearance and functionality, so I think it was worth every second I’ve spent on its design and building.
If you have any questions, suggestions and ideas leave them in the comments section below. Also, if you like this video share it with your friends and subscribe to my YouTube channel.
YouTube: https://www.youtube.com/CreativityHero
Website: https://creativityhero.com/
Facebook: https://www.facebook.com/CreativityHero/
Instagram: https://www.instagram.com/creativity.hero/
Pinterest: https://www.pinterest.com/creativityhero/


