

Introduction: Homemade RC Wheeled Robot


The purpose of this proyect is to create an RC operated 3 wheeled vehicle. The RC module will be obtained from an old, broken RC toy (hovercraft).
Step 1: The RC Components


From an old, broken toy (hovercraft), the RC module will be taked, the transmiter (control) and the receiver (will deliver electrical energy to actuators).
The transmiter can generate 4 differente signals: left-forward, left-backward, right-forward, right-backward. These 4 types of signals will be transmited to the receiver. This unit will be directly couplet to the 2 DC motors from the platform.
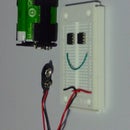
Step 2: The Connection Between the RC and the Platform

The four outputs from the receiving unit will be connected to the two DC motors. In the control, while forward, the DC motor 1, will receive 9.6 Volts from the red cable, and 0 Volts from the black one. While backward, the output in the red cable will be 0 Volts, and the output in the black one will be 9.6 Volts.
The same applies for the other two outputs (red, black) attached to the DC motor 2.
Step 3: Test With the RC Control

The four outputs of the receiver module will be connected and isolated from each one, using electrica tape. The optmial solution would be using a soldering pen, in order to weld and fix the cables and using termofit in order to propperly isolate the 4 connections.
Now the receiver module will be connected to the battery (9.6 Volts) and the first test will be perfomed using the transmiter module.


