

Introduction: How to Aligned Correctly Your Scanned Documents


Introduction:
Most of us use scanner to scan documents.
while we use it we didnt have time to align the orientation.
with this i'm going to show you how easy it is to orient a scanned documents like a pro and crop the scanned documents in a professional way.
The things you need:
1. Scanned Documents (ie. JPEG, PNG etc.)
2. Microsoft Office Picture Manager (most of Windows user have this)
Step 1: Locate Your File
Before doing anything. Locate your file first.
Now when you already have your file. Lets start by doing.
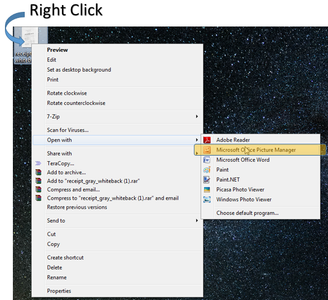
Right-click on that Image/Photo
Go to Open With then select Microsoft Office Picture Manager
Microsoft Office Picture Manager is a software program included with the Microsoft Office suite versions 2003 through 2010. It is no longer included with Office 2013 or later, but may still be obtained in products such as Microsoft SharePoint Designer2010, either 32-bit or 64-bit versions, and added to them. Picture Manager is a basic image editing and image management program. It replaced Microsoft Photo Editor, which had been included up to Microsoft Office XP since Microsoft Office 97.
Step 2: Editing


After you've open your files.
Now click the EDIT PICTURES located at the top-center of the application.
A option will appear on the right side of the application window.
now click ROTATE and FLIP.
after selecting the ROTATE and FLIP option. we can now adjust the Scanned Photos to the right orientation.
check the screenshot on how to adjust the orientation step by the step.
When your satisfied with the orientation or if the orientation is on a right position.
We can now crop the exist picture.
Click the back button.
Step 3: Cropping


Now click the CROP option.
We can now adjust the size of the scanned documents to make it professional looking documents.
After we have crop it we can now save the photos.
Step 4: Saving


To save the project just simply click OK..
then hit the SAVE button!
Congratulation!
-END-
Credits to:
https://en.wikipedia.org/wiki/Microsoft_Office_Pic... - for description
Google Search - for scanned receipt.
CHEERS!
Attachments


Participated in the
Digital Life 101 Challenge

Participated in the
Before and After Contest 2016


