

Introduction: Mercury Foam Teardrop, How to Build a Foam Teardrop Trailer. Rot Proof, Well Insulated and Super Lightweight


In a way, teardrop campers are a great reminder of the old American west, the one that the pioneers, settlers, explorers and cowboys discovered, and that the Natives had known all along. The settlers with their Conestoga wagons and the chuck wagon that carried the food on a cattle drive most often had a rear galley much like the teardrop camper galley, with a fire nearby for cooking. Today there are many people who head off into the wild in a jeep or truck towing their plywood tent with an open air galley, where ever they go. Experiencing the great outdoors the way people have for hundreds of years. They often camp in spots that people camped when horses were what you rode instead of under the hood, and many like to visit the ghost towns and mines of these early pioneers. Often following the trails that were picked out long before the first Europeans "discovered" them.
Teardrop trailers are becoming more popular every day. From their creation soon after the automobile, and ever since, they have had their swings in popularity.
Today the push for fuel efficiency has caused many people to own a car that cannot tow much if anything at all. Since teardrop trailers are small, aerodynamic, and lightweight, there is really no car that cannot tow a teardrop.
Throughout the history of tears, many materials have been used, wood being the most common, but not the only thing tried. During the depression home builders used homasote as a cheap material.
Today most builders still use plywood. As a readily available material that is easy to build with, plywood is a good choice. But plywood also has issues if allowed to get wet.
Even small leaks lead to rot and delamination, turning your pride and joy into a moldy mess.
One builder on the best teardrop site in the world, tnttt.com, lives in New Orleans, he built a teardrop to be his bug out, crash pad, for evacuations.
Over the next year or two the inexpensive plywood he used proceeded to delaminate from the excessive humidity in that region, leaving him with nothing to show for his time and money.
Being a model airplane flyer, he had experience with one from of construction used that is cheap and light weight, foam skinned with tissue paper.
He proposed building a teardrop out of foam, and after some discussion, settled on fabric as the skin that holds it together. He ultimately built a huge foam camper called the Foamstream, which so far, has not been needed to evacuate. Other builders have gone on to prove the idea, with thousands of miles towed, hundreds of camping trips, and no failures to report in all that time.
I took this fabric skin idea and covered my plywood teardrop using it, poor man's fiberglass is still going strong after 5 years exposed to the Sun, rain, wind, ice and snow.
After a few years of use and plenty of camping trips, I had a bigger teardrop idea in the back of my head, being the father of four children, I wanted a camper big enough for all of us, but as easy to tow as a teardrop.
To make this happen, I settled on foam construction for lightest possible weight. I started experimenting with glues and foam, but found I had to change almost all of the expectations and experience I had with plywood. Since a teardrop will cost two thousand for a simple plywood build, I didn't want to be spending a ton of money before I knew what I was doing. I decided to go back to what I knew only build it with the new material I planned on for my big teardrop.
I am a serial boat builder, having built 7 plywood kayaks called Mouseboats out of plywood, I decided to build another using foam instead of plywood. That way I could try out the new material, adhesives and construction method on a boat that costs about $100 US. After building the new boat, I tested it out over the summer, I liked everything about it, except that it didn't look like a "normal" kayak. If you want to see my first foam boat, check out my Seafoam instructable.
Over the next winter I came up with the way to build my Sawfish kayak using foam. That spring I put my experience to work, and built Mercury, the subject of this Instructable. We had a great camping trip in Mercury, and the design proved itself.
This past winter I built another five Sawfish, created a shorter kayak for children, Clownfish, built two of them, and a couple more experimental designs that there will not be plans for.
I would recommend that you build a smaller project first, like a Sawfish, or cooler, before attempting a large one like a teardrop. A finished kayak would also go a long way toward convincing a skeptical spouse. I've already had one builder who said he never could build anything, he was impressed that he could build a functioning kayak, and his friends and family were shocked. He has gone on to build another with his son, and has some ambitious plans for trips this summer.
This instructable follows how I built my own teardrop to a design I came up with. While some of it is specific to my own extra large design, just about everything in here will apply to building a foam teardrop camper, or "Foamie". I don't claim to be an expert, in fact my teardrop has been on a camping trip, but is still not complete. I might be able to help you with your questions, but I know the "experts" on tnttt.com can give you more advice than I can. I hope this I'ble inspires you to build your own camper and get out in the great outdoors!
Step 1: Tools and Parts


tools:
-safety glasses
-dust mask
-werner 250 wallpaper removal tool
-hand drywall saw
-shureform the harbor freight model works best for this, and is easier to hold
-flush cut pliers (another deal from Harbor Freight with a lifetime warranty)
-bricks, paint cans, old free weights, or a bunch of 5 pound rocks, ( I call them gravity clamps)
-paint roller handle, tray and rollers
-sand paper and a power sander (I have a nice orbital and some 60 grit paper)
-tape measure
-carpenters pencil, sharpie marker, ink pen
-1/2" spade or drill bit
-power drill
as far as parts, all I can tell you is you will need,
a trailer
Plywood
Teardrop door handles and latches (nothing else looks correct, or functions as well) I used DL13, DL06, and DL11 on Mercury.
Gorilla glue (for larger bottles than my store stocks, I order the big quantity online)
PLpremium (3x is fine)
canvas
Titebond II(a few gallons)
and a plan. The weekender teardrop trailer would be a good one for the average builder, Angib has a great page of free plans , here is a good article for the first time builder.
BE AWARE- there are many people selling teardrop plans on Ebay, etc. most of these plans are reprints of old articles from the 40's and 50's that you could have found for free. These old plans are not as helpful as a modern plan, due to changes in the construction materials for sale today.
I used the free generic BenRoy plans found on Tnttt.com for my first teardrop. The Kuffle creek teardrop plans are recommended as the best plans money can buy. Even if you do not build one of his plans, the methods ilustrated in ted Frederick's build manual are the highest rated among experienced teardrop builders.
(I designed my camper in my head, never set it down on paper, then figured the small details on the fly, I do not recommend this method for your first time or any build, I just have a 3D imagination, YMMV)
Step 2: A Firm Foundation


Every teardrop has to have wheels and a hitch coupler. there are some variations on frames and even frameless teardrops, that actually use the floor as the attachment for the tongue and axle, but from my observations about half of the teardrops being home built today, are built on the heavy duty trailer from Harbor Freight, with most of the rest being built on a custom welded trailer. While many people insult the Harbor Freight trailer, they cannot point to a real failure of one.
Do not get sucked into the myth that your trailer must be as wide as the teardrop you build on it, my first teardrop was built on a 4 foot wide trailer, and it is 5 feet (actually 62.5") wide. 6 inches of plywood will not bend or break if not supported, and actually it is not so much supported, as suspended from the sidewalls of the teardrop. Then the sidewalls are supported by the nose wall and galley wall, which both rest on the trailer. Teardrop design works best when you think more like an airplane or bridge designer, instead of a house builder. Think like a house builder and you end up with a very overweight trailer that is hard to tow.
The best source for trailers, in my opinion, is giving new life to ruined pop up or tent trailers. Every spring hundreds of pop up owners open their camper to find squatters have moved in. Mice, Chipmunks, etc. and they make a mess of the insides. shredding the fabric and bedding, staining the cushions, and chewing on everything else. Some dedicated searching or even a listing on Craigslist should find one, knocking on doors where pop ups look unused, or just asking around with people you know can also work.
Another good source is old boat trailers, although they need a bit more modification to be a good camper platform. After a big hurricane goes through an area, there are many good trailers for little or no money, left behind by smashed and sunk boats.
I ended up with two free pop ups that had been ruined, I just had to drag them home.
To make them usable, I had to strip them down to the frame. I burned the wood, trashed the fabric, and took the metal parts to the scrap yard. I also saved the good parts like the sink, faucet, power center, stove, and awning rails.
Once the frame is bare, it is a good idea to clean off any rust, and prime the frame. This is the time to have it settled on how big you want your camper to be. Most pop ups are over six feet wide, but the average car can't pull a trailer this wide without needing towing mirrors.
The real choice is in how large of a bed you want. We sleep on a queen at home, and this made a five foot wide teardrop the obvious choice. In my years of reading and commenting on tnttt.com, the most common size teardrop is five feet wide. Those who build four foot wide teardrops often wish they had that extra foot of space.
If you get a pop up frame, you will find it is easiest to make a five foot wide teardrop on it. Most pop up frames have main rails that are about five feet apart, and cross rails that extend out each side to make the floor six or more feet wide. Most of these frames can be narrowed by simply cutting off the extensions and leaving the main rails in place.
One of the most experienced teardrop builders I know, says that a teardrop should be twice as long as it is wide for looks. 4x8, 5x10, 6x12, this just looks better, and give plenty of space.Don't get stuck on an exact width or length, most teardrop builders make things an inch or two over the dimensions they need for the mattress to cover the width of the walls. Only 4x8 builders are really locked in, as they are building to standard plywood sizes.
Step 3: Flooring


I'm going to describe how I built my teardrop, however I built an over sized teardrop, over six feet wide and thirteen feet long. While my dimensions are huge, the basic build details will work for any size.
I made my floor of 1/2" plywood, a bit thinner than some builders use, with most using 3/4" or even 1" plywood. Since my floor is made of three panels, I cut a rabbet into the joining edges and glued them together with construction adhesive. A rabbet is a notch that is part of the thickness of the wood, you make a matching rabbet in the panel to be joined to and glue the face of one notch to the face of the other. This way does make the panels a bit shorter, by the width of the overlap. You will need a router to make a perfect rabbet.
Once the glue was cured, I flipped the floor over and sealed it with deck sealer. I got two gallons cheap on the oops rack at my local paint department, I don't really car about the color, unless my trailer gets flipped over, no one should see it.
I left a four inch strip of the floor unpainted around the outside edge, this is where the fabric that wraps the trailer together will be glued, tying the whole box together.
I also used a router and a round over bit to take the sharp corner off the plywood, the fabric will stick better if the corner is rounded.
Once the deck sealer cured, I flipped the floor back over and got ready to build, all of this was done on the trailer frame, as it makes the best build platform in my opinion.
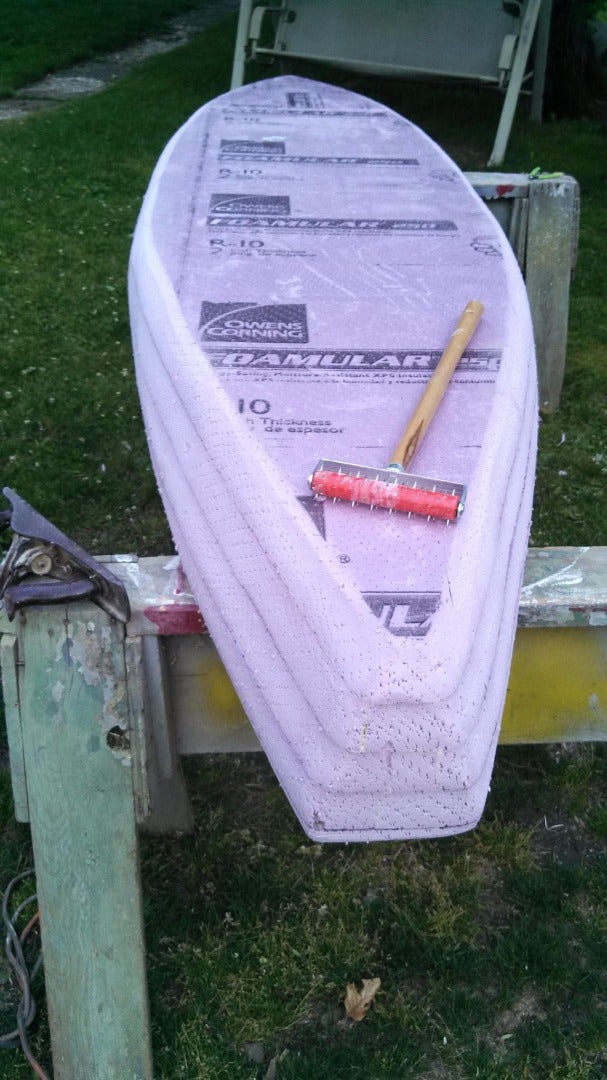
Step 4: Foam


If you want a basic shape that will be easy to build in foam check out this thread, for an easy to build, basic design from the founder of the best teardrop building website in the world. Unlike plywood, foam is harder to bend into the rounded shapes people think of for teardrops, for easy building in foam, flat panels are the answer. If you want to build a rounded shape, read up on the foamies section of tnttt.com. There are ways to bend foam, but they are much more work.
This is the part where you need to have your walls laid out. I had a shape I wanted to make, but had to modify it slightly to fit my build into the time I had before our camping trip. I cut the floor section to the shape I wanted, then measured to have foam panels that would sit on the outside edges of the floor, and inside walls that would run between the walls.
While test fitting the walls together, the friction between the foam and wood will hold everything in place. Once you add glue, everything slips and slides like it was on ice.To keep everything stuck in place until the glue was cured I hammered stainless finish nails up through the floor along the center of where each wall should sit. I used a small drill bit to pre-drill all the holes roughly six inches apart to help locate the nails. The points of the nails stuck into the foam about and inch deep, keeping the edges of the walls from moving.
For joining foam panels together I used duct tape and bamboo skewers. Cut the bamboo off flush with the outside edge after the glue cures, it will make the joints stronger. I used the butterfly scarph joint to join foam panels to make them longer than the normal eight feet. Watch the video to see it in action
The best glue for joining foam to foam and foam to wood is gorilla glue, before applying any glue, I used the wallpaper scoring tool to put thousands of tiny holes in the foam. These little holes get dots of glue in them and act like tiny nails, holding the joints together better.
The galley wall in a teardrop is an important part of the structure, glue it in place so that the walls are square. If you are doing a galley like my design, glue the back wall onto the teardrop. Whatever design you are doing, see if the designer has a build order for parts like the roof or hatch.
Step 5: Spars


If your roof is going to be made of foam or if it will be plywood, you will probably want to have wood spars to support it. My foam teardrop will have a second story and I don't want my kids falling through so the roof is plywood, otherwise my roof would also be of two inch foam. Either way I would build with spars, as I plan on carrying boats, and other gear on the roof of the teardrop. I use 1x3 pine boards on edge as spars, even in my 6 foot wide teardrop they are plenty strong.
Each end of the spar is glued into a pocket in the foam wall and the ends are sanded smooth with the outside of the teardrop. The spars are set flush with the top of the wall, and then the roof panels sit on top of the sidewall and the spar. If you want to get fancy, a slight crown in the spar will cause the roof of the teardrop to be higher in the middle causing water to shed off to the sides better. Ensure that the sidewalls are square to the floor and the roof panels are cut square with the outside of the teardrop wall. Make sure that the spars are glued to the roof all the way across, this makes them stronger and keeps them from vibrating and damaging the foam.
I used gorilla glue to attach the spars to the foam, and built a little dam of tape around the bottom of the slot to keep the extra glue from running down the wall of the teardrop.
I waited to glue in the spars that attach to the door frame ring until after the frame ring was glued in place. The door frame ring makes the door frame the strongest part of the teardrop wall.
The very last spar is the most important as it will be the attachment point for the galley hatch hinge. On my teardrop I put two spars at this location. One will be the aft spar, and the other will be the galley hatch spar, giving me a place to attach the hinge to the galley hatch. I set them in place with a very small gap in between them, about as wide as a sawblade. To keep the spars from being glued together, I laid a plastic shopping bag in between the spars at the ends where the glue was.
For my hatch design, I left the roof off of the hath area until the hatch was cut free and the hinge was installed.
Step 6: Location, Location, Location (doors Part 1)


the doors on a teardrop are almost more complicated to make as the teardrop is. I came up with my own design that works very well, without needing much if any seals. The door should be large enough to enter and exit comfortably, just like sitting on the edge of your bed at home. It should also be located the same distance from the head of the bed as you naturally sit when getting out of bed. You don't want any scooting, crawling, or sliding involved in getting in or out.
I developed a shape and size for teardrop doors that fits me perfectly and looks nice to me. I don't like the look of a square door on a rounded teardrop, and continued the rounded door on my squaredrop. I have an old door that I use as a template to trace on the wall of the teardrop.
To find the perfect door placement, grab a tape measure and go lie down on your bed with your head on the pillow. Rotate your feet out and sit on the edge of the bed like you do to get up. You really want to just pivot on your inner cheek. Now measure how high your head is from the mattress while sitting up straight on the edge of your bed, add three for four inches and this will be how tall your door should be. Measure from the head of the bed to your closest hip, subtract four inches, this will be the forward door frame dimension. Measure from the head of the bed to your furthest hip, add four inches, this will be the aft door frame dimension.
Now measure the thickness of the mattress you will have in your teardrop, subtract two inches for compression, This will be the height of the bottom sill of the door from the floor of your teardrop.
Mark these dimensions on the wall of the teardrop, If you want to make rounded corners on the door, find and trace round objects. In my case I used a 55 gallon drum funnel. A trash can lid, saucer sled, five gallon bucket, or tire could also be used for a large radius.
Then I used a hand drywall saw to stab through the foam and cut along the lines. The top and sides will be cut with the knife square to the face of the foam. However I cut the bottom sill with a 45 degree slope that runs outwards, this is to make any water shed to the outside.
Carefully save the door blank you cut out, this will become the door.
Step 7: Doors Part 2


To give the door a good sealing surface to close against, I used the cut off edges of the floor and roof panels to make the inner door frame.
Screw the panels in place inside the teardrop, so that a set of two covers the door opening and overlaps evenly ahead and behind the door hole. Trace the door hole onto them, label where they go and remove them again.
Take a 1" piece of wood and use it to trace another line inside the one you traced. This will be the actual lip that the door shuts against. Make the lip only 1/2 inch tall along the bottom edge. Cut out each door opening along the inner line, and save the cut out section, you will need this for door latch mounting.
Glue the door frame panels in place, making sure there is as little gap at the seams as possible.
The doors on a teardrop see the most use, the most abuse, and the most stress. To make the foam of the door strong enough I added a sheet of 1/4" plywood to the outside face of each door. I will try to do my best to describe the door fabrication process, I might miss some details now as I made them a year ago. Read through this build logfacebook album and build album to catch any details I might miss here.
First you trace the foam blank onto the sheet of plywood, cut this door skin out, then establish the dimensions of your window.
Step 8: Wiley Windows (doors Part 3)


In my case I use the cheapest and best window design there is, the wiley window. Unlike expensive RV windows that either have a crank open mechanism that can be broken, or a section that slides, but still give very little ventilation, Wiley windows offer a fully opening window, and even a large opening in windblown rain. The best part is that they can be built for very little money and don't require seals to work.
I cringe when I see teardrop trailers with tiny windows, windows that don't open, or windows that stick out when open. Each of these will be a headache for the teardrop camper. The inside space of a teardrop is tiny, and ventilation is very important. Each year people die while sleeping in airtight teardrops, and even air tight tents. Your body will consume all of the oxygen inside and also pump out a ton of water vapor in the six to eight hours you are sleeping, the only way to wake up alive, and not soaked with condensation, is ventilation. A continuous flow of air in and out. Teardrops with tiny windows will need to have a roof vent with a fan installed, which requires a plug in or a battery, and a whole new mess of headaches and expense. With my large, low mounted windows I get plenty of airflow, and can see out and enjoy the breeze while lying on the mattress.
When adding windows you need to be aware of any internal door framing (I have none) and the mounted dimensions of door latches and hinges. The forward edge of the door will be the hinge side, and the aft edge will be for the latch. I use the classic teardrop door latches from vintage technologies, as they are easy to install and have the perfect design for the installation. (check Ebay for possible cheaper prices) The inside latch has a large handle that you must account for as it sticks forward a few inches. Measure in from the aft edge of the door the thickness of the door frame lip, put the inner latch assembly in place so that the latch tongue is over the line you just drew and the handle points toward the door hinges. Mark where the end of the latch handle falls, try to avoid having your window go over this line. (On one of my doors I had to bend the handle end outwards to clear the window frame) Lay your window glass on the door, and ensure there will be enough free door face for the hinges to be attached. (the window will not be centered on the door if done correctly IMO)
Around here Home depot stocks plexiglass that is nearly 1/4" thick in a precut 18x24" size for about $10, this will be the most expensive part of a wiley window. line up the plexiglass with the marks you set for window dimensions.
Measure 3/4" in from each side from the lines you traced around the window glass, this will be your actual window opening in the plywood. Use a small rounded object like a soda can to make rounded corners in the window opening. Be sure to mark the foam and plywood inside and outside faces, much of the time you are working from the back or inside face of each, any errors could cause a redo.
Bore a hole inside this last line, near the edge to allow you to start a saber saw blade. Cut out the window opening in the plywood and save the cut out.
The plywood skin onto the foam blank and pin it in place with a couple screws. trace the window hole opening onto the foam and remove the plywood face. Lay the plexiglass over the traced lines on the foam and center it, then trace the plexiglass. Now take a scrap of 1/4" plywood, place it along the edge of the pexiglass vertically and trace the outer edge on the forward and aft side. This will give you the dimensions you need for the window hole and frame in the foam. Add a 3 inches to the top of the window hole in the foam for air flow.
Cut the top and side lines in the foam with the drywall saw, holding the blade square to the face of the foam, cut the bottom of the window hole at a 45 degree angle so that the slope matches the one on the bottom of the foam door blank.
Glue the plywood face to the foam door blank with gorilla glue, I find a thin looping line that zig zags all over the plywood works best. Use the wallpaper removal tool to perforate the face of the foam being glued. While I show the window screen going in between the foam and plywood, this turned out to be a mistake. the screen allowed water to run down inside, and when one of my kids broke the screen I had to cut the whole thing out. Instead I will be adding the screen later.
Step 9: Wiley Windows 2 (doors Part 4)


I design my wiley window frames to hold the glass open 1/3 of the widest dimension. Since the actual window opening vertically will be about 18" tall this means I want the glass to tip back six inches at the top. This works out to a nice dimension as well, as I don't want the frame to extend too far into the teardrop interior. Since we have two inch thick walls, the frame will actually only intrude a little over four inches.
Take the waste piece of plywood cut out of the window hole in the plywood door skin, draw a line that crosses the widest part of the plywood just beyond the corner radiuses. Now draw a line parrallel to the first line you drew, seven inches apart. Measure up from the first line 2" and make a mark on the lh side, measure down from the second line and make a mark 2" on the rh side. Now draw a line connecting the two marks you just made.
Cut along the lines you drew and save the waste. Take the two wedge shaped sections and put them on the vertical sides of the window hole in the foam with the widest end toward the top of the door. Trim the sides of the foam hole as needed to ensure that the plywood wedges will be 90 degrees to the plywood face. Lay the window glass in between the two wedges and ensure there is enough space on either side to allow the glass to be moved easily. In use the glass will rest at the bottom of the window against the plywood face, and the top will tip in against the frame when open. Using a few drywall screws, tack the wedges to the foam temporarily.
Now take the scraps you cut off when making the wedges, measure and mark the distance between the points of the wedges, cut the scraps long enough to sit over the cut sides of the wedges.
The trick to the wiley window is that catches any water between the window frame and the glass, this causes the water to run downwards due to gravity, at the bottom of the window is a trough that captures the water and at each end of the trough is a drain hole that returns the water to the outside of the door. When the glass is in the open position there is a frame behind it that works the same way. In good weather you can remove the glass completely for a full size window opening.
Cut some 3/4" thick foam into 1/2" wide strips. Use these to make the frame that the glass will rest on when tipped open. Use another section of foam to fill the corner formed by the two wood strips connecting the window frame wedges. You will need to bevel the very top of the foam strip to allow the top strip to lie flat on the wedges.
Glue all of the pieces together as shown, and clamp as needed.
Using marine epoxy (polyester resin will eat the foam) and fiberglass tape, glue a strip of fiberglass tape to the joint between the plywood window frame brackets, plywood door face, and the foam, epoxy the cut face of the plywood around the window hole in the door face. Make sure that the joints have no leaks or air holes. Drill two larger (3/8") drain holes through the front face of the door into the ends of the window bracket trough at the bottom. Put tape over the outside end of the hole and fill the holes with More epoxy. Once cured, drill a smaller through the cured epoxy, these will be you drain tubes.
Take the window glass and trace it onto a sheet of coroplast, cut the sheet, along the lines, and place it in the window frame where the glass will. trace the plywood face window hole onto the coroplast. Cut out the window opening. The coroplast will become the screen frame.
Step 10: Final Details (doors Part 5)


test fit the doors in the door openings, sand or cut the foam away from the door frame as needed to clear the door for a good fit.
Glue a plate of plywood to the outside wall of the teardrop to space the hinge mounting points out the same width as the face of the door. Install the door hinges with the door in place in the opening. I used the nylon hinges from duckworks as the doors weight very little. On my first teardrop I found some quality stainless steel hinges that are still doing fine five years later. Marine hardware costs more, but it is actually meant to survive in the outdoors without corroding, rusting or staining. Use stainless steel or brass screws to attach the hinges, steel with rust and stain.
With the doors installed, hop inside and see how the doors seal against the face of the door frame ring. On my doors I had to sand the forward inside edge of the door to allow it to close without any binding. Try to have a fit that is just about flush with the door frame ring all the way around.
Cut a square of the waste from the door frame ring that is larger than the base of the inside door latch by a few inches. Take that square inside and locate it on the inside face of the foam so that it clears the door frame ring by 1/8". I prefer to mount my latches half way up the door and mount them so that the inside door latch is pulled downwards to release it, any inside activities on the bed are much more likely to push the handle upwards possibly leading to some embarrasement. Pulling down isn't as likely to happen by accident. This makes the outside handle release when lifted, most people will assume the trailer is locked even when it isn't.
Remove the door and glue the latch mounting block in place.
Install the door, and screw the latch to the mounting place with two diagonal screws. Using a drill that fits through the square hole in the latch assembly, drill all the way through to the outside of the trailer. Be aware that the bit can tend to tear as it comes out the outside face of the door. Remove the latch and bore a large hole back through from the outside of the door to allow the outer door handle to be installed. I believe this was 3/4", but measure the handle mechanism before you drill. I used a step drill as the handle shaft is much narrower.
Install the outside handle using the provided hardware, ensuring that it rotates freely without binding. Then slide the latch assembly over the shaft. I prefer to have my outer handle trailing aft it just looks more streamlined. Screw the latch assembly in place continuing to ensure that the outer handle can release and be pulled back in to place without binding on the inside of the door.
I use a common screen door hook latch to lock my trailer doors from the inside instead of buying the "locking" teardrop latches. They do not explain it well, but all of the outside latches lock, but only the "locking" latches have a button or slide to lock them from the inside.
Test the ability of the latch to be slammed shut, I often have to trim a tiny section of the door frame ring back to allow an easy pressure to push the latch tab back as the door is pushed shut. A taper to the face of the door frame ring can also help.
To help keep the door from leaking water inwards, I use a half round file to form a groove into the top of the door that runs down the front and back of the door to help channel any water to the bottom of the door.
Remove the door again, leaving the hinges installed on the teardrop wall, remove the door latch and outside handle.
I then radiused the out side edge of the door face plywood to allow fabric to be wrapped around the sides of the doors easier. With the door sitting on a table cut a section of fabric large enough to drape over the door and hang past the inside face of the door.
Using the methods in the poor mans fiberglass instructable, Glue the canvas to the face of the door, then wrap it down under the bottom of the door and glue it to the angled face on the bottom. Use the razor knife to slice it off even with the sides of the bottom. Starting with the forward or aft side of the door, glue the fabric to the side of the door, fold the very bottom of the side fabric and glue it over fabric on the bottom of the door, making sure it follows the channel that you cut into the side of the door. Cut the fabric where it comes to the radius at the top of the door, continue working from the bottom to the top, cutting at each point where the fabric would wrinkle, but do not do the very top face of the door until the other side is done. Ensure that each cut in the fabric overlaps the edge that will be below it, this will ensure water runs down the outside of the fabric. Do not wrap the fabric around the inside of the door, It would change how the door seals against the door frame ring.
Once the glue has cured trim the hanging fabric along the edge of the inside face of the door. Cut away the fabric covering the window, and the hole for the outside door handle.
Paint the fabric with oops paint to fill the fabric, some people like to thin this first coat with water to allow it to soak all the way to the inside of the fabric. Allow the paint to dry
Step 11: Doors Part 6
lay the door face down, cut out a section of screen as large as the window glass, lay a bead of clear silicone caulk around the window hole, centering it between the edge and the frame, lay the screen into the silicone, and then put another bead on top of the one under the screen, lay the coroplast frame on top of the screen, then lay the window glass on top of it all and put a few weights on the glass to squeeze it all flat. Putting a section of plywood under the center of the screen should help to keep it from bowing until the silicone caulk cures.
Install the door latch hardware and the door on the teardrop. Ensure that the door still clears the foam around the door opening, Ensure that you can wrap the inside of the foam in the door frame with canvas and still have the door close without interference.
Drop the window glass in place and fabricate a foam wedge or two to hold the window shut against the coroplast screen ring. Ensure that the drain holes in the window channel are still open.
If you want to have a door seal trim the foam edge of the inside face of the door back to allow the seal to be installed.
I told you doors would be involved!
Step 12: An Alternative Window


If you have read my boat instructables, Seafoam, Sawfish, or Clownfish, then you have seen my simple hatch design, that is used on all of my boats.
I start with the Gama seal lid sold in the paint department of many big hardware chains, and on line. Then I use a knife to remove the outer lip of the ring that snaps onto the top of a five gallon bucket. The remaining ring becomes a mounting ring for the screw off bucket lid.
I needed a simple window design that wouldn't intrude into the interior of the camper, and could be installed facing forward without leaking.
By adding a screen to the basic hatch design, I created a simple window. Right now the design doesn't have any clear window option, you either have an open window with a screen, or a closed window with a plastic hatch over it. Since you really only sleep inside a teardrop, a clear window isn't needed IMO. I did find that using a white bucket lid allowed enough light inside to let you know when it was daylight, while a black lid kept the inside perfectly dark.
To install this basic window, prepare the gama seal lid ring by trimming away the outer lip, try to have it be as flush as possible with the bottom of the top flange.
Trace the outside of the ring onto the area you want your window. Cut the circle out, and test fit the ring.
You want an easy fit, not too loose, but not so tight that it is a fight to get it in.
-Wrap the trailer with fabric before doing the rest of this installation.
Use the ring as a pattern to cut a section of screen that is a few inches wider in every direction. I find that fiberglass screen material is easier to work with.
Put a bead of PLpremium or silicone caulk around the lip of the hole, and lay the screen material into it.
Put another bead of caulk or adhesive on the lip of the ring, and press it all the way into the hole, pushing the screen in as you go.
I installed drywall screws into the ring to hold it in place until cured, put them deeper than the threads to avoid interference with the lid, then screwed the lid in place to keep the ring from being deformed by the curing glue.
Use a razor knife to trim away the excess screen material.
Step 13: Galley Hatch


One of the best space saving tricks of the teardrop design is having the kitchen be on the outside of the camper. While it looks nice, that long curved hatch on a teardrop is one of the biggest headaches on a teardrop. If it isn't done correctly it will leak, leaks cause rot, and rotten teardrops are nothing but problems.
An easier design is to make the galley door flat with the back end, however a flat rear end doesn't lift the galley hatch high enough to avoid bumping your head on it. Most flat rear end builders just make the door swing to the side(s), but this takes away one of the great advantages of the overhead hatch. The hatch is an instant awning, keeping leaves, needles and bugs from falling into the food prep area, keeping the sun off, and allowing you to work even in the rain.
To avoid the sealing problem, but still have an overhead hatch that will not hit my head, I made the hatch shape behind the hinge cause the hatch to be higher when open. Those of us participating in the generic foamie design thread have given our own ideas about this and Mike has modified the design to what most builders like.
The biggest trick was also to make a galley hatch design that didn't require heavy or precision seals. In my case my galley has no seals, and has never leaked.
Once the glue in the teardrop was cured, I used a chalk line to snap cut lines onto the sides of the teardrop. The cut lines on my hatch ran from in between the double spar, and the aft corner of the plywood floor.
I cut the hatch free along the chalk lines, using the drywall saw.
With the hatch removed, the back of the teardrop was a large doorway with the aft spar running across the top. Using a spar on edge as a pattern, I cut the very back of the foam wall away the exact thickness of the spar on edge, from top to bottom. Then glued the spar to the face of the galley doorway on both sides. The vertical wood spars carry the stresses from the aft spar directly down to the floor of the teardrop. To make these vertical spars have a solid attachment to the foam I used "glue bolts", anchoring the wood deep into the foam walls.
Since I don't want any water to leak into the galley through the hatch seam, I added a lip around the inside edge of the galley door frame. This lip is also made of 1x3 lumber, any water that might get through the galley hatch seam, will run into this lip and be channeled to the sides and then down to the bottom.
At the top, this lip forms a horizontal ledge, and the galley hatch spar rests on the ledge when the hatch is shut, removing any strain from the hatch hinge.
Step 14: Glue Bolts


Foam is very weak in tension, by perforating the surface you can get the glue layer to stick into the foam a bit deeper, but under serious tension loads, the foam surface will tear away anyway.
To give a better anchor to the weak foam, bore a hole into the foam a few inches deep. I prefer to use the bit extension on my drill as the foam hole boring tool. The bit holder makes a rough sided hole, which is better for anchoring.
With the hole(s) bored, insert the tip of the PLpremium tube into the hole, and pump the hole full as you let the tip push back out. You want the hole full with only a little glue bubbled over the hole. Anything you glue to this "glue bolt" will be anchored deep into the foam. As PLpremium cures it swells, anchoring it into the foam.
A row of glue bolts will anchor a door frame or other part to the foam permennantly, If you put a bolt or screw into the PLpremium it will be stuck solidly, but can be heated and removed as well.
Step 15: Galley Hatch 2


To protect the cut edges of the foam in the galley hatch I faced them with thin plywood, also anchored with glue bolts and set flush with the hatch spar face.
I prefer to use what is called the "live plastic hinge" as it doesn't leak, but there are also other metal hinges that work well, though most will leak at some point.
I added the galley hatch roof section at this point, but made it out of thin plywood instead of the thickness used on the rest of the roof, as no one should be walking on this section.
The ledge on the aft spar became the perfect place to hang the galley hatch while figuring the hinge and latch locations. The live plastic hinge is mounted to the aft and hatch spars by screws with thin aluminum strips sandwiching the plastic hinge to the wood spars.
To hold the hatch shut, I used two of the draw latches from the pop up camper I started with. I installed plywood plates near the bottom of the hatch and matching ones on the lower outside galley wall, using glue bolts.
I also added plywood plates to the inside of the hatch in the same area, then through bolted the anchor part of the latch to the hatch.
On the lower galley wall I installed plywood plates inside the galley, then through bolted the draw latches in place. The normal force of air pressure on the draw latch handles is pushing them shut while towing.
Step 16: Struts (galley Hatch 3)


To keep the hatch from falling on me while in use, I added two simple struts. Since the hatch is lightweight I don't need a gas strut to help lift the hatch. Instead I used two sections of aluminum pipe. Any wood or metal pipe or rod will do just fine, just make sure they are the same length.
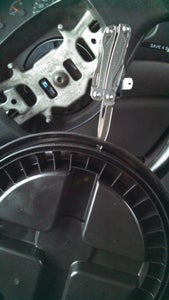
I started by getting two swivel casters to be the top strut mounts. The casters I bought had riveted wheel axles, which are harder to remove, some casters have a bolt which is easier, and gives you the perfect mounting hardware for the strut.
I removed the wheel from each caster, then drilled holes in the end of the tube that align with the axle holes in the caster, allowing the rod to swivel without binding. I had some lock pins lying around from another project, so they became the strut attachment pins, going through the strut and the axle holes.
I attached the caster base to the hatch solidly with screws in two holes, and the draw latch through bolts in the other two.
With the hatch open I found the angle I wanted the roof to sit at when open, then swung the struts forward to find where they would land on the galley frame. If you want to change the angle, you can cut the rods, or find longer ones.
I put a large screw into the galley door frame there at an angle that matched the strut angle. The lower end of the strut slides over the head of the screw and is held by it. I made sure the screw heads were set in enough to avoid the galley hatch walls when shut.
To keep the wind from lifting the hatch struts off the support screws and then dropping the hatch, I drilled through the lower end of the rods, with the holes off center. a spring clip goes through the rod and keeps the head of the screw from pulling out of the rod.
When it is time to shut the hatch, the spring clip is removed, the rods lifted off the support screws, and allowed to drop straight down, then they are swung straight in toward the center of they galley hatch. I added another plywood plate to the center of the galley hatch and put two metal pole clips there. The strut is clipped in place and then the spring clip is slipped over the tabs of the pole clip to keep the rod in place for travel.
The two struts overlap in the middle by a few feet, they also work to keep items on the lower shelf anchored in place during travel.
Step 17: Wrapping It Up


Once you are satisfied with the overall shape of the outside, and all your doors and windows are installed, remove them one last time. It is time to wrap the foam with fabric to protect it and hold everything together.
To ensure that the fabric is holding the roof and sides of the teardrop securely, it must be wrapped and glued under the edge of the floor. To make this easy, I used a trolley jack with a rubber chock on the saddle, to lift the ends of the camper body off the trailer frame. Then I set pieces of scrap wood between the body and frame, and let the end of the trailer back down onto the wood. I only needed enough space to work in between the frame and body with my fingers as I stretched the fabric into place.
For Fabric to wrap the camper you have some choices, I prefer to use the cheap drop cloth canvas sold in home centers, as it is cheaper. But some people prefer to use canvas that doesn't have a seam every four feet, and that doesn't have the pills and loose threads of the cheap canvas. This thread will give you the best tips for quality canvas fabric, without seams.
To avoid the canvas seams issue, I cut them out ahead of time, leaving me with 12x4 foot strips of canvas. I started from the back and work my way forward, one four foot wide section of the wall at a time. I wanted the seams to overlap from front to rear so they wouldn't be lifted or pulled off by airflow.
I overlapped each section by about four inches for the best possible bond between sections. Underneath the fabric was glued and stretched into place, with a few longer pieces cut to the length needed to cover the width of the plywood I didn't paint when building the floor. At the top of the walls I overlapped the fabric by 4 inches onto the roof, Once the sides were done, I covered the top with more canvas, Once this glue was cured, I used a razor knife to trim the roof fabric off flush with the outer edges of the wall.
This is the point to install the gama seal windows if you are doing them, and to install a small vent or two in for each area. It is a good idea to have a small vent in the galley, and critical for the sleeping area(s). On our camping trip last year it hit 40 F one night, so our windows were shut, thanks to the small plastic soffit vent I add to each room, we sitll had enough ventilation to not worry about a lack of oxygen.
I then removed the blocks under the teardrop the same way I put them in, then bolted the body to the trailer.
This is when I cut the wheel arches in the sidewalls. I didn't want anything in the way if I have to change a tire. To avoid any towing issues, check your bearings at the beginging of each season, inspect the tires for cracking and wear, and replace them every seven years. You don't want to be stuck in the middle of nowhere with a seized bearing or frozen lug nut. I carry a spare tire for the same reason.
I reinstalled the doors, bolted the camper to the frame, and installed my trailer lights. I just had to take the empty trailer for a spin on the road, my minivan towed it like there was nothing there.
Once the glue is cured, paint the canvas with thinned oops paint, then full strength oops paint. After all that is cured, you can finish the job with a paint scheme.
Step 18: Galley Shelf


The whole purpose of the galley is food prep and storage. For food prep you want a counter top that is at a comfortable level to work. You also want this to be strong as it will be a space used to transport cooking gear.
I added a galley shelf at a height that was comfortable for my wife to work with no issues. If you look at our actual campground set up, we back the teardrop up near the picnic table, and have the grill and stove on their own stands nearby. The picnic table did double duty as a food prep area and a place to wash and dry dishes, while the galley served as a place to store food and cooking items.
To make the shelf strong and light I glued strips of plywood to the interior of the galley using the glue bolts method. while 1/4" plywood isn't very strong, it is very strong if compressed in the wide dimension. By laminating it to the galley walls it won't have a chance of buckling, which is the only way it could fail in compression.
To support the front of the galley shelf I ran another wood spar across at the correct height to support the galley shelf, and cut pockets into the vertical door posts to anchor this cross member.
I then added support members to the vertical plywood strips at the same height as the cross member, and added some fore and aft braces to support the center of the shelf. I notched these in for added strength.
Finally I cut and fit the galley shelf, and glued and nailed it in place. The counter top is now part of the teardrop structure, making the back end of the teardrop as strong as possible without adding extra weight.
As you can see from the final pictures, we load the galley with a lot of gear, having a strong structure is very important.
Step 19: Some Really Nice Mods.


One downside to a teardrop is that you cannot stand up to get dressed inside, unless you are a midget. This is a common topic on tnttt.com. Most people just put up with the hassle of getting dressed lying on the bed, while others "hide" behind the door, or just hope people look the other way.
After sleeping in my first teardrop for a few nights a week at work, I got sick of getting dressed like that. When I converted the teardrop to a camper for two, I knew my wife wasn't going to like it one bit, so I added a side tent for each door. The side tents allow us to stand and sit just like we do while getting dressed at home. We have also taken showers inside them, used them as clothes lines, and used them to spy on wildlife visiting our campsite without spooking them. We also have a potty that stays on my wife's side, that way she doesn't have to get dressed and take a long walk in the dark at night, and any smells or spills are kept outside the teardrop.
I estimate that with the side tents in place, our private space is doubled, something that is nice when you only have a 5x6x4 space to sleep in.
I plan on adding the side tents, or a very similar idea to Mercury, and have the main design ideas worked out in my head, I just haven't had the time to do it yet.
The potty we have is a simple five gallon bucket, a luggable loo seat keeps it covered when not in use, and holds the bag in place. We use regular old small trash bags in the bucket, and add a few scoops of wood based cat litter. After each deposit we cover it with more cat litter. The wood had natural odor fighters in it, and it soaks up any liquids. In the morning we deposit the bag in a trash container.
We have a nice Zodi camping shower, which is almost as good as a real shower. It runs on the small one pound propane bottles, and four D cell batteries. We found the temperature control was no easy to control, as the pressure changes depending on how high you are holding the nozzle. This changes the flow, and the temperature.
Instead we now just drop the nozzle into the five gallon bucket and recirculate the water while we get our shower things together. In a few minutes, the five gallon bucket will have reached a comfortable temperature. We then shut off the burner and take a perfect shower. Five gallons of water is good for two and possibly three showers.
I replaced the bag the shower came in, with a five gallon bucket with a gama seal lid on it. That way it will float if it falls in the water, and we have a bucket for the water.
If we are canoe camping, we also have an instant pop up shower tent
I also have a simple garden sprayer with a shower head wand, it works fine, but I hate having to heat the water on the stove first
The simplest shower we have is really better for washing off your sandy feet, or for getting the salt off after a dip in the ocean, but could work as a real shower in a pinch, it is marketed for washing off your dog, but works just fine for everyone.
We do not go camping without our Ez-up canopy. While there are many for sale out there at cheap money, I can tell you that they will fail miserably in any wind, and even in a heavy rain. Spend the money up front on a good canopy, the commercial grade ones are actually built to last. The main point of failure on the three I had that failed, was in the X braces around the sides. Look for a central brace that goes across the middle of the canopy, with a pole sticking straight up to support the peak. If it has four folding rods that go up from each corner to support the peak, it WILL fail.
We added some screen walls to the canopy for perfect bug free eating.
A pair of zero gravity chairs make the perfect place to watch the fire, read or snooze.
I don't drink or like coffee, while my wife has become an addict, for her single cup of coffee in the morning I got her the my joe coffe maker
Since we can't bring firewood from home, and most of the wood sold at campgrounds is still wet, I gave up on wood fires. Instead we have a propane campfire, it lights instantly, goes out instantly, doesn't drop burning embers on anything, doesn't smoke us out, and provides plenty of heat. We still cook marshmallows over it, and use it to heat the coffee water in the morning.
While it is a bit large and heavy, we bring our Webber Q2000 grill, we even bring it canoe camping.
I also have a propane stove that came with the pop up camper, it appears to be a white gas stove with a conversion kit to propane, but it works fine.
We also don't go camping without our boats, and bicycles.
Step 20: On the Road
If your car doesn't have a hitch, you can find one for just about any car online. If you don't feel competent to install a hitch, local places like Uhaul will sell and install them for you, if that isn't an option, a car mechanic could do it for you. I have installed a hitch on every vehicle I've owned, myself.
Make sure you have the correct ball size for your coupler, I have a 1 7/8" trailer, and a 2" trailer, I have two different draw bars for my van, and a hitch with balls that can be changed on my car.
Inspect the hitch coupler for any loose parts. Once the trailer is hitched, and the coupler is latched, lift up on the trailer tongue until you are lifting the back of the vehicle. This checks that the coupler latch is secure on the ball.
Cross the trailer safety chains and hook them securely to your tow vehicle (TV). Don't let them drag on the road, use a bungie cord to hold them up if needed.
Do a light check, the easy way to test all the lights is to put your parking lights on and your emergency flashers, this will test the tail, turn and brake lights on the trailer.
Every time you get out of the car while towing, do a quick check of the wheel hubs, and tires. They will be warm, but over time you will be able to feel if one is too hot, indicating a potential problem.
Check the tire pressures before each trip.
When you start on a trip, get a feel for how the trailer is loaded and if the trailer wants to sway, adjust the load to stop it. A badly swaying trailer will push you around in a panic stopping condition, or coming down a hill, possibly causing a jack knife or crash.
Drive a bit slower, think ahead and plan on for stops, don't tailgate, and keep a longer following distance.
I like to find an empty road and test how my panic stops and emergency lane changes will feel at increasing speeds before I'm out in traffic.

First Prize in the
Outside Contest 2016

First Prize in the
Outdoor Structures Contest


