

Introduction: How to Build a PVC Steadicam ($14 Steadicam Redux)


Given the inconceivable challenge of improving upon such a brilliantly simple device from Mr. Chung Lee, I decided to muster up my own version, but instead it would be built out of lightweight, structural PVC.
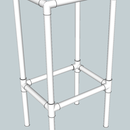
Here is how it looks. The changes I made are minor, but still functional and do add some features:
- It’s made from furniture-grade PVC & fittings from formufit.com, so I don’t need to worry about whacking one of my kids in the head with it, scratching furniture or our hardwood flooring.
- It uses sand, as the counterweight, built into the base, to counterbalance the camera.
- It has a base that will allow you to stand the camera up, when not using it.
- It can be customized with different handles and weight balances, depending upon the end user’s equipment.
Obviously this is tailored to my personal (old & cheap) video camera, and you will need to tailor it to your camera, as needed. I needed approximately two pounds to counterweight my camera, but if yours is heavier, you may want to up the weight from sand to packing it full of nuts/bolts, or even a small segment of galvanized pipe, metal pellets or another weighty substance, which I attempt to explain in more detail in the following steps.
Additionally, if your camera needs additionally stability, you can always bring out the PVC pipe segments in the base even further than the small jaunts I have.
As Mr. Chung Lee warns on his page “Improper or irresponsible use of a camera stabilizer can quickly result in the destruction of your equipment and/or injury to yourself and others. Be careful, watch where you are going, pay attention to where you are swinging your camera, and just try not to do anything stupid for your own sake.” Well said, sir.
Read on to discover the build…
Step 1: Materials - What You Need

I build the entire structure out of furniture grade PVC, as it will last longer, looks a lot nicer and doesn’t contain any lead or other heavy metals. You can certainly build it out of plumbing-grade PVC if you like, but you will need to find a few equivalent parts.
To build the basic version, here’s the list of parts you need:
PVC Parts
- Six (6) External PVC End Caps
- One (1) Internal PVC End Cap
- One (1) 1” PVC Tee
- One (1) 1” PVC 5-Way Fitting
- One (1) 10” PVC Pipe Segment
- One (1) 6” PVC Pipe Segment
- One (1) 4” PVC Pipe Segment
- Four (4) 2” PVC Pipe Segments
- Sand or other form of ballast
- One (1) 1” long 1/4” bolt
- One (1) 1/4” Hex Nut
- Two (2) 1/4” Flat Washers
- PVC Cement
- 7/16” Wrench
- Power Drill
- 1/8” Drill Bit (optional)
- 1/4” Drill Bit
- Screwdriver or Screwdriver Bit for drill
Step 2: Cut Your Pipe

- One (1) 10” PVC Pipe Segment
- One (1) 6” PVC Pipe Segment
- One (1) 4” PVC Pipe Segment
- Four (4) 2” PVC Pipe Segments
Step 3:


Using PVC cement, insert the four (4) 2” segments of PVC pipe into the four SIDE sockets of the 1” 5-Way fitting and make sure they are all the way in.
Place the four (4) external caps over the remaining sections of PVC pipe that are sticking out of the 5-Way fitting. Cement these in place as well (again, your choice).
Now you want to insert the longest of the PVC segments, the 10” PVC pipe into the TOP socket of the 5-Way fitting, cement this in place as well.
This completes the assembly of the ‘ballast reservoir’. Now lets fill it up...
Step 4: Add Your Ballast (Counterweight)


As mentioned in the intro, I used sand as a counterweight, which gets sealed perfectly inside the PVC pipe ‘Ballast Reservoir’. With this set up, it gave me about 3.2 lbs. of counterweight.
Use a funnel to pour the sand into the top of the ‘ballast reservoir’ slowly, shaking the whole unit and occasionally tapping it on a workbench, garage floor or countertop to fill in any gaps. Repeat the process until the sand comes to about 1/2” of the top of the 10” PVC pipe.
Cap the whole thing with the internal end cap, to seal up the whole reservoir. It’s probably best to use PVC cement here, as those caps don’t stay well without them, even though you will have the PVC Tee placed on top of it in a later step, which may help it stay put.
If you have a larger camera, you will obviously need heavier ballast material, which I’m sure you can be creative with. The 5-Way itself adds some heft, but some nuts/bolts, which can be packed into the ‘ballast reservoir’, might work to give you some additional weight as well.
You can also use a 8” to 10” length of 3/4” Galvanized Pipe, which can be inserted into the 10” pipe segment (perfectly) with sand pascked inside of it, and then sealed up, to give you about 2 to 3 lbs. of additional weight on top of the sand alone.
Step 5: Build the Handle


Next, we will build the handle of the unit. I’ve modeled this version after the $14 Steadicam, devised my Mr. Chung Lee, but one could build a looping handled version or any other creative method to hanging on to the whole unit (that’s what PVC pipe is for right?).
Using PVC cement, push the PVC Tee over the top of the now-capped 10” PVC pipe that is attached to the ballast reservoir. Try to line it up so it that it in between two of the 5-Way sockets (see photo), as this will stabilize it more upon setting down.
Insert the 6” PVC pipe segment into the SIDE port of the PVC Tee, and secure with PVC cement.
I chose to cap it off with an external cap, which you can cement into place using PVC cement. I used an external cap so I would be able to find the end of the pipe by feel, but you could use an internal cap to pretty it up.
Finally, to finish up the handle unit, insert the remaining 4” PVC pipe segment into the TOP of the PVC Tee and secure with PVC cement.
Step 6: Build the Camera Mount


You need to drill a hole into the center of the remaining PVC external cap. Use a 1/8” drill bit to make a starter hold, then biggen’ it up using the 1/4” drill bit.
If using a plumbing-grade PVC external cap, it may be next to impossible, as they are rounded. You could mount it in a vise, find the center of the cap, drill the 1/8” hole, then follow up with the 1/4” drill bit to finish it off, but I recommend using a furniture grade external cap from Formufit as they are flat and flush on the top. They have a spot in the exact middle where you can tell the injection molding process occurred, which makes it easy to find the center.
After your make your hole, insert a washer onto the 1/4” bolt, then insert it through the BOTTOM of the PVC external cap. Place another washer on top and then thread and tighten the 1/4” Hex bold over the whole setup as shown in the pictures.
Use a screwdriver and 7/16” wrench to tighten up the whole works. Very tight. Like, real tight. I recommend a little Loc-Tite on the threads, if you have some lying around.
Step 7: Mount...the Mount.


For your final step in the build, using PVC cement, push the Camera Mount end cap over the 4” PVC pipe that is attached to the top of the already-built assembly.
Your Steadicam is complete! Simply attach your cameras threaded tripod socket to 1/4” bolt and tighten. Use the 7/16” wrench to secure everything if it moves on you.
Step 8: Now Film! With Steadiness!
Now you are ready to film with the steadiness of a butterfly! No longer will your videos have the bumpiness of a nervous schoolboy, but will appear to flow and ooze as you move about.
The best method to hold the unit (I have found) is the place your left hand under the PVC Tee, with your middle finger just under the right hand socket, and your index finger on the actual socket of the PVC Tee. Place your right hand over the external end cap of the far end of the handle to keep your camera targeted.
You really need to practice and get the feel of the stabilizer and understand how it works for you, in combination with your arms, legs and hands. Once you do, you will learn how to properly ‘glide’ with the unit and produce some fantastic effects.
As mentioned above, this is a ‘PVC version overture’ of sorts to the original publishing of Johnny Chung Lee’s information and I don’t take any credit for his original achievements, but instead offer a material alternative. You can thank him (and others) for coming up with the basic design and conecpt. Give credit where credit is due.


