

Introduction: How to Make a Cryptex


Hi everyone!
In this instructable I'm gonna show you how to make a Cryptex; a kind of box locked by a password, that contains a roll of paper full of secret messages. Like every other invention created by Leonardo da Vinci, this is a fantastic object that it's based on a simple yet enchanting mechanism.
A couple of months ago I saw "The Da Vinci Code" film and I started wondering how to make the cryptex. I looked some guides here on Instructables.com , and I decided to follow merijnvw's guide and Random_Canadian's guide. (I suggest you to check them out if you want to learn more about the history of the cryptex or if you want to make one out of cardboard)
Since I was not able to find the needed materials, I changed the process in order to create it using the materials that I had laying around deciding to publish this instructable.
Follow this guide to understand how to make it using just scrap pieces of wood, 20cm of pvc pipe, and 4 small bolts.
Step 1: Materials & Tools


MATERIALS:
- 10cm of pvc pipe (2,5cm diameter)
- 10cm of pvc pipe (2,2cm diameter)
- 4 small bolts
- scrap pieces of wood (thickness 1,5cm and 0,4cm)
TOOLS:
- drill and drill bits
- hole saws
- file
- sandpaper
- glue
Step 2: The Options


Once you understand the mechanism of the cryptex, you can make it in lots of different ways.
In this step I'll show you a couple of options for the scrolling digits and for the inner tube that contains the roll of paper.
In the 1st pictureyou can see on the left merijnvw's option, and on the right my option.
While he used two pieces of pvc pipe glued together, I decided to divide each digit of the code in two pieces. The thinner ones are glued on the bigger pvc pipe while the bigger ones are just inserted between two glued small discs and are free to scroll over the bigger pvc pipe.
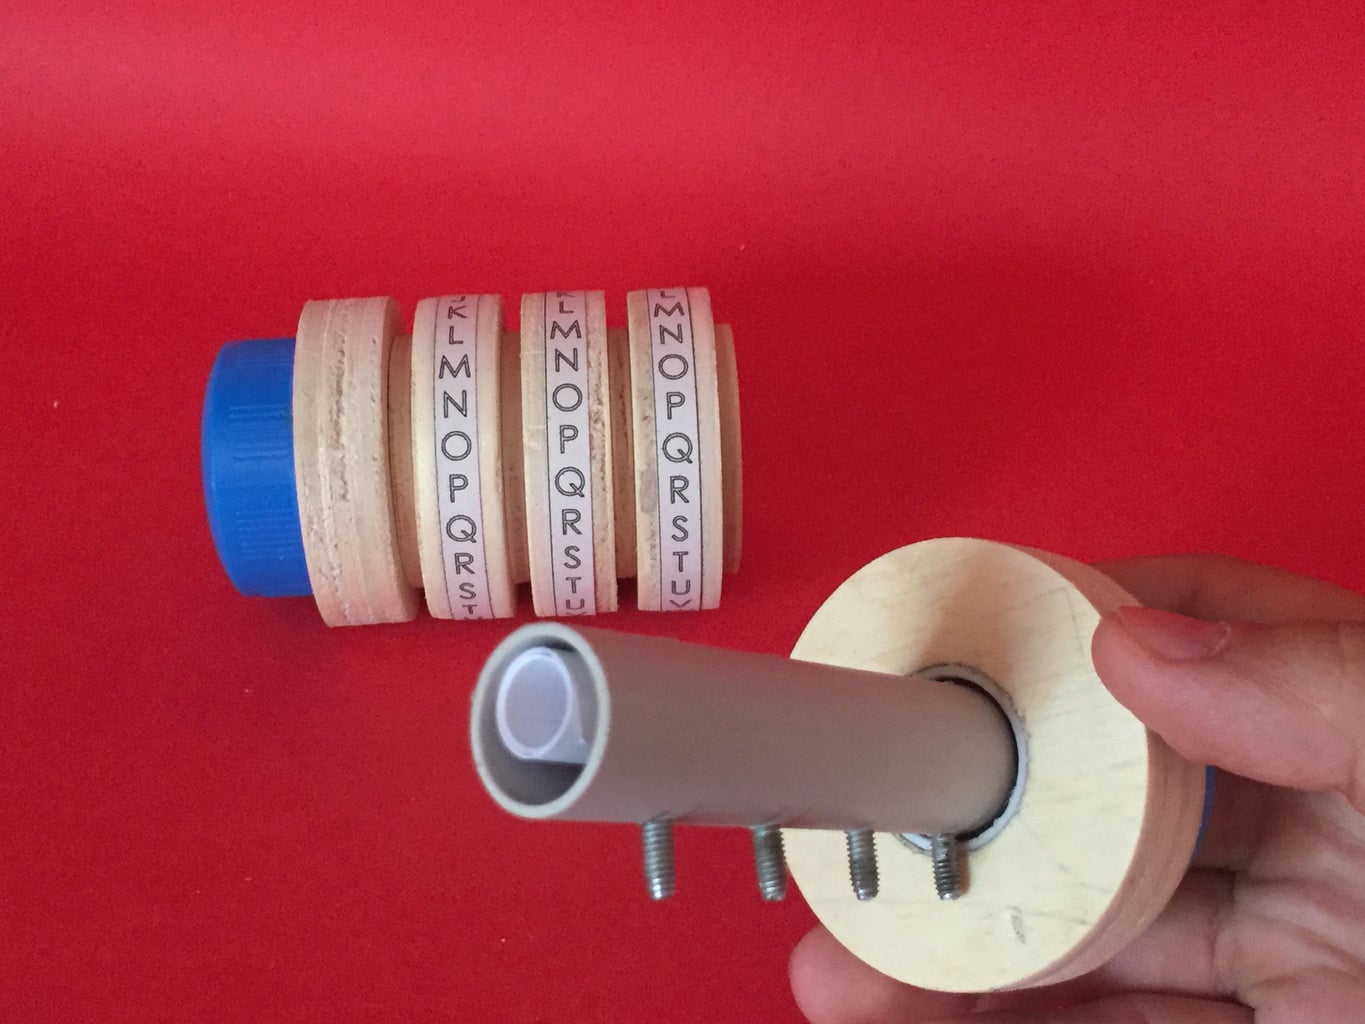
In the 2nd picture instead, you can see two options for the inner tube.
You could use a cap to close the hole on the end of the tube, and you could create a long hole on the side (as in the left of the picture) or you could just insert the roll of paper in the tube from the bottom (right option of the 2nd picture).
In the following steps of this instructable I'll show you the "right option" of both pictures.
Step 3: Cut All the Pieces


Let's start by cutting all the needed pieces using different sizes of hole saws.
If the code of your cryptex will have 3 digits like mine, you will need 5 pieces thick 1,5cm (3 for the digits and 2 as cap on each end), and 4 pieces needed as digits-dividers thick 0,4cm.
I cut the 5 pieces with a hole saw of 6cm of diameter, and the 4 thinner discs with a 4,5cm of diameter hole saw. I suggest you to insert a long bolt through all the pieces, and to sand all of them at the same time using a drill and a piece of sandpaper like in the 2nd picture.
Finally, each of the 9 pieces must have a 2,5cm hole in the center, in order to insert each of them over the bigger pvc pipe.
(Obviously you can change the dimensions (specially the diameter) of the discs based on the materials that you have, but the important thing is that the dividers must be thick just as the small bolts that we will use in Step10)
Step 4: Mark the Groove on the PVC Pipe


The bigger pvc pipe must have a groove.
In order to make it you just have to insert all of the wooden discs (except for a bigger one) on the pvc pipe. Mark the needed length for that pipe (photo#2). Then remove all the discs saving the first one (photo#3) and make another mark under it.
Finally mark two lines in parallel to the pipe to complete the groove (photo#3).
Step 5: Create the Groove


In order to cut this groove you could use a dremel, or you could drill several holes along the marked spot.
Since I bought a router I decided to use it to create a perfect straight line with almost no effort. So I screwed together some pieces of scrap wood (really scraps) and I created a quick jig to secure the pipe in place and to create the groove using the router parallel fence.
As you can see in the 2nd picture I also screwed down the pipe to secure it better on the jig.
Finally you can cut the tube at the right length obtaining what you can see in the 1st picture.
Step 6: Mark the Groove on the Wooden Pieces


Now it's time to mark the groove on all the wooden discs except for two bigger ones which, since they will act as caps, they don't need to have the groove.
First of all I inserted all the wooden discs on the bigger pvc pipe, and I made a mark on the inside following the groove of the pipe (photo#2).
In order to mark the same spot on each piece, I created a quick paper template.
Then I drilled a hole in all the pieces using a 3,5mm drill bit (which is a little bigger then the small bolts used in Step10).
Step 7: Create the Groove


Once you have the hole, you just need to use a file to extend it creating the groove.
I suggest you to clamp the pieces on a vise in order to work on them more precisely.
Step 8: Mark the Position for the Bolts


Now we can start to work on the smaller pvc pipe marking the position for the bolt.
Insert it in the bigger pipe, and make a mark along its groove.
Add a 0,4cm disc, and make an horizontal mark (photo#4). Then repeat this step alternating a 0,4cm disc with a 1,5cm one.
At the end of this process you should obtain 4 marks that will help you to drill the holes for the small bolts in the right position.
As you can see in the last picture, in order to check that everything is correct, you can place the small tube side by side to the wooden discs. If the marked squares coincide to the 0,4cm discs you made everything right.
Step 9: Drill the PVC Pipe


Use a 3,2cm drill bit to make 4 holes in the center of the marked squares on both sides of the pipe as in the 2nd picture.
Then use bigger drill bits to enlarge the holes just on one side of the pvc pipe until you reach the dimension of the bolt's head (photo#4).
Step 10: Insert the Small Bolts


Use a screwdriver to secure the 4 bolts on the pvc pipe.
Be sure to screw them as straight as possible (photo#2,3).
Again, in order to check that everything is correct, you can place the tube side by side to the wooden discs. If the bolts coincide to the gaps created by the 0,4cm discs, you made everything correctly.
Step 11: Start to Assemble It


Finally it's time to assemble the body of the cryptex.
Since we are gluing together different materials, I suggest you two things: first of all use super glue or epoxy, and then use a x-acto knife to make scratches that will improve the adherence between the pieces.
Start by gluing the 1,5cm disc (the one without the groove) to the bigger tube (photo#2,3).
Then glue a 0,4cm disc (repeating the scratching process photo#4,5). Place the groove centered with the groove in the pvc pipe and wait for a couple of minutes in order to allow the glue to dry properly.
Insert a 1,5cm disc (with the groove) without gluing it, and then glue another 0,4cm disc.
Repeat this process until you reach the end of the pvc pipe. At this moment you should get the body of the cryptex(photo#1). If you shake it you should not hear any noise, and all the 3 non-glued discs should rotate freely in their place without too much effort.
Step 12: Finish to Assemble It


To complete the cryptex, we need to assemble the remaining parts that will act as container for the roll of paper.
(I should have drilled the hole on the wooden disc as big as the smaller tube. Unfortunately I don't have a hole saw small enough so I had to use the same hole saw used for all the other inside holes filling the gap with insulated tape and a piece of the bigger pipe. Also, the smaller pvc pipe that I used, should have fit tightly inside the bigger pipe. Example: if the inside diameter of the bigger pipe is 2cm, the outer diameter of the smaller pipe should be 1,8/1,9cm. But as I said in the intro, I decidet to challenge myself building a cryptex using just what I already had, without buying anything.)
Step 13: Paint It?


At this moment we have a functional cryptex.
You can free your creativity deciding to paint everything with your favourite color, or maybe each disc with a different color or...why not? Give it a couple of hands of clear protective paint as I did.
Do whatever you want but be sure that the three "digits discs" can be rotated in their place without too much effort.
Step 14: Decorate It


I decorated it applying a couple of hands of clear protective paint, and then I glued a blue plastic cap on each side.
Finally I printed the alphabet on 3 stripes that I glued to the central discs.
In order to set the code you have to align all the grooves looking into the hole of the main body of the cryptex. Then you just have to mark a light line (photo#4), on which you will glue the correct letter (letter A in photo#5).
P.S. Here below you can find the alphabet that I used made by Random_Canadian. You just have to print it at the right size or, more simply, you could just write the letters/symbols by hand.
Attachments

Step 15: Hide Your Secret

As last thing, write your secret on a roll of paper, insert it in the smaller pvc pipe, and close the cryptex by rotating the 3 digits.
I hope that you liked this ible! If so, don't forget to check my other ones.
Thank you for reading my Instructable. ;)
Feel free to comment and ask if you need to know something!
manuelmasc

Participated in the
Wood Contest 2016

Participated in the
Wizarding Contest


