

Introduction: How to Make a Reclaimed Wood Buffet


HOW TO MAKE A RECLAIMED WOOD BUFFET
Video Walk-thru and Tutorial
In this build I walk you through the steps I personally use to make reclaimed wood furniture. I take barn wood siding and timber from a reclaimed building in Pittsburgh, and mill it into this beauty of a piece. Im extremely excited with how it turned out and I hope you enjoy this video. If you want to build something similar you may need a few speciality tools, I have listed my recommendations below. I also have a few links to the products I use in the video. Video link is after the walk through! Enjoy!!!
Suggested Tools
Table Saw
Makita Sub-Compact Drill and Driver
Finish
Step 1: Mill Stock and Glue Up Panels


Mill up your stock for the ENTIRE project (at least to something close to S4) and then glue up panels.
Step 2: Cut Leg and Stretcher Stock, Lay Out and Mark Joinery


Joint and plane your stock down to final dimensions for your face and leg stock. Then go ahead and layout your carcass face frame. Mark and label your joinery for step 3
Step 3: Cut Joinery and Rabbet Rails and Styles


Cut all of your joinery. I use a Festool Domino XL, I recommend using some sort of tenon joinery. Tongue and groove or a floating tenon would be perfect
Step 4: Cut Panels to Final Dimensions


Cut all your panels down to final dimensions and then pre stain them.
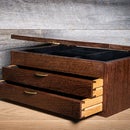
Step 5: Assemble Panels and Carcass


Glue up your carcass in stages. Starting with the sides and the the back, bottom, and front.
Step 6: Cut Doors and Drawer Parts


Once the carcass is assembled measure for your door width and drawer box size. I used 1/2" material for the drawer sides and bottom. With finger joints and ball bearing drawer slides. Measure your box 1" shorter than your opening. I measure for 4 doors and cut all my rails, styles, and panels. I use tongue and groove joinery on the table saw. The grooves are cut by flipping the rails and styles and running them over the standard saw blade at 1/8" depth and the tongues are cut with a mitre gauge.
Step 7: Assemble Door Panels and Cut Raised Panel


Assemble your interior panels for your door. I choose a shaker stye so I wanted a flat door. In order to make it nice and ridged, i made my doors a raised panel. Then i reversed them, so the flat side was forward. I cut these on the table saw as well taking small cuts with the blade angled at 12 or so degrees.
Step 8: Pre- Stain and Assemble Doors


Here you want to sand your panels to 220 grit, and then pre stain them before assembling your doors. Insert spacer balls into your doors, and use glue on all the tongues. I use 23g 5/8" pin nails to secure my doors from the back.
Step 9: Assemble Drawers

Using whatever methodology you prefer, assemble your drawer. Making sure to leave clearance on the top and bottom for your slides. I used ball bearing side mounted slides, they need 1" of extra space to glide smoothly. I used finger joints and an inset panel for my drawer boxes. Clamp them up, and once they dry sand them down.
Step 10: Cut Trim Molding and Final Stain


Rip all your boards for the skirt and use a router table or a shaper to cut your molding. I used a 1/2" cove molding for my baseboard and my top trim. Cut your mitres and attach with glue and pin nails (23g). Once assembles finish sand and apply your final stain.
Step 11: Apply Finish
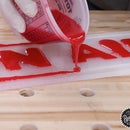
At this step I apply the final finish using my Earlax 5500 sprayer. I use a high build, self sealing, Endurovar product from General Finishes. Check out my reclaimed wood finish video for my tips on how to finish reclaimed wood here. I finish all the parts before assembly.
Step 12: Final Assembly


To assemble the final piece I use my KREG Cabinet Hardware Kit and drill the holes for my european hinges. I mount my doors then insert my drawers and add the face, and thats a wrap!

Participated in the
Woodworking Contest 2017


