

Introduction: How to Make a Simple C Program in Ubuntu Linux
Computer programming is a skill that is becoming more in demand everyday. Students are beginning to learn computer programming skills as early as elementary school in some areas. In other areas of the world, students do not begin to learn computer programming until their undergraduate years in college. This puts some students at a disadvantage because their schools did not offer programming.
This tutorial will teach you how to make a simple C project in Ubuntu Linux. It is for people who do not have experience using Ubuntu Linux and C programming. It will guide you through software installation, navigating the terminal in Ubuntu, and compiling and executing a basic C project. At the end of this tutorial, you should be able to create your own basic C project.
Step 1: Install VirtualBox Onto Your Computer
VirtualBox is a product by Oracle that allows you to run a virtual machine on your computer which means you can run Linux on your Windows or Apple machine.
Go to https://www.virtualbox.org/wiki/Downloads and download the proper version for your operating system. After downloading and installing VirtualBox from the website to your computer, restart your computer.
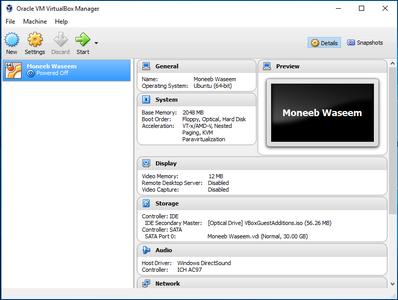
Step 2: Create a New Virtual Machine


Press the "New" button to create a new Virtual Machine. This will pop-up a window that will allow you to give a name to the Virtual Machine and select what type of operating system the Virtual Machine will be running. In this case you will be selecting Linux and Ubuntu 64 bit and press "Next".
Once you have selected the Virtual Machine type and press "Next", you will be taken to a window where it will prompt you to enter in the amount of RAM allocated to the Virtual Machine. Feel free to give you machine as much RAM as you would like and press "Next".
Now you will be asked if you would like to create a virtual hard drive. Select "Create a virtual hard disk now" and click "create". After creating the hard disk, you will now be able to run Ubuntu on Linux through your Virtual Machine.
Step 3: Navigate Through Ubuntu Terminal and Create Project Location
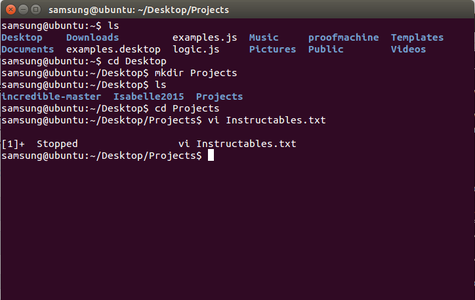
The first step in creating a C project is to create a location for the project. In order to do this you must be familiar with navigating through directories using the terminal and creating files using the terminal. The commands in the picture above are used to create a folder on the Desktop called "Projects". It then navigates into the folder "Projects" and creates a text file called "Instructables.c". This is the file that will be used to create the C project.
It is important to understand what the commands in the terminal are doing. Here is a breakdown of the commands that are used to create the "Instructables.txt" file and its location:
- ls - Used to show the folders and files in the current directory
- cd - Used to navigate into a folder or directory that is in the current directory
- mkdir - Used to create a new directory in the current directory
- vi "filename.txt" - Used to create a text file with whatever name you give it in the text editor "Vi"
Step 4: Write Your C Project in the Text Editor
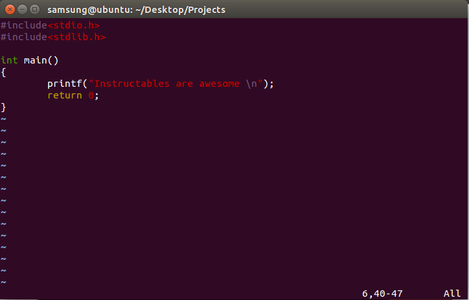
Above you can find the code for a simple C. When this project is compiled and run, it displays a text that says "Instructables are awesome!". It is important to understand what each of the lines in the code do. By understanding these few lines, you are given a small knowledge of how to create a C program. Here are what each of the lines of code in the project do:
- the command #include tells the compiler to include all the functions from the file "stdio.h"
- the command #include tells the compiler to include all the functions from the file "stdlib.h"
- int main() is the main function of the program. This is where all of the functions and instructions that are supposed to be done are put. Curly brackets are required at the beginning and end of the function.
- The "printf()" function is used to print text to the terminal. Whatever text is put in quotation marks is outputted to the terminal. The "\n" at the end of the text is used to create a new line.
- Since the main() function is of the type "int" you must return a value. By using "return 0" you are showing that the function is complete.
In order to write in the text editor, you must press "i". When you are done typing, you press the "esc" button. To quit and save the text editor you type ":wq" and then press enter.
Step 5: Compile and Run Your Project

In order to run a C project, you must compile it to make an executable. One you have the executable file you can then run the program. Before you compile your C project, you must make sure that there is a C compiler installed on your system. In order to do this, you can run the following commands from the terminal:
- sudo apt-get update
- sudo apt-get upgrade
- sudo apt-get install build-essential
- gcc -v
- make -v
Once you have run these commands, you will have the C compiler called "gcc" installed on your computer. In order to compile and create the executable file, run the command "gcc -o Instructables Instructables.c". This command is going to create an executable file called "Instructables". Now to run this file, run the command "./Instructables".
Congratulations! You've created your first C program! You now know the basic building blocks of creating, running, and executing a C program through the terminal on Ubuntu.
Step 6: Shutting Down the Virtual Machine


It is important that you make sure you properly shut down the Virtual Machine. If the Virtual Machine is not shut down properly documents and configurations can be lost. In order to properly shut down the Virtual Machine, press the "Machine" tab in the task bar. Then when asked what to do, press the "shut down" button


