

Introduction: How to Marker Render


Here I will show you how to create a simple marker rendering that can be used for design presentation boards. The principals in the tutorial can be used for any object/shapes.
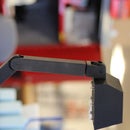
Step 1: The Object and Fine Lining


First you will need to start by drawing out the object you wish to render as an example i did a bicycle bottle cage and holder. After this you will need to go around and add a fine line on all of the lines in your drawing using a fine liner. For the second stage you may want to get a thicker fine liner and go over certain lines to add depth to the drawing. As a rule I would only use a thicker line if a spider can crawl behind the object and not be seen.
Step 2: Adding Block Colour and Gradients


I would recommend adding block first as you can build on this to achieve different tones. I started off by adding down a light layer of orange to the arrow and also a layer of red and grey to the bottle cage. To get a gradient or colour merge of two different colours as shown above i would choose the more dominant colour and add a broken spotty pattern to achieve the diffusal of colour. If you are unsure what i mean take a look at the second picture as shown above. Now for any reseeded or darker areas. Take a dark colour such as a dark gray and cover these area with the colour. You may want to select an even darker colour to go over places that may have shadows. Take a look at the final picture of this step.
Step 3: Finishing the Rendering


For any object that doesn't have a bright colour i would recommend picking a light or washed out grey to colour this object as it lifts the product off the page as the brighter colours in the foreground appear closer to the viewer. I would now recommend cutting the rendering out and gluing it onto a new sheet of paper to remove an edges that have bleed and to make the rendering seem crisp against the paper background.

Participated in the
Makerspace Contest


