

Introduction: How to Program a Servo With Arduino


Hi everyone and first of all I want to say that...
I have a YouTube channel!
And my first video is about programming servos(I think it's obvious). Well this is a very simple project for arduino beginners (anyway it's more difficult than LEDs projects) and I wanted to make a tutorial about it so that beginners know how to program a servo and more people get interested in arduino.
Step 1: Video!
First of all I recommend you to watch the video. Please remember to subscribe, I know it's a small channel but remember it's new and I know that with your help it will grow up really quickly.
Here's the link:
Step 2: Materials
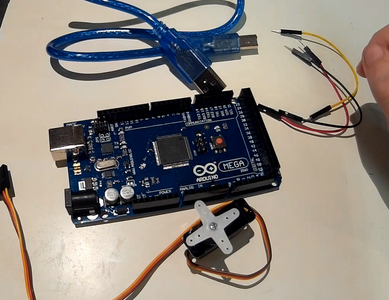


You'll need:
-An Arduino board
-A servo
-3 jumper wires
-A-B USB cable
-Your computer with the arduino software
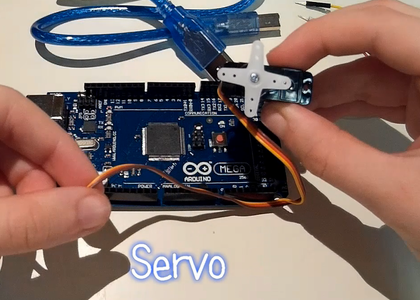
Step 3: Prepare the Servo

First of all take your servo and the jumper wires and connect them to it so that you can connect the servo to the arduino. I'm connecting wires of the same colour so that I won't get confused later. In my case(and in most sevos) the colour code of the wires is:
Yellow:signal
Red: for the 5 volts
Black/Brown:ground
Step 4: Connect the Servo to the Arduino Board
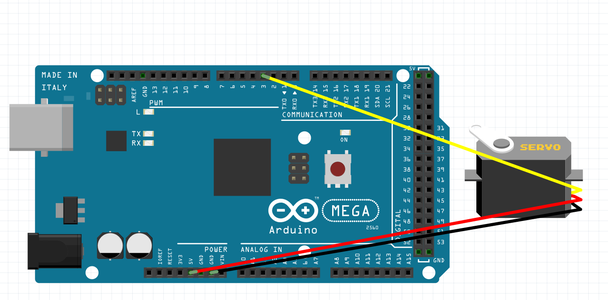


Now connect your servo to the arduino. Connect the yellow wire to a digital pin(in my case 3), then connect the red wire to the 5 volts and the black wire to the GND. Then take the USB cable and connect it to your computer.
Step 5: The Code

Here's the code. There's a small explanation of it in the video.
#include
int servoPin=3;
Servo Servo1;
void setup(){
Servo1.attach(servoPin);
}
void loop(){
Servo1.write(0);
delay(2000);
Servo1.write(45);
delay(1000);
Servo1.write(90);
delay(1000);
Servo1.write(180);
delay(1000);
}
Step 6: Program Your Own Servo!

Now you know how to program a servo!

Participated in the
Digital Life 101 Challenge

Participated in the
Full Spectrum Laser Contest 2016


