

Introduction: How to Take a Wholesome Picture and Make It Creepy in Photoshop


Everyone has a dark side of their mind but most never show it. If you are one of those that like to express this once in a while I have included step by step instructions on how to take your own wholesome photos and creep-ify them out.
Preparations:
- 1 wholesome picture
- any additional photos that you would need to portray your creepy imagination (wholesome or not)
- Photoshop (I use CS 5 but these techniques should be accessible in any CS version)
Throughout this tutorial I will be using terminology frequently used within editing programs, other tutorials, and the design world. I will list the words you need to know below with their description to help you. I will also place the definitions in the steps they apply to.
- canvas: the canvas is the area that you will be working in. When you start working on a project chances are you will open several pictures. Instead of referring to each picture in individual files the programs create 1 canvas and opens all of the pictures into that one location.
- layer: these are the individual pieces of your canvas. Each photo will be 1 layer. Layers will appear in the order they are listed. The best way to look at a layer is to compare it to a cake. When you look at a chocolate cake you see the frosting and fun designs but underneath you know there are other layers of ingredients. You may only see the finished outside but each layer within is necessary to arrive at your final project.
- mask: masking is a term used when you hide aspects of the canvas. Imagine a mask that you would wear on Halloween. It will cover up the areas you don't want to be seen.
- opacity: opacity is just another way of referring to transparency. The lower the opacity the higher the transparency.
NOTE: if using pictures that are not your own please ask for permission.
Helpful Tip: I recommend being somewhat familiar with Photoshop for this project.
Helpful Tip: name your photos appropriately! img_1054xy32.jpg is confusing and will make your life miserable.
Helpful Tip: have a game plan for what you are going to make before searching for photos. It is much easier to accomplish your goal when you have a solid plan.
Optional Tip: I used a WACOM INTUOS 4 pen tablet to help with certain aspects of this tutorial. It is very helpful and if you are looking to pick one up visit WACOM to look at their products.
Step 1: Setting Up Your Canvas


When working on projects I recommend always 'pre-creating' your project. I recommend having all of your photos and your design or layout already thought out.
Preparations:
- all of your photos named and ready to use
- your idea already thought out
Instructions:
1. Roughly figure out how much space you are going to use for your project.
2. Create a 'new' project from the 'file' drop menu.
3. 'Place' all of your photos you will be using onto your canvas from the 'file' drop menu. (image 1)
4. Arrange your photos to the approximate location where they will be used. (image 2)
5. MAKE SURE YOUR DOCUMENT IS IN THE RIGHT RESOLUTION. 300 DPI is the standard for printing. You can check this in your 'image' drop menu under the 'image size' button. (image 3)
Helpful Tip: if you are going to be printing your project make sure that you create your file in a size format that is typical. 8.5" x 11" or 11" x 17" are usually what I recommend.
Helpful Tip: start renaming your layers now. If you place a photo make sure it is named something accurate to what it actually is. You will most likely end up with several layers and it can get confusing very quick.
Step 2: Start the Selection Process


When working with photos you are most likely only interested in certain features or aspects of each photo. Your first task is to select the parts that you want to use and discard the rest.
Instructions:
1. 'Mask' or 'select' the parts of the photos you wish to use. (image 1)
2. Make sure your photos are on individual layers. (image 2)
3. Make sure the arrangement of the photos are exactly how you want them. (image 1)
Helpful Tip: I am a fan of the 'mask' feature. Especially for beginners it removes a large chance of frustrating mistakes by keeping the whole picture intact.
Helpful Tip: if some of your photos are surrounded by 'white' space use your favorite 'selection' tool and just delete the 'white' space. It is quicker than masking and easy to redo if mistakes are made.
Step 3: Add the 'dark Strokes' Filter


The next step is to add the dark strokes filter to all of your pictures. The reason to apply the filter to all of them is to keep a uniform appearance. Since none of the pictures were originally together this will help 'blend' them.
Instructions:
1. Apply the 'dark strokes' filter to every picture. You can find this by going to the 'filter' drop menu and then selecting the 'brush strokes' menu. Then select 'dark strokes.' (all images)
Optional Tip: you don't have to use the dark strokes filter. You can technically use any filter you want and you will still be able to follow these instructions. It is a matter of preference.
Step 4: Start the Shadowing Process


This is probably the most important aspect of the entire project because this will really solidify the uniformity of the piece. The shadows help make the pictures feel like they belong together. When shadowing be sure to remember everything that would cast a shadow. Areas often forgotten are places on the actual image (body parts such as arms, legs, necks, etc. or small details in walls, nature scenes, etc.).
Instructions:
1. Create a new layer and name it appropriately. This will be your shadowing layer. (image 1)
2. Find your 'brush' tool and make sure the color is black for shadowing. (image 2)
3. Change the opacity of the brush to roughly 10%. The reason behind this is that you will be able to create all levels of the shadows. Not every shadow is pitch black. Shadows usually taper out. (image 3)
4. Adjust the brush to the appropriate size for each object.
5. Shadow each object. (image 4 & 5)
Helpful Tip: if you accidentally shadow in the wrong spot or you made the shadows too dark always remember you can use the eraser tool. This is why it is on its own layer.
Step 5: Change Some 'blending' Modes


With your images placed and shadowed it is time to start with some of your finishing touches. The first step we will do is to change some 'blending' modes. If you placed some creepy photos on top of others experiment with different blending modes to get different effects.
Instructions:
1. Select the layer you want to change.
2. Change the blending mode. (all images)
3. Repeat as necessary.
Helpful Tip: sometimes it helps to copy the layer you want to edit and then change the blending mode of the copied layer. This will give you more options for different effects.
Step 6: Final Touches


This last step is completely optional but recommended. We will now start with the fine tuning and detailing. Start looking for small mistakes or areas that could be improved and fix them.
Instructions:
You can complete any of the following or even find your own techniques.
- fine tune your shadowing.
- adjust any masking that might be off.
- add any objects or effects that you haven't already done.
- etc.
Helpful Tip: if you feel that your image isn't how you want it tweak with it until you get it the way you want it. You will eventually get the desired results.
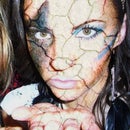
Step 7: Finished Product

Congratulations! You have now taken wholesome photos and made them creepy. They are definitely fun for Halloween and gag gifts.

Participated in the
Halloween Decorations Challenge


