

Introduction: How to Build a Modern Mailbox


If you have any specific questions let me know. Please be aware that ALL my instructables are uploaded and published over App, so forgive any errors you may see.
About this project: Our old mailbox was in dire need of retiring. The post was was falling apart and I had to constantly prop the mailbox up with rocks. It just had to go. Here are the materials and tools I used:
1/2" plywood
My old redwood fence siding, ripped in half
Galvanized sheet of metal.
Left over IPE wood
Left over treated wood
Left over redwood board
Hinges
Galvanized pipe
Exterior clear varnish
Wood Glue
Exterior screws
TOOLS:
Chop Saw
Drill
Rubber mallet
Table saw
Step 1: The Old Mail Box

Here it is. Sad. Sagging in solitude. The post is rotted and the box is so boring. Your days are numbered my friend. It is paramount to get the standard mailbox sizes and how high and how far from the curb it should be.
Both can be found here: http://www.medfordmailboxshop.com/merchant/pages/guide/mailbox-sizes.htm
and here: https://www.usps.com/manage/know-mailbox-guidelines.htm
Our house is mid century modern (flat roof, singles and plenty of glass windows) and I wanted a mailbox that had the same look and feel. So in my head I knew I wanted to mix wood textures, add some metal with a dash of color.
Step 2: Cutting the Plywood to Size.


I was inspired by this mailbox http://design-milk.com/installing-a-modern-mailbox/ ... but I just did not want to pay through the nose when I knew I could make it myself. With the inspiration in mind, I cut down the 1/4 plywood in a rectangular shape with slopping/tapering sides to give it a mid-century vibe . The base and back and 'floor" of the mailbox is a left over redwood board I had laying around. Screwed all of them together using 1.5" galvanized exterior screws.
Step 3: Design # 1. No Bueno!


The next step was to get this box completely wrapped up in an aluminum sheet. After laying the box on the aluminum sheet, I traced all the sides and began the tedious work of cutting the sheet down to size without committing any errors. Errors meant I had to go buy a new sheet and start again. I used liquid nails and 1/4" screws to attach the aluminum sheeting to the plywood body. And although technically this project could be all done and the look of this mailbox version is closer to the inspiration and has that old school riveted airplanes of the 50's ... I just was not happy with the look. It was just too shinny. Too much metal for my taste. Also, please note I failed to document the IPE front door. This was a left over 1" by 6" IPE board I had. I wanted a thinner door so 1" board was never going to work. Using my table saw I ripped the IPE board in half which yielded 3/8" boards. I then passed them over my small jointer to get a clean edge and glued them together. The hinges are ace and the door knob is a left over nob I got from IKEA.
Step 4: Design #2: the Winner


I finally settled on a new design where the body of the mailbox would get wood siding and the "rooftop" would get that metal touch I wanted. In many ways the mailbox was to become a shrunken mid-century home. So, I ripped the aluminum sheeting off and started from scratch.
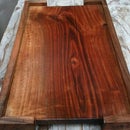
For the siding I used weathered redwood siding that came from our replaced fence. The boards were too thick so I set my fence to 0.25" and raised my table saw 4", thus ripping the boards in half with two passes. I painted the redwood and ipe front door with outdoor varnish. 2 to 3 coats should do the trick. The red colors became instantly vivid. Screwed the base and ipe door to the body of the mailbox. Then I glued the siding and secured them with finishing nails. Finally I trimmed the excess siding protruding from the tapering sides.
For the siding I used weathered redwood siding that came from our replaced fence. The boards were too thick so I set my fence to 0.25" and raised my table saw 4", thus ripping the boards in half with two passes. I painted the redwood and ipe front door with outdoor varnish. 2 to 3 coats should do the trick. The red colors became instantly vivid. Screwed the base and ipe door to the body of the mailbox. Then I glued the siding and secured them with finishing nails. Finally I trimmed the excess siding protruding from the tapering sides.
Step 5: The Numbers & the Red Flag


I bought the numbers and red flag from a local hardware store for about $25.00. No instructions included though. I lined them up on paper and poked the hole through. I then used the template to transfer the holes on the mailbox, drilled pilot holes for the screws and dropped silicon beads in the holes. Then using a rubber mallet, I tapped the numbers into place.
The red flag kit was designed for a thinner mailbox. So I drilled through it, used a stainless steel machine screw and washer & wing nut to secure it in place from the inside.
The red flag kit was designed for a thinner mailbox. So I drilled through it, used a stainless steel machine screw and washer & wing nut to secure it in place from the inside.
Step 6: Front and Back Trim


The back and front were still exposed to the elements so I cut redwood siding to fit, glued and nailed.
Step 7: Galvanized Rooftop


WARNING: Wear Your Gloves when working with galvanized sheeting, it can be very dangerous.
I bought a sheet of galvanized metal, set the mailbox upside down, marked the measurements and added about 1.5 inch all around to allow for screwing down. I snipped the corners so that they can fold over each other (crucial for weather proofing). Then using my rubber mallet and scrap of wood I gently hammered the sheet to submission. Finally using a metal rasp to smooth the edges of the cut metal to so that is not as sharp. Rooftop was secured with pan-head exterior screw evenly spaced. Almost done!
I bought a sheet of galvanized metal, set the mailbox upside down, marked the measurements and added about 1.5 inch all around to allow for screwing down. I snipped the corners so that they can fold over each other (crucial for weather proofing). Then using my rubber mallet and scrap of wood I gently hammered the sheet to submission. Finally using a metal rasp to smooth the edges of the cut metal to so that is not as sharp. Rooftop was secured with pan-head exterior screw evenly spaced. Almost done!
Step 8: Base and Finishing Touches


For the base I ripped a 2 by 6 treated board to fit then screwed that in place at the base of the mailbox using 2" stainless steel screws. Onto this base I will attach the pipe that will hold the mailbox up.
The USPS stipulates that if you are to use a pole, it needs to be 2" pipping and can be driven into the ground so that if hit by a car it can easily give way. I originally used 1" (since then replaced) so thats what you see here. I got 6 feet with the plan of driving 2 feet under ground. I spray painted the pipe black then screwed it to the based of the mailbox. Optional: give the entires exterior a once-over of varnish.
Now: goodbye to the old, and hello to the new. I used a sledge hammer for the hard labor part and used a level to make sure the mailbox is level. All done. Hope this is useful any once again and questions or comments are welcome.
