

Introduction: ISS Above on Lcd(i2c) Raspberry Pi


hi
Whats up? Having fun or not?
First of all I'm gonna tell you something about myself. i'm 18 and since i remember i have always loved making things and hacking into things! you know thats a part of all of us but these days i feel that in the future I'm gonna work,earn money and then just live my life with building thins and doing projects. when i think about that it feels great.
ok ,back to project, I'm gonna make it quick.
step1: Raspberry first boot: have seen lots of projects tell you how to start working with raspberry pi. but i just tell you the things to do the project. if you are new to raspberry pi just search web for : "start working with raspberry pi tutorial"
Step 1: Connecting to Raspberry Pi


you can use :
HDMI connection on raspberry or connect to it through SSH using "putty"
1-first connect the raspberry to internet with a plan cable or wifi connection
(I am using wifi using TP-Link wifi dongle,might be hard a little if you are a newbie!)
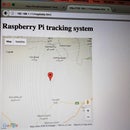
2 - then when you are in the same local network with the raspberry download Angry IP Scanner
3 - in angry-ip-scanner put a range for ip's for searching .
( as shown in picture: "192.168.1.1" - "192.168.1.255")
4 - that way you will see your raspberry ip address for connecting to it.
(the ip might change over time you can make it static in your router settings)
5 - now that you have your raspberry's ip, go to putty and put your ip there in "host Name" field.
and click on connect.
6 - then you will see a black window opens like shown in pictures. Then it asks you for username to login and password.
user : pi password : raspberry
7 - there you go into the raspberry using ssh connection and now you can type your commands.
Step 2: Lcd I2c


Normally that you buy a character lcd it will have 16 pins that should be connected to raspberry. and that will engage lots of your gip pins.
so avoiding that , what you need to do is using a i2c lcd converter. its a module that will be connected to lcd 16 pins and need "vcc" and "ground" for power and "scl" and "sda" for i2c connection. so it makes it easier a lot.
here you can buy it : pcf8574 lcd i2c module
When you made the connections you can connect the i2c module to raspberry pi :
on module on raspberry
GND ---> PIN 6
VCC ---> PIN 1
SDA ---> PIN 3
SCL ---> PIN 5
once you'r done with connections go to putty command line on raspberry and type and enter :
sudo mkdir /home/pi/ISS_LCD
now if you do a :
ls
you will see a directory named lcd.now go to lcd by:
cd ISS-LCD
now go to tutorial by Matthew Timmons-Brown for raspberry i2c-lcd and make the lcd running.
(it's a great tutorial, something which is not found simply always:) )
Step 3: Open Notify ISS API


in International Space Station Current Location you can find the API which we'r gonna use.
now here is the code that makes a json request to open notify api and finds out the latitude and longitude of ISS.
and then use python geocoded library and google geocoded api to find out the city (on earth!) that the ISS is on the top.
and then prints on the first line of lcd the city.
(if it will be on the sea the google won't find any city so it prints: "ISS : free oceans" )
and on the second line the number of crew(Astronauts!).
open a python file and paste the code in it and execute it using these commands and we're done!! :
it might print some warnings about ssl verification but its fine:)
cd ISS-LCD
sudo nano iss.py
ctrl+x
y
Enter
sudo python iss.py
<p># -*- coding: utf-8 -*-</p><p>import lcddriver
import time
import requests
import json
import geocoder
display = lcddriver.lcd()
astros = requests.get("http://api.open-notify.org/astros.json")
gps = requests.get("http://api.open-notify.org/iss-now.json")
astrosdata= astros.json()
gpsdata = gps.json()
location=gpsdata["iss_position"]</p><p>lon=str(location["longitude"])
lat=str(location["latitude"])</p><p>pn=str(astrosdata["number"])
g = geocoder.google([lat,lon], method='reverse')
ci =str(g.city)
print(ci)</p><p>if (ci=="None"):
                 display.lcd_display_string("ISS : free oceans", 1)
else: display.lcd_display_string("city : "+ci,1)
display.lcd_display_string(pn+" astronauts", 2)</p>
Step 4:

Participated in the
Automation Contest 2016

Participated in the
Internet of Things Contest 2016


