

Introduction: IWB Holster for Taurus 357 Magnum Snub Nose


Here we will look at what goes into making an IWB holster for a Taurus 357 Magnum Snub Nose Revolver.
SAFETY NOTE: FIREARM SHOWN IN ANY STEPS IS UNLOADED
NO AMMUNITION IS NEARBY WHEN FIREARM IS BEING USED IN THE MOLDING PROCESS
Tools needed:
Cardstock (template)
Pencil (for layout of template)
Metal Belt Clip
Leather
Stitch Groove Tool
Utility Knife
Edger Tool
Alphabet Stamp Set
Various Leather Tooling Tools
Bear Stamp
Stitching Hole Punch
Hole Punch
Black Sinew (thread)
Leather needles
Wood Mallet
Rawhide Mallet
Slicking Tool
Sharpie (the fat one)
"C" clamps
Pop cycle sticks
Step 1: IWB Holster for Taurus 357 Magnum Snub Nose

First thing that has to be done is make a template of the firearm you want the holster for. Once the template, which consists of a tracing of the firearm and a layout of the holster, then you choose the type of leather you want to use. Make sure that the leather is large enough to cut out the template and any accessories you may have.
Step 2: IWB Holster for Taurus 357 Magnum Snub Nose

Here we have already changed the pattern some from the original design, as well as laying it on the leather and tracing and then cutting out the pattern. You can see in the upper right hand corner we have cut a piece of leather for the metal belt clip. You don't want to just attached the metal clip to the holster where you will have a rivet touching the metal of the firearm and possibly scratching it. Therefore you cut a piece of leather, from your left over leather, for the belt clip to fasten to.
Step 3: IWB Holster for Taurus 357 Magnum Snub Nose

Here you see the piece of leather with the clip attached to it temporarily to see how it is going to fit.
Step 4: IWB Holster for Taurus 357 Magnum Snub Nose


Well, again the design has changed some. After careful consideration it was determined that you don't want the belt clip on the cylinder of the revolver. So a change was made to cut a piece of leather that would fit to one side, about where the trigger guard is located. This area give you more of a flat surface. In this picture I have already determined where the stitching groove is going to be on both pieces of leather. I have also cut a slot in the top of the belt clip leather so the flat (back) part of the clip and be slid down into the belt clip leather.
Step 5: IWB Holster for Taurus 357 Magnum Snub Nose


In this step we are using binder clips, some scrap leather to hold the holster together to look at the fit of the pistol in the holster and location of the belt clip. Just a safety note...FIREARM IS UNLOADED! NO AMMUNITION NEAR BY!!
Step 6: IWB Holster for Taurus 357 Magnum Snub Nose


Here in this step we have already marked the rivet location on the belt clip piece of leather. We have stitched the top of the belt clip leather to the main holster body. After stitching the top, we slide the belt clip into the the slit that was cut, line up the belt clip with the rivet hole and apply the rivet. Once applied then we sew the right side of the belt clip leather to the main body of the holster. DO NOT SEW THE LEFT SIDE, that comes in a few more steps.
Step 7: IWB Holster for Taurus 357 Magnum Snub Nose


The next step is to determine if you want just a plain holster or have some tooling done to your holster. Here I chose to do some tooling. I have some leather tooling stamps and tools, so I did a bear in the center at the top, along with my initials and some other tooling. Before tooling leather you must case the leather. Case the leather means that you wet the leather to so that the tooling will take easily to the leather. Tooling leather has to be done before you sew the holster together.
Now I forgot the next step, and forgot to take any pictures of that step. It is punching in the stitching holes. I have a 3 hole punch that I use to put in the stitching holes. You use a plastic cutting board to lay the leather on and beginning at the top left part of the holster, close to where you sewed in the belt clip leather, you start your holes in the stitching groove all the way down to the bottom. Do not punch holes on the right side of the holster.
Step 8: IWB Holster for Taurus 357 Magnum Snub Nose


Now comes the fun part!!! Wet forming the firearm to the leather.
Of course I have left out a two steps and realized I had no pictures of that step. The stitching step. In the stitching step you first need to apply rubber cement to the inside left and right edges of the holster. Let the rubber cement almost dry, you join the to sides together getting them flush. Take the binder clips and scrap leather and hold the pieces together for about 15 minutes. Once the binder clips are removed you can take a dremel tool or a drill press with a bit just smaller than the holes you punched in for the stitching and drill thru the punched wholes thru to back side. Take a leather awl and come back thru the holes on the back side to clean them up. Now you begin to stitch up the stitching side of the holster.
Now to the wet forming of the holster. You can wrap your UNLOADED firearm in plastic wrap, so as not to get it wet, or if you are like me and keep your firearms clean regularly you can just put it in there. But you place the firearm in the holster and start working with your fingers the edges of the firearm. Once the general impression is seen you can then use a Sharpie, with the cap on it, to work into more detailing of the firearm. I used a Sharpie and I have what leather crafters call a slicker which is a piece of wood with grooves lathed in it to slick the edges of leather. You will see that I also used pop cycle sticks and "C" clamps to hold them in place on the holster. This is to hold areas as close to the firearm as possible.
Once you are comfortable with your impression of the firearm in the leather, then you set it aside, with the firearm still in it (this is why some choose to wrap in plastic wrap) for approximately 24 hours to allow the leather to dry. Once dried you can remove the camps and pop cycle stricks.
Now comes the treatment of the edges. I bought some shoe polish die that is used for dieing the edges of your shoes where the soles are. Carefully apply the die and let it dry. Then you take the slicking tool and slick the edges. Now to do that what you do is take your finger and dab it into some water, rub that water on the edges and then with the slicking tool work the edges, going in one direction first, and once you have all the leather fiber laying down you can go back and forth to get that almost plastic looking finish.
Your holster is done, other than treating the leather and polishing it.
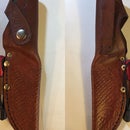
Step 9: IWB Holster for Taurus 357 Magnum Snub Nose


The finished project, a beautiful handcrafted leather IWB holster for your firearm. The final test, holding it from the bottom above the table and the firearm stays in the holster!!
This procedure can be done for either revolver or semi-automatic firearms. The steps are typically the same.

Participated in the
Tandy Leather Contest 2016


