

Introduction: Internet of Things With Raspberry Pi-2


This is a follow-up to my previous instructable Internet of Things with Raspberry Pi - 1.
(If you're not familiar with web servers, PHP coding and the basic concepts of IOT, you should probably go through part 1 first.)
In the previous instructable, we set up an Apache 2 web server on the Raspberry Pi and created a web page for it, from which we could control an LED.
In this tutorial, we'll be adding controls for playing videos and songs on the Raspberry Pi using the OMX media player.
PS: If you like it, don't forget to vote!
Step 1: Connect the Pi


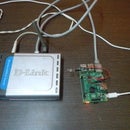
Connect the following to the Raspberry Pi as shown in the picture:
- Power supply
- HDMI (if your screen/monitor doesn't have an HDMI port, you can use a VGA to HDMI converter)
- Ethernet (to internet)
- USB Keyboard and mouse (unless you're accessing the Pi over SSH or VNC)
Step 2: Introduce Your Pi to OMXplayer
Run the following command to install OMXplayer on the Raspberry Pi:
sudo apt-get install omxplayer
You'll be using this player to play media on your Pi.
Step 3: Get Some Tunes
Start by downloading two to three nice songs and shorten their file names to something small. (e.g. 'Where the river flows by Scorpions' can be shortened to just 'WhereTheRiverFlows')
Long names also work, but they take too much time to type when coding.
Now put all the songs into a folder called 'songs'. Make this folder in '/home/pi'.
Step 4: Throw in a Video Too
Similarly, create a folder in '/home/pi' called 'videos' and add a video in it. Follow the same steps as earlier for naming it.
Step 5: Modify the Code...
Run the following commands to open your current web page code:
sudo nano /var/www/index.php
Add the new parts as shown below or just copy this code to the index.php file:
<?php

    if (isset($_POST['on']))
    {
		exec("sudo killall python");
		exec("sudo python /var/www/mystuff/ledON.py");
    }
    else if (isset($_POST['off']))
    {
		exec("sudo killall python");
		exec("sudo python /var/www/mystuff/ledOFF.py");
    }
    else if (isset($_POST['blink']))
    {
                exec("sudo python /var/www/mystuff/ledBLINK.py");
    }

//New code starts here
    else if (isset($_POST['WhereTheRiverFlows']))//Your first song
    {
                exec("sudo omxplayer /home/pi/songs/'Where The River Flows.mp3'");
    }
    else if (isset($_POST['StarWars']))//Your second song
    {
                exec("sudo omxplayer /home/pi/songs/'Star Wars.mp3'");
    }
    else if (isset($_POST['BezubaanPhirSe'])//Your third song<br>
    {
                exec("sudo omxplayer /home/pi/songs/'Bezubaan Phir Se.mp3'");
    }
    else if (isset($_POST['bell']))//A funny sound clip
    {
                exec("sudo omxplayer /home/pi/songs/'bell.mp3'");
    }
    else if (isset($_POST['Presentation']))//Your video
    {
                exec("sudo omxplayer /home/pi/videos/Presentation.mp4");
    }
    else if (isset($_POST['stop all']))//This is to stop all media
    {
                exec("sudo killall omxplayer.bin");
    }//This command stops all media
?>
<html>
	<style type="text/css">
//Button colour is now yellow and size has been changed
		#form{font: bold 30px/30px Georgia, serif;}
		button{background: rgba(255, 255, 0, 0.99); width: 250px; height: 180px;border: none;border: 3px solid black;border-radius:20px;}
		#container{margin0px; auto;width:80%;min-width:40%;}
	</style>
	<body>
	<div id="container">
		<form id="form" method="post">
			<center>
			<button name="bell"><h1>Bell</h1></button>
<br><br>		<button name="on"><h1>Led ON</h1></button>
			<button name="off"><h1>Led OFF</h1></button>
			<button name="blink"><h1>Led BLINK</h1></button>
	//This part is contains the new buttons
<br><br>		<button name="StarWars"><h1>Star Wars</h1></button>//Your first song button
			<button name="BezubaanPhirSe"><h1>Bezubaan Phir Se</h1></button>//Your second song button
			<button name="WhereTheRiverFlows"><h2>Where The River Flows</h2></button>//Your third song button
<br><br>		<button name="Presentation"><h1>Presentation</h1></button>//Your video button
<br><br>                <button name="stop all"><h1>Stop all media</h1></button>//The button to stop all media
			</center>
		</form>
		</div>
	</body>
</html>
Step 6: Try It Out!


Connect to your local network from a smartphone or laptop and try playing some tunes!
You'll notice that the control panel now looks a lot more cheery with some colour and font size editing.
Modifying the code to your personal requirements is relatively simple once you get the hang of it.
So go ahead. Add some more songs and videos.
I also added a small code for a bell sound clip so that whenever someone is at my front door, they can connect to the open wifi network and ring the 'IOT bell' instead of the door bell!
Step 7: The End
That's all for this time folks. Stay posted for more cool stuff.
The next part will be about adding a live webcam and using a wifi adapter so stay tuned!

Participated in the
Raspberry Pi Contest


