

Introduction: Knot Board for Australian Cub Scouts


The purpose of the Knot Board is for it to be built as a Pack Night Activity, and for Cub Scouts to take home and practice their Boomerang Knot work.
- This design was prepared by: Max P. - Assistant Cub Scout Leader at 1st Wantirna South Cub Scout Pack
- The example was constructed by: Max H-B. - Cub Scout at Boronia Cub Scout Pack.
- The supervision of construction and Instructable has been prepared by: Paul B. - Assistant Cub Scout Leader at Boronia Cub Scout Pack.
Step 1: Materials/Tools/Equiment

You will need the following for each Knot Board;
Materials
- Board x 1(16 mm MDF 300 mm x 200 mm)
- Para Cord x 2 colours (800 mm length of 6 mm)
- Screws x 2 (9 mm countersunk screws)
- PVA Glue
- Masking Tape
- Lamination Pouche
- ISO A4 paper x3
- Heat shrink x 2 (25 mm)
Glad Wrap
Tools/Equipment:
- Colour printer
- Laminator
- Scissors
- Jigsaw
- Clamps
- Drill
- Drill Bits - 20 mm spade bit, 6 mm drill bit, 2 mm drill bit.
- Sandpaper - fine grit
- Grinder (if required)
- Extension lead
- BBQ lighter
- 90 mm DIA PVC Pipe (600 mm length)
- Safety Glasses
- Hearing Protection
- Pencil
- Tape Measure
- Ruler
Note:
- The quantities shown above are for the construction of one knot board. Either multiply out the quantities show to the number of boards you require for your Cub Pack, or review the standard sheet sizes of MDF and lengths of para cord to determine how many you can make in one batch.
- Cub Scouts should be supervised at all times when using power tools.
Example cost
When constructing the example Knot Boards for this Instructables the following materials where purchased to make 12 Knot Boards:
1 sheet of 16 mm x 1200 mm x 600 MDF = $12.11 (you may need to pay to get it cut at the hardware store)
2 x 6 mm of 10 m para cord = $16.00
Cable Heat shrink 1.2 m = $5.05
Lamination Pouches (Qty 25) $7.80
PVA Glue (1kg) = $13.88
Masking Tape (1 roll) = $3.85
Colour printing services (24 x $0.88) = $21.20
B&W template (1) = $0.07
Screws $5.65
Total = $85.53
Cost per Knot Board = $7.12 ea
Step 2: Cutting the Knot Board

I would encourage you to pre-cut the boards. The design has taken into consideration standard sheets of MDF (1200 x 900, 2400 x 1200, etc), most hardware store will cut sheets of timber into the knot board size.
Step 3: Knot Board Cutting Template


This is a great activity for the Cub Scouts to participate in. The templates have been prepared to make it possible for your Cub Scouts to do all the drilling and cutting without having to do complicated measuring.
- Cut the hatched edge back so the width of the template is 200 mm
- Using masking tape, stick the template down as shown; making sure the tape lines up with the centerlines of the 8 mm holes on the bottom of the board.
- Using a ruler measure to the center of the bottom of the board and strike a line for the center point of the 8 mm hole.
Attachments

Step 4: Drilling the Knot Board


I would recommend having more than one drill setup so you can have Cub Scouts rotating the from the holes nominated below.
The Leader/Adult needs to set up the drill to get it ready.
22 mm Holes
- Clamp the Knot Board down with the Cub Scout.
- Using a 22 mm spade drill bit drill through the center points of the two circles at either end of the "CUT OUT HANDLE",
- Only drill half way though the board, then flip, re-clamp and finish the drilling, this is to prevent damaging the wood,
8 mm Holes
- Clamp the Knot Board down with the Cub Scout.
- The Leader/Adult needs work with the Cub Scout/s to set up the drill bit with a depth gauge, simply lay the drill bit on the template and use masking tape to indicate the 40 mm depth on the drill bit,
- Using a 8 mm drill bit horizontally drill into the bottom edge of the board at the centerlines of the two 8 mm holes,
- Making sure to pull back on the drill half way into the depth of the hole to clear the sawdust before continuing to drill,
- Take a length of the para cord test the hole is wide enough,
2 mm Holes
- Clamp the Knot Board down with the Cub Scout.
- The 8 mm hole must be drilled prior to this hole,
- Using a 2 mm drill bit vertically drill down into the 8 mm hole, stopping the drill once it enters the 8 mm hole,
The appropriate safety equipment for this task is: Safety Glasses and Hearing Protection. Leader/Adult supervision must be provided at this step.
Step 5: Cutting Out the Handle


I would recommend setting up the jigsaw so you can have Cub Scouts move from the drilling when they are ready to cut out the handle.
- Remove the template from the Knot Board,
- Clamp the Knot Board down with the Cub Scout,
- Using the ruler and pencil, strike a line at the top and bottom of the 22 mm holes,
- Using the jigsaw line up the bottom line and cut using the Cub Scouts dominant hand (Left/Right) controlling the jigsaw,
- Towards the end of the cut, slow down the speed of forward movement to prevent damaging the wood,
- Wait for the jigsaw blade to stop moving before removing the jigsaw and repeat with the top line,
Remove the Knot Board from the clamps and using sandpaper remove any rough edges of the board; sand on a 45 degree angle all edges and the corners,
The appropriate safety equipment for this task is: Safety Glasses and Hearing Protection. Leader/Adult supervision must be provided at this step.
Step 6: Para Cord


I would recommended pre-cutting the lengths of Para Cord and Heat Shrink. I have shown a way to make with masking tape on the table the length you need to cut the para cord, this will allow you to drag the length of cord out and cut quickly.
- Put the Heat Shrink over the end of the para cord and using a BBQ Lighter heat this up until it is tight on the para cord and there are no loose fibers of cord, this is a great way of showing how to care for ropes,
- Squeeze PVA glue into the 8 mm holes and push in the para cord (you may want to wrap a small section of masking tape over the very end to help it push in without bunching up),
- Screw in the countersunk screws to hold the para cord in tight.
Leader/Adult supervision must be provided at this step.
OPTIONAL:
You can decide if you want to grind the head of the screw off at this stage, to make the knot board smooth.
Step 7: Knot Instruction Sheets


I would recommended to pre-print the Knot Instruction Sheets as one sided prints, preferably as colour; you can decide if you want the Cub Scout to laminate the instruction sheets or pre-do this and leave the cutting for the Cub Scouts.
- Pre-heat your laminator and follow the instructions on what setting/speed to use for an ISO A4 sheet,
- Put the Cub Scout Knots instructionsheet back to back with a Advanced Knots instruction sheet into one lamination pouch,
- Then laminate it,
- Once it has cooled you need to first cut inside the outer edge of the sheet of paper to separate the two sheets,
- Then cut around the outer box of the knot instructions,
- Starting with the Cub Scout Knots sheet, apply PVA glue around the outer edge and up and down in the middle of the back of the sheet,
- Turn the instruction sheet over and line up the top corners with the top of the board (the bottom of the knot board has the handle and now the para cords),
- Cover the instructions sheet with Glad Wrap,
- Then using the PVC pipe as a rolling pin, push the glue out to all the edges of the instruction sheet and remove any air bubbles,
- Remove the Glad Wrap and dispose of it,
- Wipe up and excess PVA glue with a tissue (it is better to have some squeeze rather than none, as this is a sign that the glue is: evenly spread, their are no air pockets or dry patches, and the instructions not likely to lift up as a result),
- Turn over the Knot Board and repeat with the Advanced Knots instruction sheet.
Minimal Leader/Adult supervision can be provided at this step.
Attachments
Step 8: Finished, Time for Practicing Your Knots
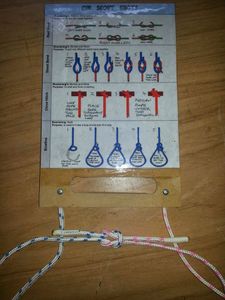


Once the Knot Board has dried you are good to start practicing your knots for you boomerangs.

Participated in the
Great Outdoors Contest


