

Introduction: Laser Cut Luminaria Bags


Luminaria bags are a classic holiday decoration that light up houses and sidewalks for Christmas. Using your Epilog Laser system, you can customize these paper bags with a one-of-a-kind design to create a special look for your customers.
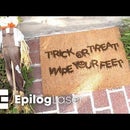
We used a simple snowflake design that we cut into each bag, but you can use any Christmas theme to create a great design that will make your custom luminarias really stand out.
Supplies
- Luminaria bags - coated or uncoated. We purchased ours from Amazon.com
- Small sheet of scrap metal to place inside the bag
- Electric candles (if using uncoated bags) or real candles if using a flame-retardant bag
- An Epilog Laser System
We used a 60-watt Epilog Helix with the following settings:
Speed: 60%, Power: 15%; Frequency: 500
Our artwork is free to download here.
Step 1: Place Scrap Metal Inside the Bag to Protect the Back Side

For our luminarias, we only want to cut through one side of the bag. By taking a small piece of scrap anodized aluminum and sliding it inside the bag between the layers, we were able to easily use the laser to cut through only one side of the bag.
Step 2: Set Up the Luminaria in the Laser and Print the Design

Place the luminaria in the upper right corner of the table, focus the table and run your design. As each bag is finished, remove the metal sheet and place it in the next bag.
Step 3: Decorate!

When you're done, use a small bag of sand or other type of weight to hold down the bag and place your electric candle in the bag to create a beautifully lit decoration.


