

Introduction: Make Your Own Arduino Based Game Console:


Hello I am Jordy Weening and I started working on a home made gameduino as a school project. A gameduino is basically an arduino driven gameconsole. This does sound fancy but it really isn't. I made the most bulky console that will ever exist but please don't judge me. After all it was a very cool project to work on and you should definitely try it yourself because actually it is really easy and also very rewarding.
The game console features 6 games: Snake, Pong, Simon Says, Tetris, Breakout and dodge. You will probably know what a couple are but if you're not really sure, you could watch the video where i showcase everything.
Next to the games, it features a nice menu which gives options to shut down the sound an test the screen. Also there is an high-score system included which saves on the EEPROM memory of the arduino mega.
Warning!! this isn't really made to be exactly copied, because it's a little complicated this probably wont work. but for a smart person it will be helpful to look at the code and hardware how I did things just to make it easier. obviously you could try to copy it and I will greatly support you if you have any questions just ask them.
Step 1: Parts Needed

Of course for this project you need a couple of things, I have listed them down below.
- Wires, I used a lot of them so be sure to have them around.
- Maxmatrix display I bought mine here: http://domoticx.nl/webwinkel/index.php?route=produ...
- 5 normally off buttons, I bought mine at a local marketplace.
- A piezo buzzer.
- A switch, I got mine from some old electronics I had laying around.
- 5, 10K ohm resistors.
- 1, 220 ohm resistor.
- A 16*2 LCD display.
- An arduino mega, I bought mine pretty cheap over at this site: http://www.dx.com/p/mega2560-r3-atmega2560-16au-co...
- An optional 3D printed case, I used this case, which I found online: http://www.thingiverse.com/thing:99710
- A breadboard is pretty useful for testing.
- A red and green LED.
- A 9 volt battery with connector.
- A 10K potentiometer.
- Some wood and basic supplies if you are building a case.
There are many led displays out there but not many have a controller board included, you specifically want to have MAX7219 controller included otherwise the code wont work.
Step 2: Wiring It All Up.
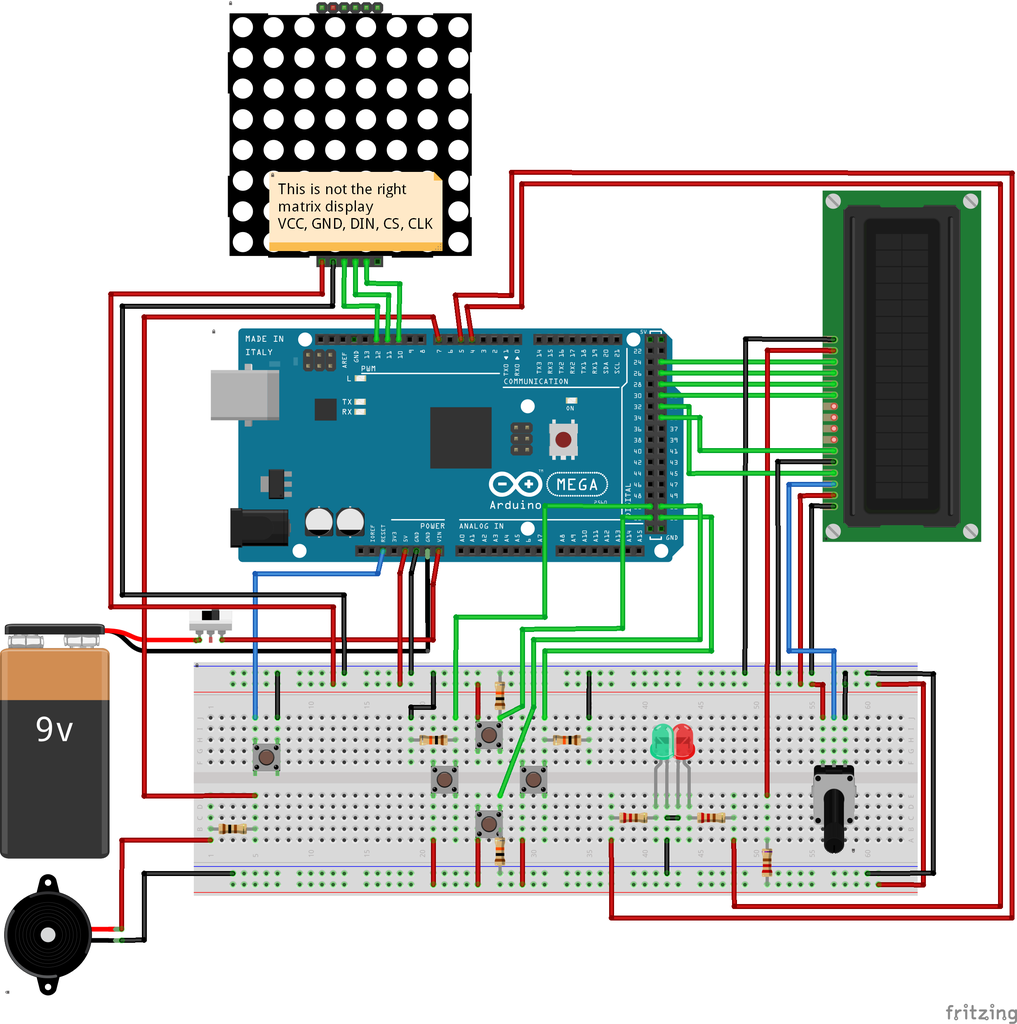

Following the schematic at the top you should be able to wire everything up right. But if you need a closer look, I included the Fritzing file so you can download it.
Be very careful when wiring up the battery, if you get these wires around your arduino will basically explode.
If you look closely to the image you can see that i use staples as breadboard jumper cables, yeah... please don't judge me I am not as poor as you think. :)
Attachments

Step 3: The Code.
So I won't do a full explanation off the code just because it's to long and complicated. But just to give an overview of the layout: There is a "main" file, this file is mainly the setup. Here are the variables being declared and also the menu is ran from this file. When you choose a game all of its functions are in a separate file with its name. Fair enough right.
Be sure to download these libraries:
Timer library: http://playground.arduino.cc/Code/Timer
Ledcontrol library: http://playground.arduino.cc/Main/LedControl
The other two libraries are as far as I know already included in the arduino IDE.
Liquid Crystal library.
EEPROM library.
So just download the file and unzip it. Then just drop the whole folder inside the "Arduino" folder.
<EDIT: You might have seen a few bugs in the video, I updated the code and everything should work fine now (especially the menu)>
Step 4: Building the Case (optional).


So I decided to build a case out of wood, but if you have a better idea be sure to do that because I am not totally happy with the result. I could share all my measurements but I think you are better off doing it by yourself, just because you might have other parts. And my measurements weren't always correct.
If you are building a case then these are the tools you will most likely need:
Hot glue gun.
Soldering Iron.
Saw.
Hammer or drill.
Some nails or screws.
Imagination.
And if this is all done you have just finished building your very own game console, congratulations!!
(for problem solving go to the next page).
Step 5: Debugging.

You may come across various problems, on this page I will place some solutions to help you out, if you find a problem that is not on this page, please post a comment down below and I will try to react as soon as possible. Also I will try to add the solution to this page.
1:
You may encounter some problems with the lcd:
the first thing you should look at if you're wires are all connected properly. Then look if you're potentiometer is maybe turned the wrong way. If this doesn't work try to run the hello world sketch on a different arduino, here's a link to it: https://www.arduino.cc/en/Tutorial/HelloWorld\ If this doesn't work either you might have a diffrent lcd, you have to change the dimensions in the code then. find this line of code in the setup function in the main file: [lcd.begin(16, 2);] and change the numbers according to you're dimensions. If this still doesn't work please post a comment and I will try to find you're problem.

Participated in the
Microcontroller Contest 2017


