

Introduction: Make a Camera View-sight for Bird Photography


What is a view-sight and why might you want one for your camera?
I invented the term "view-sight", so no wonder you never heard of one. It's that pointy thing on top of my camera in the photo. I made it because the camera I recently bought did not come with a view finder, only a LCD screen. This camera has a 30x optical zoom, and I planned to use it for bird photography. But most wildlife photographers prefer a viewfinder because it helps them focus on the subject. In addition, a LCD screen can be hard to see in bright sunlight. Let's just say I may have bought the wrong camera for bird photography, because I have been having a terrible time finding the bird on the LCD screen when using zoom. But the camera has great features otherwise, so I decided to see what I could do to remedy the situation.
Step 1: It Looks a Lot Like a Gun Sight...

My goal was to design something that would help me quickly focus on a distant bird with the camera zoomed out at up to 30x. Also, it had to be simple and compact, because I chose this camera so I could carry it in my pocket, rather than hauling around a large DSLR camera and telephoto lenses.
Doing some research, I found there were magnifying lenses for the LCD screen, also electronic sighting devices, available for otherwise good small cameras without viewfinders. I wasn't too impressed with what I found, and besides, "if you can make it, why buy it?".
I began thinking about the simple gun sights used on rifles. They are fairly accurate without resorting to electronics or telescopic sights.
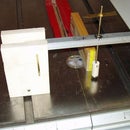
You can see the final product on the intro photo. A magnet holds the brass sighting device onto a small square of steel that is glued to the top of the camera. This way you can easily remove the sight whenever you want to.
Step 2: These Are All the Parts

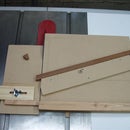
Three components make up the view-sight, they are made from:
Brass strip, 1/4" x 1/32" thick.
1/2" rare earth magnet.
3/4" x 1/8" thick steel bar.
Also glue and black paint.
Everything is available at your local hardware store.
Step 3: Make the Components


The sight itself is made from a 2-1/2" length of brass strip. I bent about 3/8" of each end up, then used a triangular file to make a V notch on one upturned end and a point on the other. Brass cuts nicely.
The brass sight should fit snugly into a groove in the 3/4" wide steel bar. First I cut off a 1" long piece of the steel bar with a hack saw. Next came the only difficult part of the project, making a shallow 1/4" wide groove into the small steel piece. Holding it in a vice, I marked the outline of the groove with a sharp knife. Then I used small files to cut the groove. Make sure the brass sight fits snugly into the groove. I painted the steel piece with flat black spray paint.
Step 4: Assembly


The steel piece will be glued to the top of the camera directly over the lens; but do not glue it just yet. You can see where I put it on my camera, it may be different on yours. Just be sure it is not covering or interfering with any of the controls.
Glue the magnet to the top of the brass sight, about in the middle. Shiny rare earth magnets are difficult to glue; I suggest lightly sanding the contact surfaces of both parts, then use epoxy. Glue these pieces first and let the glue harden before going to the next step.
Step 5: Final Gluing and Alignment of the The Sight


Now you can glue the steel piece to the camera.
Use a silicone based adhesive like E6000. This is the last step; after the glue is applied but still not set, align the sight with the image in the LCD screen. Put a drop of adhesive on the bottom of the steel piece and set it, with brass sight and magnet attached, onto the camera. Then align the sight with a distant object; at the same time align the camera, in zoom mode, so that the object is in the center of the viewfinder. I did this by focusing upon a small light at about 30 ft. distance.
Step 6: Results

I'll be testing it out for a while before I consider it a success.
So far it has been a help, especially for finding birds in trees.


