

Introduction: Make a Five Cut, Big Bowl From an Eight Foot 2x4


This is called a five cut bowl because that is all the cutting needed to build one. The inner cut of the top ring is the outer cut of the ring below. You get four rings and a base that, when assembled, make a bowl. Each ring is cut at an increased angle which results in a curved bowl with tapered sides. I wanted to figure out just how big of a wooden bowl I could make from an standard 2 x 4 stud eight foot long. The answer is 18" in diameter and 6-1/4" tall. This Instructable will show how to do it.
Note: This Instructable has been selected for the 2 x 4 contest.
. If you liked it please vote for me.
Thanks

Step 1: Procure Wood and Prepare Stock

I hate 2 x 4 contests where people will take a piece of really nice expensive piece hardwood and mill it to 1-1/2" by 3-1/2" (standard 2 x 4 dimensions) Worst yet is when they mill it to 2" by 4". I believe the spirit of the contest says it should be a stud grade 2 x 4. Here is the one I bought. You can still see the stamped markings.
This is a whitewood kiln dried 2 x 4 that cost less than $3. I figure if I screw up then I can scrap it and start again. The only leeway I took is that I sorted through the pile to find one the was not twisted, had four clean edges, and only tight knots. I had it sawn in half so it would easily fit in my car.
When I got home I milled the two pieces to 1-3/8" by 3-1/4". They are now ready to be cut to size.
Step 2: Cut Pieces


There are six pieces with three being cut from each length of wood. See the attached plans for more detail. Using a miter saw, on each length of wood cut; one 18-1/2" with 8 degree tapers, one 17-1/2" with 31 degree tapers, and one 13-1/2" with 45 degree tapers.
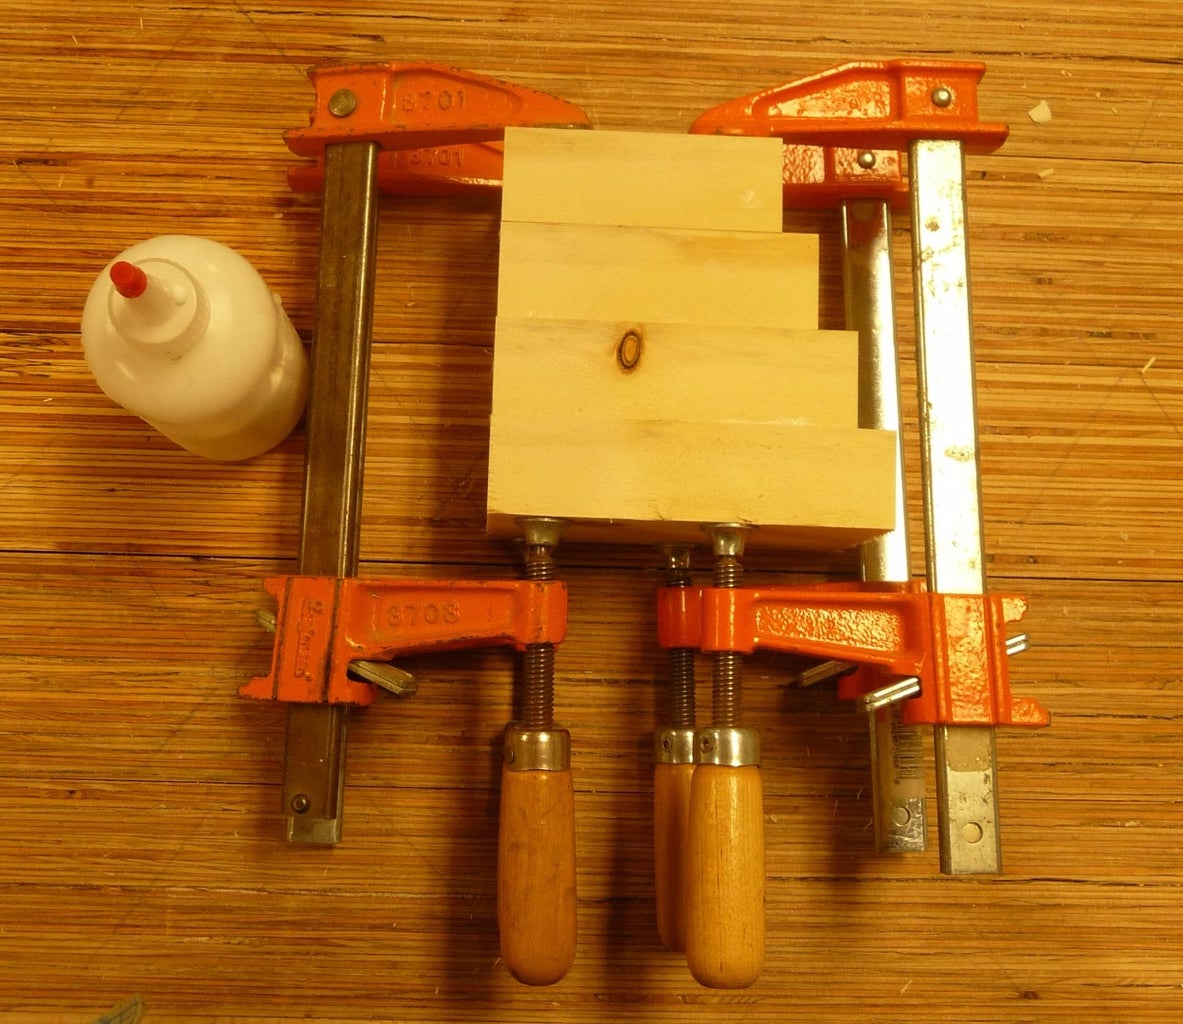
Step 3: Glue, Clamp, and Sand


Clamping culls and clamps are used to glue the four middle pieces together. After an hour, glue on the outer two pieces. Give it a couple of hours and then plane or thickness sand the large piece to 1-1/4" thick. At the same time you sand or plane this blank, also plane a scrap piece of 2 x 4, at least 20" long, so it is the exact same thickness. This scrap will be used to make an angle gauge. You now have a big bowl blank.
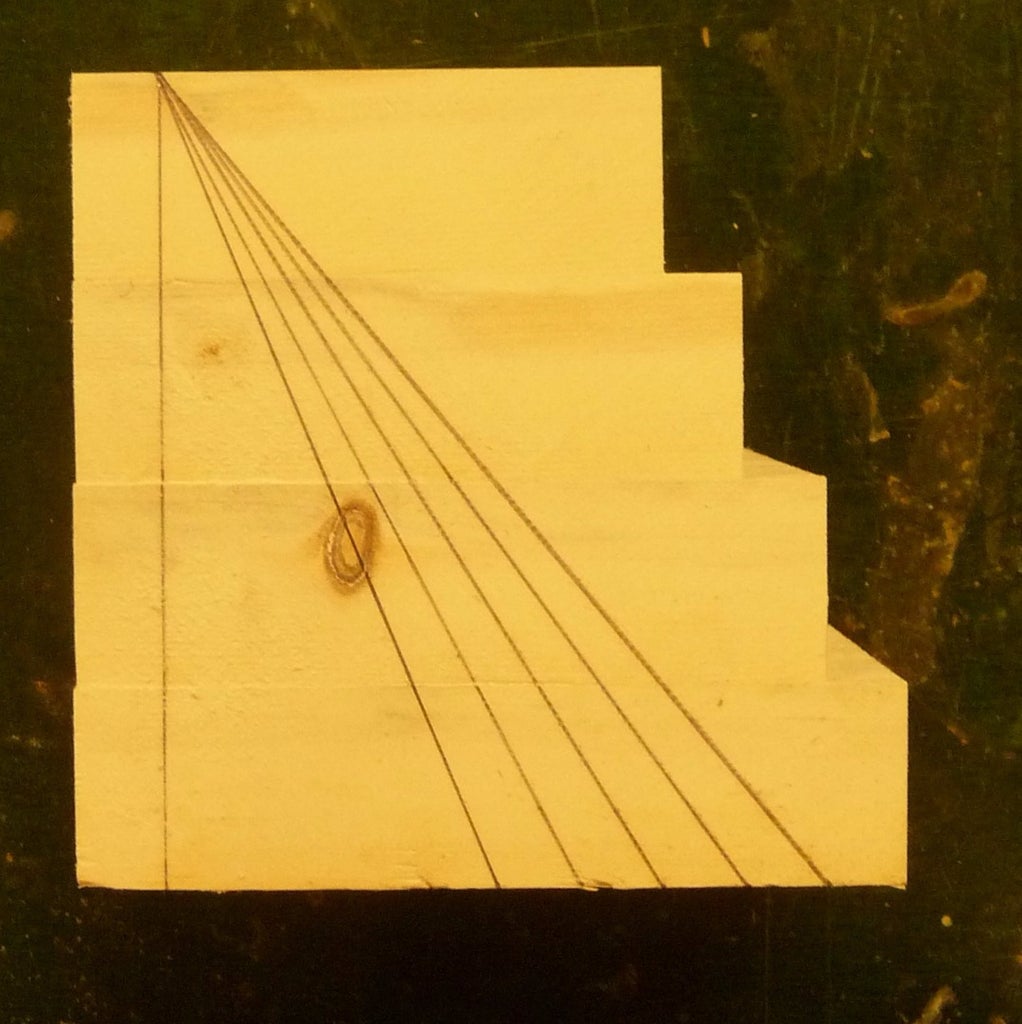
Step 4: Draw Pattern

Find the center of the bowl blank and use a compass to draw five concentric circles. They will have radiuses of 9", 8-1/2", 7-7/8", 7-1/8", 6-1/4". You now have the pattern. (Error found, last radius changed to proper value. It is correct in the PDF).)
Step 5: Make Angle Guide
The reason the angles were not given in degrees is because you can't be certain just how thick the bowl blank will be. It is supposed to be 1-1/4" thick. But would you throw it away if it was 1-3/16" or 1-7/32"? Maybe you want a thinner bowl and milled the wood to 1" thick. This would throw off the angles. Because the scrap piece is, by default, the same thickness as the bowl blank, making a very accurate angle is easy.
Take the scrap and cut four pieces; 5", 4-1/2", 4, and 3-1/2" long. Glue and clamp them together as shown in the photo.
After the glue has dried use a square to draw a straight line about 1/2" from the left. On the bottom edge mark five points on the right of the line at 2", 2-1/2", 3", 3-1/2", and 4". Draw five lines from these points to the top of the line. You now have an accurate angle guide. If you later decide to make another bowl the wood will not be the same exact thickness so you will have to make another guide. For that reason I usually give the guide to the person for who I am making the particular bowl. It helps them describe the construction of the bowl to their friends.
Note: After making this guide I found it was 4-29/32" tall, which means the bowl blank is 1-29/128" thick or undersized by 3/128". So instead of the bowl being 6-1/4" tall it will a bit over 6-1/8" tall.
Step 6: Set Band Saw Angle and Cut Rings


Use the guide to set the angle of the band saw table to cut the first circle. Then adjust the table angle for the second cut. This second cut will be the inside of the top ring and the outside of the ring below. Unfortunately to make this cut requires the top ring be severed. This is not a problem because the ring will be glued back together. Note that the cut is started with the grain. This is done to minimize the appearance of the cut. Also wood glued with the grain makes a better, stronger bond. Adjust the table for the third cut, fourth cut and finally the fifth cut. When completed you have four rings and a base.
Step 7: Glue Rings Back Together


Use wood glue and clamps to join the rings back together. When dry remove the clamps and stack the layers to get a rough idea what the bowl will look like when completed.
Step 8: Stack Rings and Glue


To assemble the bowl you will need some sort of bowl press. I used a pieces of 18" by 18" squares of plywood, some clamping culls, and clamps. The plywood is scrap for the construction site dumpster. The rings are pressed together, between the two pieces of plywood, with the clamps. The culls are not absolutely necessary but they do help apply pressure to the center on the bowl. The bowl is clamped upside down, starting with the top ring.
Place the top ring, upside down, into the clamp and apply glue. Place the second ring on top followed by the top piece of plywood. Attach clamps and press for 30 minutes. Open the press, add glue. add another ring, and press. Again wait 30 minutes and repeat for the fourth step. It seems that gluing all four at once would save time but it is hard to get all the rings aligned at the same time. Trust me on this. Glue one ring at a time.
This step is complete and four rings glued together. The base has not been attached ay this time because it is easier to sand the inside of the bowl without it.
Step 9: Sand Inside of Bowl

When removed from the press the general shape of the bowl is apparent but the inside surface will need to be sanded. Start with 60 or 80 grit sandpaper to remove any burn marks and sand the ring layers flush. When move up to 120 grit to finish. 120 grit is good enough for an oil finish. If a shellac and lacquer finish is desired then continue sanding at 150, 180, and 220 grit.
Step 10: Glue Base to Bowl


Before gluing on the base, sand the base's surface that will be the inside of bowl with 120 grit sandpaper. Place the bowl in the press, apply glue, and add the base. Then close the press. This time instead of using the culls I cut the plywood in 19" circles and used clamps to press them together. A heavy weight was placed on top to apply pressure to the center of the bowl. Leave in press for 30 minutes. After finishing this step I find I prefer this pressing technique over the one previously shown.
Step 11: Sand Outside of Bowl

Sand the outside of the bowl pretty much the way
you sanded the inside. Also sand the bottom of the bowl.
Step 12: Round Edges


To give a more finished appearance the outside edge of the bottom of the bowl and the inside edge of the top of the bowl are rounded. You may decide you prefer the sharp edges of the bowl and if so, please skip this step. (Just a thought. This bowl would make a great enclosure for a woofer speaker and you would definitely not want to bevel the top inside edge.)
Start by marking lines 5/32" away on both sides of the edges to be rounded. I used a small compass as a marking gauge.
Bevel these edges up to these lines. This defines the rounding shape. (Sorry for the blurry picture.)
Finish rounding these edges with 120 grit sandpaper.
Step 13: Finishing


Give the bowl a good once over final touchup sanding. As for finish the easiest is no finish at all and let the wood develop a natural patina. I would do this only if the bowl was a show piece and not to be used.
A bowl meant to be used will be handled and hands are oily. So a mineral oil / wax finish is perfect. It keeps dirt out of the pores and allows your hand oil to add to the finish. There are many formulas for wax oils mixtures available but I prefer to just buy it premixed.
This finish is food safe and it is what I use on wooden toys I make for children. Just follow directions and your have a good utility finish in no time. Three coats should do it.
A show piece finish would be shellac or lacquer. This requires sanding the bowl up to 220 grit.

Second Prize in the
2x4 Contest


