

Introduction: Make a Propane Forge for $50!


If you're tired of using the BBQ as your forge, this project may be just what you're looking for! Using a combination of new and scrap materials, we make a propane forge for $50!
Step 1: Tool and Materials
Tools
(Minimum compliment)
- Oxy/Acetylene Torch
- Drill with masonry bit
(Standard compliment)
- Hacksaw (I used a portaband)
- Welder (Any would do, even oxy/acetylene, I used a MIG)
- Drill with Masonry bit
- Cutting torch (or plasma cutter)
- Tape measure
Materials
To allow for maximum flexibility and use of available materials, I'll refrain for specifying sizes so you can more readily use the material you have on hand.
- Firebricks (mine were 1½x5x9½" and I bought 11)
- Angle Iron to frame the bricks (mine was 1½x2½x¼")
- Plate steel to form the floor and ceiling (I found a piece the perfect size that had some interesting bends in it)
- Steel tubing to form the legs (I used 1¼x⅛" square)
- Propane Weed Burner
Step 2: Frame the Bricks


Lay out the bricks that will form the floor of your forge and cut the angle iron to frame them in. I cut triangular notches in the appropriate places and bent the corners for a really clean look. The piece I had was only long enough to wrap around three sides so I was not able to do it with a single piece. On the bright side, if all you had were short scraps, you could just cut mitered corners and build it like a picture frame.
I wanted to make sure a nice floor was in place to support the brick, so I cut a piece of plate steel and welded it in to fill the void in the middle of the angle iron frame.
Step 3: Add Legs


You can actually use whatever you want for legs. I used 1¼"x⅛" square tubing, but if all you have is angle iron, that will work too. You may want to add some cross bracing for stability though. I had two seven foot pieces of the square tubing so I cut four 40" legs. To give it some style and stability, I cut them at a 10° angle with a 10° miter. This resulted in an angle that, if aligned properly, would result in all four legs slanting away from the center of the floor. Miraculously, when I sat it on the floor it did not rock. Usually, I have to do some grinding to get things level.
Step 4: Put a Hole in the Floor


Determine where you want your burner inside the box. Many people want the burner in the top pointing down. Some people also like more than one burner. I'm on a budget and I like my stuff to look cool, so I went with one burner at the back pointing up out of the floor.
Set your brick into the floor and draw a circle on it where you want the burner to come through. Using a masonry bit, drill a series of holes around the perimeter of the burner hole. Drill them all part way through at first to establish the location, then come back and using a rocking motion, both punch through the brick and connect the holes to each other. If you're careful and patient, you'll be able to get a relatively clean hole in the brick.
Mark the location of the hole on the steel floor and burn it out with a cutting torch or plasma cutter,
Step 5: Frame Your Walls
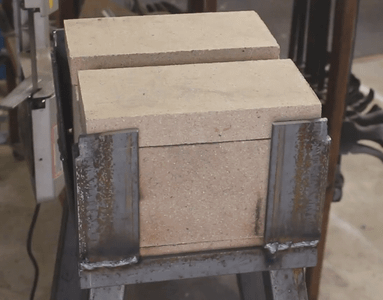
This forge is fairly small with interior dimensions of only 5x7x9½." Plenty large enough my projects though. Because of the size, the walls of this one are formed with only three bricks laid on their sides and all I had to do was weld angle iron uprights in the corners to secure them in place.
Step 6: Install the Roof and the Burner


Two more firebricks as the roof complete the build and I found this cool bent shape that just happened to be the right size at the steel yard to cap it off and hold the roof bricks in place. I retrospect, I shouldn't have welded it on. That way should any of the bricks break, I can easily replace them. Live and learn.
I installed the burner by welding a piece of ½" square tubing between the two back legs and wiring the burner handle to it with the Clampmaker®!
Use another firebrick as a front door to keep the heat in, and to keep from singeing your eyebrows when you throw it into turbo mode.
All the steel I got for this project were remnants at the steel yard and only cost me $10 for all of it. Be frugal. Shop around. Metal recyclers are even cheaper usually, but I wanted all new materials for this project so it would be nice and pretty. I spent $20 on firebrick and $20 for the weed burner for a total cost of $50.
Step 7: Watch the Video!

Participated in the
Metal Contest 2017


