

Introduction: Make Your Own Step Stool!

First of all, let me say hi to all of you that are viewing this instructable.
This is my first of many instructables and i hope you'll find it educational and interesting.
In this instructable, i'm going to show you how to make simple, yet classy step stool using basic woodwork tools and ony wood glue. So, we are gonna make it right way. Before we proceed, please concern that English is not my native language so please forgive me for grammar and spelling mistakes. Maybe you'll find this instructable too detail, but i'll show you not just proces of making step stool, but also proper way to use power and hand tools and safety notices when using power tools, also techniques for processing wood. After i finished it, i counted around 140 pictures in 14 steps so i can say that this instructalbe is quite detail!
I'm not professional carpenter, just a unemployed guy with no money and a lot of free time, and woodwork is my passion for several years. I have some hobby tools that i managed to gather during the years, and an old shed that i'm using as my "workshop".
So, let's begin!
Step 1: Find a Material for Your Step Stool (and Start a Fire :-) ))


First of all - fire up! While i'm writing (and doing) this instructable, outside is -10 degrees Celsius, or 14 degrees Farenheit, so if you are experiencing weather like I here in Croatia, keep your workshop warm.
For this instructable i'm going to use a piece of construction lumber that i have in my shed for few years, and now i decided to use it for my step stool. Most important thing - it's free, dry and won't warp or anything after few month of use, and i suggest you to always use dry lumber, you will save yourself money and effort. My board is 120 cm (47,24 inch) long and 33 cm (13 inch) wide, and 2,5 cm (1 inch) thick, it's pine. Please note - in Croatia we use metric system but i will also add every measure in inch so you can easily read this instructable.
You can also buy finished laminated boards, but i will show you how to make one.
My step stool should be 45 cm (17.7 inch) wide, 22 cm (8,66 inch) long, and "legs" height of 30 cm (11,81 inch).
Thickness will remain approx. 2,5 cm (1 inch). You can use exact or similar measures, use them as a guide measures, not a rule.
When dealing with construction lumber, or any kind of lumber that you dont know where it came from, always check for any metal objects (nails, etc) that can injure you or damage your tools, and be sure to clean it up due to sand and dust on lumber.
One more thing before we start - please make sure that you comply all safety notices on your power tool and that you use them responsible. They are very dangerous if you don't use them right and for intended purpose. I will not consider myself responsible for any injure that may occur to you.
Step 2: Before Cutting...


First that we need to do is rip our lumber, because you can't plane it in one piece with hand held power planer that i will use, and also when you rip it to smaller stripes and then glue it back together, board will be more straighter and will remain straight over the years. And it won't crack! This step stool will have lifetime guarantee :-)
So, in order to get straight board, i will rip lumber to 5,65 cm (2,2 inch) - yo can use similar or same measure - your choice. So, i need 5 pieces of 5.6 cm (2.2 inch) lumber - 4 pieces for board, and 1 piece for connecting piece between "legs" of the stool.
I don't have table saw, so i will be using hand held circular saw. It has a poor guide, so i will be using simpe guide that you can make in minute. Use a straight piece of wood and attach it to a circular saw bottom with screws. To do that, you will need to drill 2 holes through the circuar saw base. See picture 1 and 2.
Use a meter (measuring tape) to measure distance between blade and guide wood. We need 5.6 cm (2.2 inch). That distance must be equal on both side of the blade so that saw can cut straight. To secure the guide, attach it to a saw base with screws and once again check distance- Picture 3.
Before we proceed, check your saw blade depht. It must be few millimeters more than the board thickness. See picture 4. This is very important, because back kick of circular saw often occure when blade is put to low into the wood.
CLAMP YOUR WORK - always! Avoid working with non clamped pieces and always clamp your work!
Let's cut!
Step 3: Cutting...


After we adjust our hand held circular saw, we can proceed to cutting.
Hold your saw tight and gently push your guide against the edge of the board. When cutting, never stand behind circular saw, but stand on the side so that saw is not in front of you. This is important because if you lose control and saw jumps back (back kick), you won't be behind saw and saw will not hurt you. This also goes for table saws.
When you are done, you should have 5 pieces of board - 4 pieces of board for stoll's top part and legs and 1 piece for connestion piece between legs.
On pictures there are only 4 pieces - sorry i forgot to photograph fifth piece for this step.
Let's go to step 4 -planing.
Step 4: Planing...


For planing, i will use hend held power planer, since i dont have table jointer or thickness planer.
Ajdust desired planning depht and plane down your piece. First plane wider side of pieces, counting how many times did you plane each piece. Each piece must be planed same number of times in order to maintain constant thickness of each piece. This is important for gluing. So, simply count how many times did you plane first piece, and then repeat on other pieces.
See picture 1.
After you planed wider sides, proceed to planing narrow sides. Now you use little trick that will help you keep your pieces squared - plane them in pair. See picture 3.
When planing narrower sides, check for square. It's important for gluing that your pieces are squared. If they are not squared, glued board will not be flat and will be bent. See picture 4. It's not important how many times you have planed narrower sides, just plane it until is flat and squared. It's not important if stoll is 22 cm (8.66 inch) or 22.2, or 21.8, etc...But don't plane them too much, you'll end up with child stool :-)
On picture 5 i 6 you can see planed pieces, ready for gluing.
Step 5: Gluing...


In order to prepare your pieces for gluing, sand narrow parts with 40 grit sandpaper for better glue joint. Picture 1.
Apply glue equally on all sides that will be jointed together. Use brush to cover entire surface, better then just squezze out glue on wood. Picture 2.
After you applied glue on narrow sides, clamp all pieces together as best as you can, so that they are alligned to form a board. Picture 3.
Check for alignment (pic. 4.) and adjust if necessary (pic. 5). Hint - use wooden or rubber mallet to prevent damage from banging against wood.
Remove excess glue from joints (pic. 6) - first use squeegee (pic. 7) and then wet rag.
Now - the fifth piece. Use fifth piece to create connection between future stoll's legs. (pic. 8).
Cut it to approx. 35 cm (13.77 inch). I use mitter saw, but you can use regular hand saw or any other tipe of saw if you don't have mitter saw.
Even if your glue says that one hour is enough for dry, my experience says that it's the best to leave work clamped to dry over night and continue your work tomorrow.
Step 6: Flattening and Sanding - Part One (and Mistakes)


Once you removed clamps, you have your board glued up, nice and sturdy (pic. 1). I don't know for your board, but mine ididn't came up so good. It's nothing that we can't fix. So, we have to resolve problems that occured during our work.
First, as soon as i removed clamps, i noticed (my damn "critical eye") that my board is not flat, especially edges of board. The board is wider at the edges, by 7 mm or 3/8 inch, and that on each side. See pic. 2.
This happened because i used hand held power planer, and pieces that we glued together was not 100% flat and equal, each so little that you cannot notice when you look at each piece individually, but when you glue 4 of them, that difference multiples by 4, and you see the end result. If you use table planer, you won't have this problem. Let's fix that.
First, determine the difference, and best way to do that is that you put flat piece of wood (it can be anything that you know that is flat), and draw a straight line along that flat piece. Pic. 3. and 4.
Now remove wood until you reach line, then stop. I will use hand held plane, but you can sand it out, or use surform rasp, or whatever is available to you (pic. 5. and 6.) repeat this at every end of board that needs to be flatten. Be patient, and don't remove too much wood.
Now we need to flatten top and bottom wider sides of the board (pic. 7). Here i have huge misalingment in thickness of one glued piece (pic. 8). Flatten this mistakes as you flattened your board's ends earlier, i will also use hand plane (pic. 9). As you flattening your board, use something that you know that is flat to check your board's flatness. I use piece of straight scrap wood.
Another mistake - as i was planing my board to flatten it out, i created dent in the wood (pic. 11) that we will later repair with wood filler.
Now we proceed to sanding. It will be very helpful if you have some kind of power sander, because hand sanding is very time consuming and power sander will save you a lot of time. Result will be the same. If you are sanding by hand, use sanding block or some piece of hardwood between your hand and sandpaper because if you use just your hand and sandpaper, you wont be able to flatten the transitions between glued pieces - you will just round them up.
I will use belt sander with 40 grit sandpaper and sand it in direction as shown in picture 13. Sand untill you are satisfied with the result. Now the board is even more flat then before.
Most of my power tools are hobby (amateur) type, not professional type. I found that amateur tools are as good as professional, and the end result is the same, but with one big exception - they tend to heat a lot, so give them time to cool down and don't push them to hard, and they will serve you for long time. (Pic. 15)
Maybe untill now you noticed that i have big hole on my board (Pic. 16). That hole is from screw or nail or something that pierced the lumber all the way through, and i'll show you how to fix that.
Drill through that hole with drill bit with diameter bigger than hole, then use dowel same diameter as drill bit, put some glue on it, and hammer it down in hole. Let it stick just a little bit on each side of board, and once it's dry, sand it out to flatten it with board. (Pic. 17. and 18.)
Step 7: Cutting the Parts for Stool


My board is now flat, rough sanded, and ready for cutting to pieces for stool. We need 3 pieces - 2 for stool's legs and one piece for top board.
Observe your board, and decide which side will be top side, a.k.a. visible side.
I will use my mitter saw for cut, you use whatever is available to you. First, cut board on one side to make it square and remove unequal finish of glued pieces (Pic 1). After the cut, check for square and proceed to marking (Pic. 2.).
Mark your legs and cut them first. My will be 30 cm (11.8 inch), and top board will be 42 cm (16.5 inch). After the legs, cut the top board (Pic. 4. and 5.).
Now you have your parts cutted to desired dimensions (Pic. 6).
Let's go to the next step.
Step 8: Drawing a Layout and Creating Dado Joints


First, i'm going to draw a layout for stool's legs, because i don't want them to be just a block of wood.
I will use caliper/divider (that's how google transleted me this - pic. 1). I will try to explain as best as possible how i
make my marks for cutting. If you don't have caliper/divider, just use some round bucket cover or something.
Size of circle is arbitrary, and please se picture 1 for marking explanation. First mark bottom side of legs, and then put markings on both sides of the legs. Use smaller circle for bottom pattern (Pic. 2). This markings are just guides, and you can use other circle patterns. Just mark them exact on both legs (pic. 3.).
We won't cut the markings yet, now we will mark and make a dado joint.
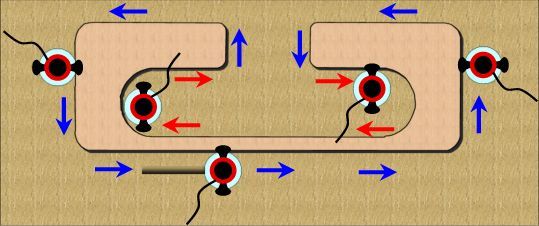
Making of dado joint is the tricky part, so be careful and patient.First we are making female slot on bottom side of top board.
I will put my legs 5 cm (2 inch) of the inside on each board, and 2 cm (0.8 inch) from edge of the board. See Pic. 4 and 5.
For making a joint, i will use my router, and it would be very god for this point if you have one. I will use 12.7 cm (1/2 inch) straight bit, and route 1,5 cm (0,6 inch) deep. To rout out your female joint, use flat guide wood (pic. 6 and 7.). I use same that i use in my circular saw. When your markings are done and you are ready for make your first slot, measure the distance between egde of the board and guide wood and remember it. When you will be routing other side of the board, just put guide wood on the same distance from the edge of the board, you don't need to mark everything again. At this point you won't need your top board for some time, so put a wood filler where necessary and let it dry (pic. 8 and 9.).
When you rout out female slots on both sides, it's time to rout out male part of joint on stol's legs (pic. 10).
Now, since we make our slots 1,5 cm (0,6 inch) deep, we must make out male part of joints 14 mm (0,55 inch) wide. That's not the problem. The problem is thickness of male part of the joint, and it must be exactly 12.7 mm (1/2 inch), since that is the width of out female slot. If you used router bit different then 12.7 mm (1/2 inch) width, you must calculate your measures. We make male part of joint on both legs and just on the top side, ie. the side that we will attach to the top board.
When you have determined required measures, mark it on wood and remove wood with router (Pic 11.). Use guide wood as before, and clamp your work tightly. Rout both legs in pair to save time and to accomplish more accurate joint. Now cut 2 centimeters of male joint from each side of legs, use handsaw and a chisel (pic. 13 and 14.)
If you did everything right, your joint should fit perfectly. Mine does :-) But don't joint legs to board yet, just see if the joint is good and adjust if necessary. (Pic. 15.)
Now we will prepare the connection piece between legs, and first make female slots on legs for that piece. Here will also use dado joint. First we will make slots on legs, and slots must be on inside of legs (pic. 16). Find center of the leg (this is the reason that we didn't cut the layout earlier - it would be difficult to mark our slots), and mark your slot vertically, and make it little smaller than the connection piece. Again, use guide wood as before and rout your slot on both legs. (pic. 17).
Now, to make male part of the joint on connection piece, we must first measure space between legs. Mine space is 30.2 cm, and cut your connection piece little bigger, i cut it to 32.2 cm, so i have 1 cm for male slot on each side (pic. 18). Rout it as you rout male piece on leg's top side (Pic. 19.). After you rout wood to make male piece of joint, use hand saw and saw off 0,5 cm (13/64 inch) from male part of joint to fit it to slot, as we did before. Mine fits OK.
Now we proceed to cut the layout on the legs.
Step 9: Cutting the Layout and Sanding


Now we will cut the layout by the markings that we made with caliper earlier. Use jigsaw, bandsaw or handsaw...
I will use jigsaw. Remember to cut by the line, not into the line (Pic. 1,2,3).
Since our cuts are rough at this point, we need to sand them out. For sanding, i will use my belt sander that you seen before, and my homemade jig for edge sanding (Pic. 4.).
When you curved stool's legs, put a wood filler where needed and let it dry.
Back to the top board - because legs will be curved, i will round up my top board, you can also, or you don't have to. Your choice (Pic. 5. and. 6.).
Step 10: More Sanding...


I bet you dreamed sanding last night, didn't you? :-) I'm kidding, but i know most of you hate sanding, so as I. But sanding in one of the most importnat skills in woodworking.
Now we need to remove dried wood filler and again sand our stool's parts.
To sand out dried wood filler, don't use belt sander, since your sanding belt will catch all wood filler remains and will be unusable after few seconds of use, and we all know that sanding belts are not cheap! So first rough remove dried wood filler with sanding block and piece of sand paper. Use 120 or 150 grit sandpaper. Be sure to use dust mask, since things are about to get dusty!
After you roughly removed wood filler, proceed to sanding with your power sander, also 120 or 150 grit.. Be sure to sand every side of each part, so that you have nice and smooth surface. Sand in direction of grain on wood.
Check pictures.
Step 11: Edge Profiling - Fine Tuning


At this point, you can see how your stool will look like. Most of them out there come with nice and profiled edges, so we will profile our edges too.
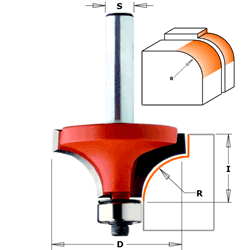
For that job i will use my router and round router bit, but it can be done with file and sandpaper.
Just put your bit in the router and profile your edges. Not complicated job, but be sure to do it very carefully because routers can be quite dangerous tools. Also, make shure that you are using your router the right way.
Check pictures.
One thing that i forgot - on top side of stool's legs, cut 1,5 cm (0,6 inch) from each side (Pic. 6). Our leg/top board joint will look much nicely if leg is little narrower than top board. If we didn't profiled our edges. this wouldn't be necessary. Now round/profile that piece again :-) I should done this at the step 9, but we learn from our mistakes.(Pic. 7. and 8.)
After you profiled all edges, you'll see that edges are all rough (at least mine are) and they need to be fine sanded (Pic. 9. 10. 11. and 12).
Once you profiled and sanded everything, we are ready for gluing.
Step 12: Gluing


One you sanded everything, parts are ready for gluing.
Since we are using dado joints, our joints need ony glue and will last for a very long time.
Check pictures for further instructions.
We are very close to the end now :-)
Step 13: Finishing


So we have come to the end of the line. Almost. After you removed clamps, your stool is almost over.
My needs more sanding, first with 120 grit to fix smaller errors such as clamps mark on top board where i didn't put scrap wood between clamps and board. After everything is sanded with 120 grit, use 240 grit to give your stool glass smooth finish.
After you sanded everything, chech is your stool legs are flat and alingned. You don't want to teeter on your stool.
Best way to check that is to put stool on surface that you know is 100% flat. Well, mine teeters little, and i can fix that in a minute or two. Determine which side of legs teeters and sand those endings of legs that are longer and causing teetering. Check the pictures.
As far as I'm concerned, my stool is over but my wife said that natural pine look won't fit in area where stool will be dispayed, so she want's it painted white. So i painted it white. But just 2 coats of white, so the wood structure is still visible.
Step 14: Wisdom Words


I hope you enjoyed this instructable and that you manage to understand all the things i tried to explain here, expecially since english is not my native language.
This is not just a stool, it's result of your effort and skills, and you know when someone says that you more appreciate things that you earn yourself? Well, now you know that you most appreciate things that you make by your own hands.
You could buy stool like this for few bucks, but it's much more educational and self rewarding to make it yourself.
So, enjoy in result of your work and hope to see you on some other project! This was my first Instructable, first of many i hope!

Participated in the
Wood Contest


