

Introduction: Making a Kayak Paddle


Making your own wood kayak paddle is a great way to personalize your kayaking adventures. Instead of just another plastic paddle you can have a beautiful piece of functional art that you made yourself.
This particular paddle uses Paddle Plans from Guillemot Kayaks, but you could base your build on a paddle you already own and like buy tracing the outline of the blade shape.
The wood I'm using is Western Red Cedar for the body of the blade, with a bit of Ash as the reinforcing accent. The shaft is made from Sitka Spruce with a reinforcing spline of Ash.
The blade is reinforced with fiberglass and has a nylon para-cord reinforcement around the edges. This make for a lightweight but very strong paddle
Supplies
- Western red cedar
- Sitka spruce
- Ash
- 2-ounce fiberglass
- Nylon Parachute Cord
- Tite-Bond III waterproof PVA Glue
- Epoxy
- Varnish
Step 1: Gluing Up the Blanks
The blades will be cut out of blanks that are 16"-18" long, about 4" thick and at least 4" wide. With wider blanks you can make more blades.
In the video I am using 2x8 western red cedar stock and laminating a 1/4" thick piece of ash between the layers of cedar. You can use any combination of wood you would like. Softwoods such as cedar, pine and spruce will be lightweight, hardwoods such as ash, maple, walnut, oak etc. will be strong but if used extensively will make a heavy paddle. The weight of blades will make a big difference on how enjoyable it is to use the paddle.
The shafts I am making here are about 8' long buy 1-1/2" x 1-1/2". They will get cut down to size later. If you use wider material you can laminate up several shafts at a time. You can also use shorter material if you are going to make feathered blades where the blades are at an angle to each other.
I cut the material to size and then glue them together with waterproof PVA glue such as Tite-Bond III. Other glues such as Gorilla or epoxy can also be used.
Step 2: Cutting the Blades
I use a jig I made for the band saw that helps cut a curved blade, but you can just mark the curves onto your blade blanks and make the cuts free hand.
The blades are thicker at one end and thinner at the other. I alternate the which end is thick and thin so I move consistently through the blank and so I will have a symmetrically matching set for each end of the paddle. You will need to cut at least 4 of these blades.
Step 3: Preparing the Shafts - Scarfing and Tapering
Most of the paddles I make are feathered. This means the blades at each end are at an angle relative to each other. This can relieve some stress on the wrist when paddling and help cut through a headwind.
This feathering is achieved by joining two ends of the shaft together in the middle with a scarf. By cutting the scarf at an angle you can achieve the desired angle between the two paddle blades. It is a little tricky, but once you are set up it is very easy to achieve.
I use a sled in the table saw that cuts a taper and holds the shaft material at an angle to the saw blade.
It looks nice to taper the ends of the shaft on either side. This is not required, it just makes the paddle look nicer.
A round over bit helps start make the shaft in to a nice comfortable oval.
Step 4: Gluing on the Blades and Initial Shaping
Even though the blades of these paddles may be feathered, they are still glued on straight and square on the shaft. It helps to cut away some of the shaft on the power face of the blade before gluing on the blades, but this is not required.
I use the Tite-Bond III to glue the blades on either side of the shaft. The thin end of the blade aligned with the tip of the shaft and the thicker end is towards the middle of the shaft. Some good long clamps are nice for this process, but you could wrap everything with string or stretch wrap to hold it all while the glue dries.
I use my thickness sander to flatten out the power face of the paddle, but you can do it with hand tools such as a spoke shave. Likewise with the back face of the blade. Here we are just working on the outer end of the blade at first.
When the flattening process is done I cut out the outline of the blade shape. You can use your favorite paddle as a pattern, just remember to flip the pattern over for each end of the paddle.
Step 5: Sculpting the Blades
This is the hardest part of the process. I use a right angle grinder to do some freehand shaping and then refine the shape with hand tools. I try to make the edges of the blade nice and thin to keep the paddle light, while leaving the central section of the blade full thickness for strength.
The most common mistake is to leave the blade too thick because you are scared to go too far and make it too thin. Don't be too much of a wuss about it, aim for 1/8" thick all the way around the edge with a nice smooth taper from the middle. The blade eventually gets reinforced with fiberglass which makes it very tough and strong.
Step 6: Reinforcing the Edges
I regularly bounce my paddles off rocks. I want a rugged and durable edge to absorb the abuse. I have found that para-cord saturated in epoxy resin is very tough. While you can't exactly cut down a tree with these paddles, they will handle paddling in rock gardens or doing whitewater.
I use a small rasp to start a shallow groove around the whole perimeter of the blade. This just provides a place to hold the cord until the epoxy bonds it to the paddle.
I use some heat and liberally brush epoxy on the cord to maximize the penetration of resin into the cord.
Step 7: Glassing the Blades
It is amazing how much strength a layer of 2-ounce fiberglass will add to the wood. Between the two and with the cord around the edge the paddle blade can absorb a lot of abuse.
I can get two layers out of the width of the fabric. I cut all the pieces to size as well as some extra pieces to add more strength to the tips.
Again some heat will help the fabric absorb the resin for a nice clear layup. Squeegee off the excess to keep the blade lightweight. After squeegeeing the fabric should not be glossy, the matte finish indicates the fabric is tight against the wood and not floating up.
After the wet-out coat of epoxy has set up I apply a fill coat that fills the weave of the fabric and starts making the paddle shiny.
Step 8: Gluing the Shafts Together and Finishing
I like to do most of the work before gluing the scarf on the shaft together. This just keeps the parts easy to handle while doing the work.
Since the paddle shaft is a bit oval, the scarf does not fit together in a perfect match, you will need to eyeball it a bit to make sure the two halves are straight and true before the glue sets up.
You can then finish shaping the shafts in the scarf area and start the finish sanding process.
Coat everything with a coat of epoxy after it is all smooth. This serves as a solid base for the protective coating.
Before the final finish coats give the whole paddle a through sanding up to at least 220 grit sandpaper.
In this case I use a 2-part automotive style clear coat that is available from Amazon, but you can also use a more traditional marine spar varnish.
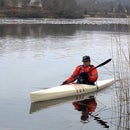
The finished is lightweight and strong. I prefer the feel of wood in my hands over fiberglass or carbon fiber. Especially in the winter it feels warm and comfortable.
Happy Paddling!


