

Introduction: Maple Syrup Evaporator


This Instructable will show you how to make a maple syrup evaporator for roughly a $100 dollars from an old filling cabinet. This is the second one I have made and they work great, especially if you are just getting into the rewarding hobby of maple syrup making.
A good evaporator can set you back thousands of dollars and are designed for medium to large scale production. If you are like me and are relatively new and tapping under 50 trees, this is the project for you. My last version was able to boil about 10-15 gallons of sap an hour, I'm hoping this one will do about 15-20 and hour. Last year I was able to harvest about 900 gallons of sap, but do to only being able to boil on weekends, I had to trow much of it away.
The only tools needed was an angle grinder with cut off wheel and sander, drill, and a square. Not much too it.
This Instructable will not provide insight into sap collection and processing, but more juts the making of the evaporator.
A big shout out to Garden Fork for the inspiration.
Enjoy
Step 1: Gerrting Started


First step is to round up your materials and tools. The two most important aspects of this build are the filling cabinet and the steam pans. My first evaporator I used a Legal size filling cabinet which is larger in volume but is more difficult to find pans that fit. In this version I am using a letter sized filling cabinet which is about 3 inches narrower but allows for a larger selection when it comes to pans.
I found my pans first at a local kitchen supply shop and based my cabinet selection based on their size. The pans cost about $80 and the cabinet was free (just surf the web or ask around, these are becoming obsolete)
Step 2: Dismantle

First thing you need to do is light the load. Remove all the drawers, sliders and cross braces. Most will come off with ease but you will find a couple welded areas that need to be cut with the angle grinder.
Step 3: Angle Iron for Support


I had roughly 40 feet of 1 inch angle iron lay around that I used for strengthening the cabinet and providing an adjustable ledge for the pans to sit on. This can be easy bought at your local building store or found a a local scrap yard.
I used self drilling/tapping screws for the whole project. If you look at the images you can see I cut notches instead of drilling holes. This allows for adjustment when needed and and vary about 2 inches depending on your pan sizes.
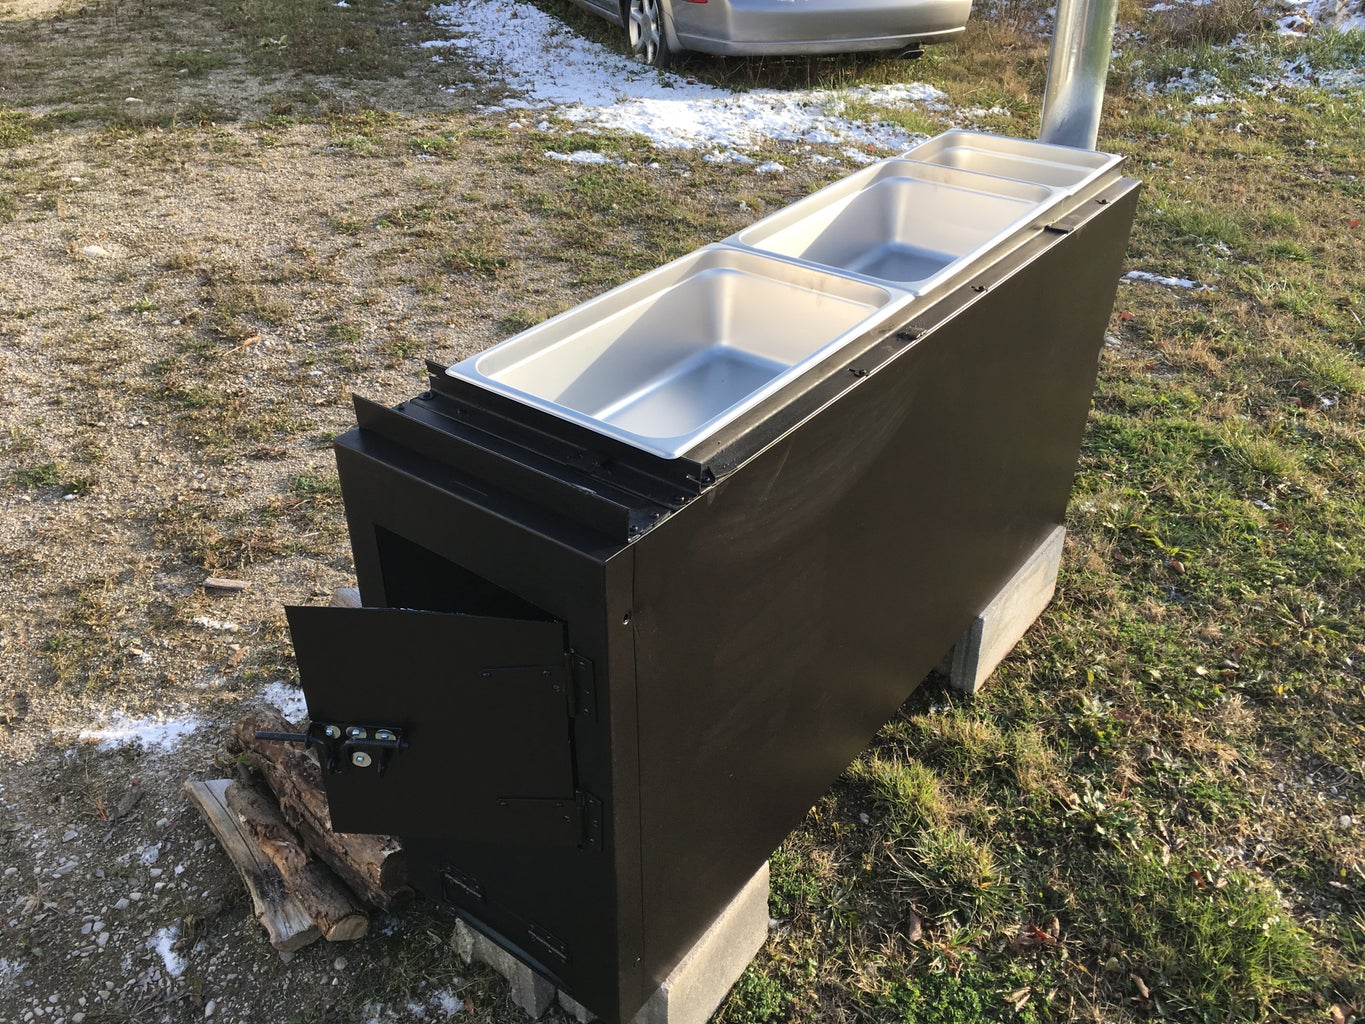
Step 4: Test Fit

Fit your pans in and make sure they fit. You can adjust the sides easily by sliding the rails in and out till you have a nice fit. You don't want it to tight as you want to be able to move the pans in and out when boiling. I could not will the cabinet void 100% with the pans and as you can see in the photo, covered the last 4 inches with some scrap to help prevent heat lost.
Make sure to use stainless steel pans. You can use aluminum but they will leave a metallic taste to your final product
Step 5: Sand, Sand and Sand Some More


This is the longest and pain stacking step in this project. You will need to sand off all the paint. If not it will flake off during your first couple burns and get into your sap. You could burn off all the paint but this will not get all the paint off and will take a long time. It took me about 2 hours with 40 grit sanding pads on my angle grinder.
You could leave it like this, but I decided to give it a coat of heat resistant paint to prevent it from rusting and, come one it just looks so much better
Step 6: Time to Cut


Mark out where you want your front door, exhaust hole and an access point below the front door to help with air flow and cleaning out ashes while in use. When adding hinges its smart to cut those sides first, attached hinges and latch before you cut the bottom and top, this will make your life so much easier.
Step 7: Time to Paint


Paint the whole project with heat resistant paint. Make sure not to paint anywhere in direct contact with a flame.
Step 8: All Elbows

Install the elbow for your chimney. This and the 4 foot chimney I used only cost about $7. Attache with self drilling screws.
Step 9: Holding Fire


{"context":{"location":{"href":"https://www.instructables.com/editInstructable/edit/E9M6ARGJ9SVU2VG/step/10#","origin":"https://www.instructables.com","protocol":"https:","host":"www.instructables.com","hostname":"www.instructables.com","port":"","pathname":"/editInstructable/edit/E9M6ARGJ9SVU2VG/step/10","search":"","hash":""},"jQuery11020658472320017332":1,"b":{"jQuery11020658472320017332":20,"sizzle-1510452369849":{"parentNode":["8205 24",524]}},"h":{},"gtmHasClickListenerTag":true,"gtmHasLinkClickListenerTag":true,"gtmLinkClickListener":true},"selector":"#editor-Object-1630"}
Step 10: And You're Done


Now all you need is some sap, fire wood and some time to kill. I should also mention I drilled a couple holes in the bottom in the event any water gets in and will drain out. They should also provide a little more air flow to keep that fire going. Once the sap starts flowing I'll add some pictures of the evaporator (a.k.a. Vader) and let you all know how it turned out. I hope you have enjoyed this project and please leave a comment/feedback below.
Cheers

Participated in the
Reclaimed Contest 2017

Participated in the
Hand Tools Only Contest 2017

Participated in the
Metal Contest 2017


