

Introduction: Mini Digital Pinball Cabinet

This started after really getting into The Pinball Arcade on Android, I had an idea of creating a stand for my Nexus 7 that would also double as controls for Pinball.
So, I looked around for ideas and saw that a couple of people had already done it, so I decided to build my own and try creating an instuctable to go along with the build.
This is my first instructable, so bear with me.
Step 1: Parts


Here is a list of parts I used for the build: -
Nexus 7 (Rooted)
OTG Cable
Xbox 360 wired controller
MP3 speakers
Arcade Buttons (2 + 1)
Chair Buffer rubber feet (4)
M6 25mm bolts (2)
White A4 Printable Vinyl Self Adhesive Sheets (4/5)
4x1mm magnets (8)
Wire (I used an old IDE cable)
6mm MDF
8x16mm Pine Stripwood
3mm Balsa wood
Grey Primer
Black Satin Spray Paint
Clear gloss Spray Paint
PVA/wood glue
Hot Glue Gun
Polyfiller
Step 2: Mock-up and Cutting


Firstly, start out by making a cardboard mockup. This will give you an idea of the final cabinet and saves wasting MDF if it doesn't quite come out right. The first one I made looked weird and was to large for the Nexus, so I made a second smaller one which looked and fit better.
It's important to have a cardboard mockup when working out the hinge. I never made technical drawings, it was just hit and miss until I was happy with it.
Once you've got it all looking good, measure out and cut all the pieces using the MDF.
I've included my measurements on the image, but after painting is a tiny bit tight, so you may want to increase the width by a couple of mm.
At this stage it's also easier to drill holes for sound, buttons, hinges and for ventilation. For the flipper buttons I put them in a place where I could rest my hands on a table with my thumbs on the lockdown bar. Don't forget to take into consideration the lift from the feet. Likewise the launch button should be confortable, I placed mine so I didn't have to take my finger off the flipper button to reach.
Step 3: Gluing


Before gluing the pieces together, you should place them together to make sure it all fits snuggly together.
Once you're happy, glue the pieces together. I used stripwood to strengthen the joints. I didn't glue the front panel on the backbox because I had to idea of putting a digital photo frame inside but never got around to it.
You will also need to glue some strips to the sides of the main box to hold the lid and Nexus in place. And one more piece to keep the nexus from sliding down the lid.
Step 4: Painting


Once everything has set do one final test to make sure the lid fits and the hinge works nicely.
Next prime the MDF using grey primer/undercoat.
Then paint it with whatever colour you like.
I recommend black satin as it gives it a nice authentic look, and has less sheen than gloss. Also remember, several thin coats is better than one heavy coat.
Also at this step I cut and painted the lid. The lid goes under the N7 and is there to cover the innards of the cabinet. I put lots of holes where the N7 battery is located to allow for ventilation and a hole for the OTG to go through.
Step 5: Speaker & Controller


You will need to hot glue the speakers to the sides over the holes you drilled earlier. I took the casing off the speakers to make access easier, and hot glued the battery pack to the back of the main box. But this will all depend on what speakers you are using.
At time of writing The Pinball Arcade doesn't natively support controllers, so you need to use a program that changes button presses to screen touches. These programs require root access, so obvioulsy you need a rooted tablet. I use USB/BT Joycenter, but there are others. Zen Pinball does support controllers, so you can use a stock Nexus.
Once you have downloaded the program, using the OTG Cable, set up the contoller to emulate screen touches for flippers and the launch button (Unfortunaly I didn't emulate the plunger, maybe in another build). The flipper buttons are easiest to map to LB/RB, and the launch ball button to A, setting up this way will also match Zen's native controls.
When you have set up the controller and saved the profile you can begin dismantling it. You can remove the rumble mechanisms and tops of the analogue sticks, you should be left with the circuit board and a long lead.
At this point you can shorten the lead, just to save space in the cabinet.
Using the picture above as refernce, solder the wires to the LB/RB buttons. Carefully scrape some of the black substance off the A button terminal to reveal metal and solder wires to these.
Now either using solder or crimp connectors, attach the other end of the wires to the microswitches that came with the arcade buttons.
Test the controller again in TPA to make sure everything works as it should. I placed some hot glue on the soldered parts to strengthen them.
Now simply hot glue the controller into the cabinet, hooking up the buttons as you do so.
Step 6: Alterations


At this point I will mention a change I made. I did this step after I'd finished, but it makes more sense to add it here.
The lid for the main box was not giving enough ventilation to the Tablet, and was making it real hot after a short play. So I decided to cut the middle of the lid out completely. I then cut another piece of MDF roughly the same size as the Nexus 7 to sit over the hole when not in use. You also need to cut a hole in the lid for the OTG and speaker to plug in to the N7.
Now is also a good point to screw the feet to the bottom of the cabinet.
Step 7: Artwork


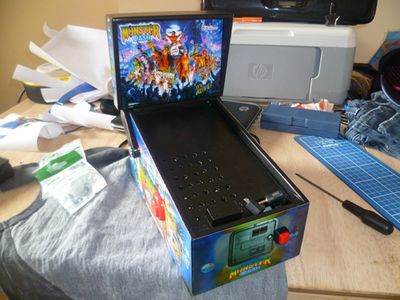
By now you should have a fully working mini pinball machine. All that's left now is artwork and lockdown bar. You can paint the outside in your own design or, like me, print some decals.
Inkjet printable vinyl sheets can be found on ebay. You need several sheets for all the pieces. Now design or find some artwork you want on your cabinet. I chose Monster Bash, but I can't remember where I found the scans. Resize the images to fit your cabinet and print them to the vinyl sheets.
Cut them to size and stick to your cabinet. I would recommend gluing them, as after a while my corners started to peel slightly. You will also need to seal the vinyl using a special spray otherwise the ink may slowly rub off. I just used clear gloss spray and it worked fine.
You may also notice I didn't cut the sound holes into the vinyl. I didn't want to ruin the sideart so I left it, and it doesn't make a huge difference to the sound.
I also found a playfield shot of Monster Bash to go on the MDF Nexus 7 I made.
Step 8: Lockdown Bar


The final step is creating the lockdown bar. I thought of getting a metal one made, but in the end I decided to go with a thin wood.
I used 3mm Balsa wood. Basla may be weak but your hand never actually rests on it so it needn't be that strong.
Measure and cut the balsa to fit around the cabinet. And bring it far enough up that it covers the leads and just overlaps the N7.
Glue the pieces together, and using polyfiller and a fine sandpaper, smooth all the surfaces.
Next, prime and spray with the same Black Satin you used on the main cabinet.
Finally, glue small magnets to both the lockdown bar and the cabinet. This will hold the bar in place and make it easily removable. You can't see in my images, but I actually recessed the magnets and then painted over them to disguise them.
Step 9: Finished!!!


Finally, you can hook up your tablet and enjoy pinball the way it was intended.


