

Introduction: Modern Nightstand / Bedside Table With Cable Management System & Wireless Charging


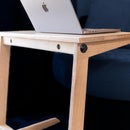

Hey everyone, I made this modern night stand with hidden wireless charging and cable management system in the back for me and my wife. The legs have a cantilevered design that gives it a modern flair. The reason behind the design (as with anything I make) is to fit the way I use my furniture pieces. I want a modern, minimalist, and airy look while having plenty of storage for how I would use it. The bedroom is a place where I like to watch movies, read a book, and edit content for Youtube and Instagram. That's the reason why there's essentially a "shelf" beneath the top surface of the nightstand for me to store my electronics or books, while leaving the top clutter-free for my lamp, or glass of water. And since I often have my electronics plugged in, I made a small cord management system in the back of the night stand to keep my cords from falling into the abyss behind the nightstand while they're not in use. Lastly, the nightstand also has a hidden wireless charger built into the cabinet portion. It's just an additional feature to keep things clean.
Be sure to check out the Youtube video above to help better understand each step!
Materials (Approx. for 1 nightstand)
Walnut hardwood: (60"x6"x1")
Walnut 3/4" Plywood: (1/2 sheet)
Walnut 1/2" Plywood: (1/8 sheet)
Walnut 1/4" Plywood: (1/16 sheet)
14" Soft Close Drawer Slides https://amzn.to/2VaZyDO (Amazon)
Tools
Microjig Tapering Jig: http://bit.ly/2XyhTID (Microjig)
Microjig Grr-ripper: http://bit.ly/2IQbMLF (Microjig)
Microjig Grr-rip Block: https://bit.ly/2Vpv8dN (Microjig)
White Marker: https://amzn.to/2Efn89z (Amazon)
Bandy Clamps: https://amzn.to/2EYyfCA (Amazon)
Step 1: Cutting Vertical Leg


First, I prepped the materials to make the legs. After crosscutting the boards to length, I flattened the faces and squared up the edges. Then I ran them through the planer to get the pieces down to a consistent 1".
I wanted the leg structure to have a 15-deg backward lean, so after ripping the vertical pieces down to roughly 2" wide, I marked out this 15-deg angle. The mark doesn't need to be perfect. It mainly acts as a reminder how the cuts need to be made. Since I was making two night stands, there are too many mirrored cuts and too many chances to make a mistake. I set the fence so that all the legs come out the same length. In my case, I cut them to roughly 26" long so that after the lean, the resulting height of the night stand will be about 24".
Step 2: Cutting Tapers on Top and Bottom Horizontal Pieces


Next, i laid out the tapers on the top and bottom horizontal pieces. For both, I had the tapers going from 1" at the back to about 2" at the front. Then I used my tapering jig to cut them after lining it up with my lines. Remember, the top piece is shorter than the bottom piece, so the actual angle of the tapers are different between the top set and the bottom set. But using a tapering jig, I only had to set up once for the short piece and then once for the long piece.
The last thing I did was cut 15-deg off of the wider end of the legs. This will match the horizontal pieces up with the ends of the vertical piece.
Step 3: Cutting Mortises on Horizontal Leg Pieces


Alright guys, this is the fun part. This was my first time cutting bridle joints, and I can assure you, it's a lot easier than it looks! I started out by cutting the mortises on the horizontal pieces first. It's always easier to cut the mortises first, and then cut the tenons to fit later, versus trying to fit a mortise to a tenon. Anyway, here's how I did it.
The easiest way to lay these out is by clamping the pieces together and then striking lines where the horizontal and vertical pieces meet. This helps me to determine the height/depth of the mortise. Next, I used a ruler to layout the thickness of the mortise, which is 1/3 the thickness of the leg piece. Since the legs are all angled, the best way to cut these mortises is using a tenoning jig such as the one I used in the video. When I made the tenoning jig, I had in mind that I'll be using it for something like this, that's why the support piece can be adjustable to hold any piece -45deg to 45 deg from vertical. I've got a video on the build of this jig linked above.
The most important thing is to make sure the mortise is cut dead center of the leg piece, so once glued up, the vertical piece and the horizontal pieces will be flush. This is actually a lot easier than you'd think! The trick to making sure the cut is centered on the piece is using a dado set slightly thinner than the width of the dado to be cut and then line up the tip of the blade with only one side of the layout lines. After making the first pass, just flip the piece over to make a second pass. This will ensure the mortise is dead center of the piece!
After you've cut the mortises into all the horizontal leg pieces, let's move on to cutting the tenons in the next step!
Step 4: Cutting Tenons on Vertical Pieces


Since the angle of the tapers on the horizontal pieces are unknown, once again I brought the pieces together to layout the cut lines. In this case, the line will indicate the angle and the depth to cut the tenons. After striking a line, I used a bevel gauge to transfer this line over to my miter gauge. Keep in mind, this angle will be different between the top and bottom horizontal pieces because their lengths are different. It'll be a very small difference, but it's enough to cause a big problem during glue up.
With the miter gauge set, I began to cut the tenons. I set up a stop block against my fence to make sure all the tenons will be the same length. I started out with the dado blades set much lower than needed so I can sneak up on the perfect fit. I made one pass, flip the workpiece over to make a second pass on the opposite side, this ensures the tenon is centered on the workpiece. I deliberately cut the tenons slightly thicker and longer than needed, so that I can flush things up with hand tools. In the last images you see above, I used a rabbetting block plane to clean up the saw marks. After cleaning up the saw marks, I should end up with a perfect fit.
Step 5: Leg Glue-up


With the mortise and tenons cut for the bridle joints, it's time for the glue up. I applied glue on all the contact surfaces. You can see in the video that even after I used the block plane to clean up the saw marks, the joint came together snug, but the tenon poked out slightly. All the tenons poked out the same amount, so that after flushing things up with a scraper, all the legs will end up being the same height.
What I did forget to do before the glue up was cutting a 45-deg miter on the ends of the horizontal pieces. This is for gluing the back trim for the top and bottom shelves. Since I don't have a miter saw, I had to do this on the table saw, which had some difficulties but I managed to get it done. It's much easier to do on a miter saw, if you have one. Or just do this step before gluing up the legs. OR, if you like butt joints, you can skip cutting the miters altogether.
Step 6: Making the Cabinet Case (Part I)


The cabinet case is pretty standard, with four sides made from 3/4" walnut plywood that's edgebanded with walnut hardwood. Pretty much what you've seen me do before in other videos (maybe?). The thing that's different is the back of the case is made from 1/2" ply instead of the typical 1/4" I use. Also, the back sits about 1-1/2" inboard of the back edge. This allows me space to add a cable management system as well as a space to store a power strip.
After cutting the boards down to their rough sizes, I cut and attached walnut hardwood strips to the plywood. After the glue cured, I flushed them up with a hand plane. Then I cut the mitered edges into the boards while cutting them down to length. Before gluing up the sides of the cases, I laid out the location for cutting the dado that will receive the aforementioned 1/2" ply, and then made the cut on the table saw. After the dados were cut, I glued up the bottom and two sides together, reinforcing the miter joint with Dominos.
Finally, I measured for and cut the 1/2" back panel. Once the back panel is cut to size, I applied glue in the dados and slid the back panel into place. I had to use a little bit of gentle coercion to get this done.
Step 7: Making the Cabinet Case (Part II)


Before gluing on the top of the case, I used my CNC to route out a recess for my wireless charger. There are other ways to do this if a CNC is not available, such as drawing a line and then using a palm router to cut out the recess. But since I have a CNC, I decided to let it do the work while I worked on other aspects of the case such as installing the drawer slides and applying finish to the inside of the cabinet. For such a small cabinet, doing these two tasks while the top is open makes it A LOT easier!
After the recess for the CNC has been cut, I used hot glue to attach the wireless charger, and then applied finish to the bottom side of the top panel.
Step 8: Making Cable Organizer


Next, I took a piece of scrap 2"x2" about 12" long to make two cable organizers. I drew out the side profile of the cable organizer on the end grain of the shape and marked out the materials that will be removed. I made the cuts using my table saw. For something like this, it really shows the importance of using the Microjig Gripper. With the legs supporting the piece, it's very stable no matter what angle I made the cuts. Click here to buy.
After the final shape of the cable organizer has been made, I marked out the locations of the notches for holding the cable. The pitch between the gaps are roughly 3/4". I also had to make multiple passes at each mark, adjusting the fence with each pass in order to make a gap wide enough to receive the cable. Finally, I cut the 12" long piece into two for my two separate organizers.
Step 9: Final Case Glue-up


With the cable organizer completed, I used glue and clamps to attach it to the bottom face of the top pane. Once the glue has cured, I assembled the top panels to the case.
Step 10: Cut Joinery to Attach Legs to Case


The legs are joined to the cabinet case with dados. Before cutting the dados, I first stacked up a bunch of scraps I had laying around to prop up the case to the height that looked best to me. Then I marked out the lines and cut them on the table saw. The dados are roughly 1/2" deep. I advice cutting them a little bit shorter at first, and sneak up on the fit. Getting a tight joint here is important to the structural integrity of the whole unit.
Step 11: Cutting Top and Bottom Shelves


With the legs dry fit from the previous step, I measured out and cut the top and bottom shelves out of 3/4" ply. Similar to the case construction, these also had hardwood edge banding applied.
Next, I marked out the height which I will cut dominoes into the legs, which will be used to join the top and bottom shelves to the legs. The height of the dominoes were set to leave the edge of the legs about 1/4" higher than the top of the shelf. This allows me to cut a small bevel on the legs that eases the top edge of the legs down to the top shelf.
Step 12: Leg and Case Glue-up


After a successful dry-fit, it's time for the final glue-up! After applying glue, I worked my way around the cabinet, first clamping one of the leg assemblies to the cabinet, then prop up the top and bottom shelves to their proper heights and glue them to the leg assembly. Finally, glue up the other set. Do not glue up both leg assemblies first before gluing in the shelves, because the Dominoes will get in the way. If, instead of using Dominoes, you used dados for holding the shelves, then glue the two leg assemblies first before inserting the shelves into them.
After everything is assembled, I applied finish to the whole assembly.
Step 13: Making Drawer Boxes


The drawer boxes were made from 1/2" ply for the sides, and a 1/4" ply for the bottom. After cutting the sheets to size, I cut a 1/4" dado through the 1/2" boards for receiving the 1/4" ply later. I've shown at least another way to making the drawer boxes, but for this one I used Dominoes again. And there are many other ways to making these, so pick your poison! :) With three sides glued up, I measured and cut for the drawer box bottom. Then closed off the box with the fourth side.
To install the drawer boxes, I used a 1/4" ply as a spacer on the bottom to lift the drawer box up. Then I pulled out the drawer slides installed earlier and screwed the male side into the sides of the drawer boxes.
Step 14: Making and Installing Drawer Fronts


Next up, it's time to make the drawer fronts and install them. As I mentioned in the video, I've got a kid who's started crawling, and soon he'll start walking. So this time I decided to stop using drawer pull hardwares, instead, I just cut a bevel into the top of the drawer fronts which will allow the fingers to hook on to. After cutting the bevels, I used my hand plane to knock down the sharp edges.
Making the drawer front was quite easy, but installing presented a challenge since there aren't any hardware for attaching the fronts to the drawer boxes initially. Plus, there's the initial extra force needed when pulling out the soft-close drawers so I couldn't use the pin-nail trick either. So what I ended up doing was driving in two screws, allow the screw tips just protrude out from the other side. After putting the drawer front in the proper location, push the drawer front toward the drawer box. This will put two indents into the back side of the drawer fronts. Pre-drill into the drawer fronts, then pull the drawer boxes out and line up the screws with the holes on the drawer fronts. Now just drill into the drawer front. Voila!
Step 15: Installing the Power Strip


With the cabinet completed, I installed the power strip to the back of the cabinet. This was the reason why I used the 1/2" ply instead of the 1/4" ply. It's so there's some "meat" for me to drive the screws into for hanging the power strip. With this done, go and enjoy your minimalistic modern night stand that's filled with features to help you get things organized!

Runner Up in the
Woodworking Contest


