

Introduction: More Humane Moisture Sensor


Recently I got a project from Titan industries, who were in search of something as an interactive plant pot which could bridge this gap of emotional communication, in mins this reminded me of brilliant projects done by people where the plant could could tweet and send mails and txts and on your command over the cloud, could also self water them.
But all this is good only if you stay away from your home for a long time. How the plant pot communicate when you are around? You obviously don’t tweet your sister in the next room for cookies!! That’s not humane.
Often the most difficult part in making and designing is “elimination”.
So my system is a small modular hand held plat moisture level indicator which gives facial expressions based on moisture level of soil. a Moe humane approach , just ilke a kid. No internet connection :p.
So all you do is make multiple of these(I’m going to shortly release detailed instructions of making them ) and put them on your indoor plant pots. And they make faces depending on moisture content of soil.
Step 1: Things You Require


1. 1- 8X8 LED Matrix. (Link to buy in India)
2. 1- Arduino Pro mini 5V ATMega328. (buy it from here in India)
-If you don't know what is Arduino; it's time you do and head over here
-To know about the different variant and our version of Arduino head here
3. 1-FTDI Board - 5 Volt logic level means all the pins have operate on max 5 volts; for geeks the term is 5Volt TTL level (It will be used for programming Arduino Pro mini as it doesn't come with on-board system to do so like Arduino Uno). (buy it fro here in India)
4. USB mini Cable. (here )
5. Moisture sensor (here to buy )
6. Transparent Acrylic Boards (Design and drilling pattern are in my Git and can be downloaded from here)
7. Tools as per your expertise.
8. Black tint sheet for transparent acrylic plates.
9. nuts, bolts spacers.
10. 8 X 220 ohms resistors.
11. on/off switch.
Step 2: Step: 1: Knowing and Glowing the LED MAtrix


Download the latest Arduino IDE and follow the instructions on the website to install it.
Then, as according to the above diagram, wire all the components on bread board and around Arduino.
Then upload the Matrix_basic.ino code to the Arduino.
If you are new, don't be afraid, Go through the code as it is self explanatory.
Attachments

Step 3: Step:3 How to Use the Moisture Sensor (Troubleshooting the Sensor)


This Moisture Sensor can be used to detect the moisture of soil or judge if there is water around the sensor.Let Your plants reach out for your help when needed. They can be very easy to use, just insert it into the soil and then read it. With the help of this sensor, it will be realizable to make the plant remind you : hey, i am thirsty now, please give me some water.
1.Connect the VCC pin from sensor to 5Volt DC pin of Arduino.
2.Connect the GND pin from sensor to GND of Arduino.
3.Connect the signal to Arduino Pro mini's A6 Pin (Analog 6 - measures analog variance in voltage).
4.Insert it to soil.
5.Connect FTDI board to Arduino Pro mini.
6.Connect FTDI Board to computer via mini USB Cable.
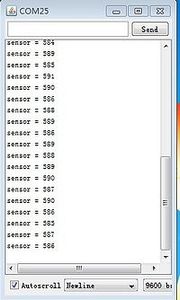
7.Upload the code Moisture_meter_calib.ino (here's how)
8.After successful upload fire up the serial monitor to see the results. (Here's how to open a serial monitor).
9. keep a note of results from different soil conditions as they will be used as determining conditions in later version of code for our final project compilation.
Attachments
Step 4: Step : 4 Preparing the Housing/cabinet


It's all in the pictures.
I just now connected the water sensor and LED matrix to the same Arduino pro mini, added a switch for power on/off and housed in as in pictures.
The .svg files are down below for laser cutting of acrylic plates.
Attachments
Step 5: Step:5 Now You Program It.
Open the semi_final.ino in your Arduino IDE and in the void loop{} edit the if else conditions for sensor readings corresponding to soil moisture levels and replace them with what ever resulting values you get from trouble shooting (Step:3)
Attachments
Step 6: Step:6 It's Now Time to Play


Now just power up and insert it to your plant pot and let it tell you when it's hungry.


