

Introduction: Morse Code Gennerator


Hello There!
I recently made a project for my course "Micro-controller Applications" called a "Morse Code Generator using Arduino UNO"(actually it is more of an interpretor,you'll see). Even though the project was pretty simple I ended up wasting my Sunday due various reasons. In the end, after many hours of debugging the code,and trying to make the componets work properly it finally worked. So I felt like sharing my project on Instructables.
Here are the list of components:
- Arduino UNO
- LED Display-since most of them come with just holes,you'll need male header pins,soldering wire and soldering iron)
- Push Buttons
- 220Ohm(1) and 10KOhm(2) resistors
- Potentiometer
- Connecting Wires
Now after you have got the materials, lets first learn a little about Morse Code ->
Morse Code was the 1st telegraphic code found by Samuel Morse after his invention of electric telegraphy in 1837. Morse introduced the variable-length binary code for English alphabets and numbers using dots, dashes and spaces. In this code, more frequently occurring letters are represented by short code words, while letters occurring less frequently are represented by longer code words.
Morse codes are usually generated using electric switches.A single tap is considered a dot. A continuous connection of the switch would represent a dash and an open connection meant a gap between the dashes and dots.
Morse code was widely used for long range transmission before the invention of telephony by Alexander Graham Bell in the 1870s. These days it is used in military message transmissions.
You can check online for the International Morse Code Standards.
Step 1: Building the Circuit
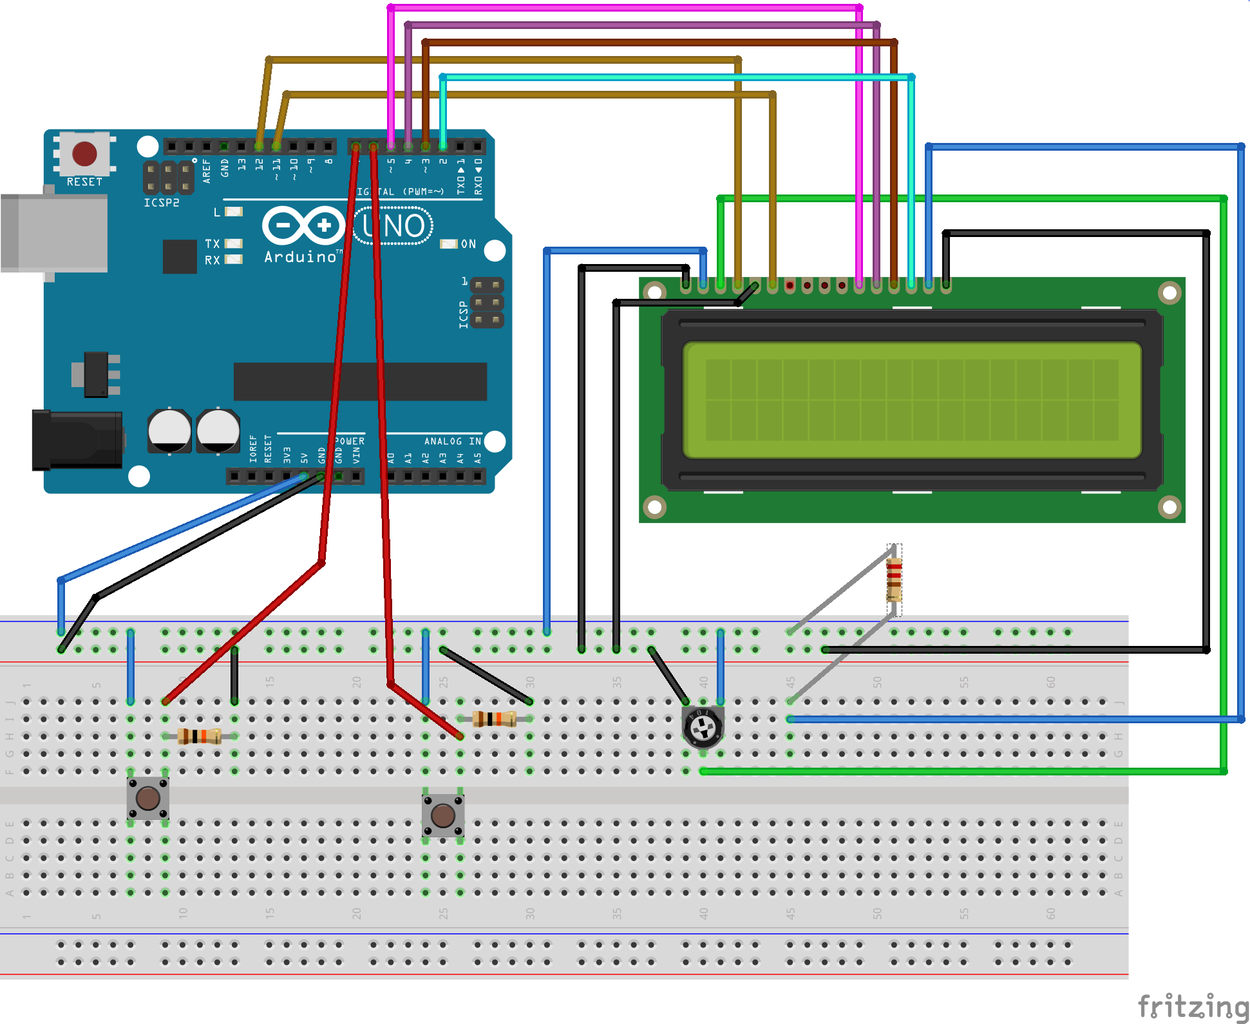
Here I am using 2 push buttons- one for entering the sequence and the other for terminating the sequence.Connect 5V supply to the push buttons.Connect the other end of push button for entering the sequence to digital pin 7 and the 2nd button to the digital pin 6 of the Arduino UNO board. Then connect 10K Ohm resistors to both the buttons and ground them.
To solder the male header pins to the LCD Display,take 2 header pin sets of 6 pins each. Take the shorter ends and carefully solder them to the first 6 holes and the last 6 holes of the LCD Display. You will only be needing those holes only for now.
Now carefully follow the circuit diagram given to make the connections for the LCD.
- Pin 1 to Vcc(5volts)
- Pin 2 to GND
- Pin 3 to pot O/P of potentiometer connected between Vcc and GND
- Pin 4 to Digital Pin 12
- Pin 5 to GND
- Pin 6 to Digital Pin 11
- Pin D4 to Digital Pin 5
Pin D5 to Digital Pin 4
Pin D6 to Digital Pin 3
Pin D7 to Digital Pin 2
- Pin A to Vcc through 220 Ohm resistor
- Pin K to GND
Connect power supply to the Arduino and then use the potentiometer to adjust the brightness of the text for the LCD.
Step 2: Code

Here is my code
Note:Instead of the dashes and dots in the standard Morse code,I have replaced them by 1's and 0's.For example
A is represented by " . - ". So I used one 1 to represent a dot and three 1's to represent a dash.
#include<LiquidCrystal.h>
LiquidCrystal lcd(12, 11, 5, 4, 3, 2);int inter(String*);
String morse;
String a="0101110"; String b="01110101010"; String c="0111010111010"; String d="011101010"; String e="010"; String f="01010111010"; String g="01110111010"; String h="010101010"; String i="010100"; String j="010111011101110"; String k="0111010111"; String l="01011101010"; String m="011101110"; String n="0111010"; String o="0111011101110"; String p="0101110111010"; String q="011101110101110"; String r="010111010"; String s="0101010"; String t="01110"; String u="010101110"; String v="01010101110"; String w="01011101110"; String x="0111010101110"; String y="011101011101110"; String z="0111011101010";
int letter;
void setup()
{ lcd.begin(16, 2);
lcd.print("Morse Code Generator:");
lcd.setCursor(0, 1);
pinMode(7, INPUT);
pinMode(6, INPUT);
Serial.begin(9600); }
void loop()
{Serial.println(digitalRead(7));
morse=morse+digitalRead(7);
Serial.println(morse);
delay(1000);
letter=digitalRead(6);
if(letter==HIGH)
{ Serial.println("Character End!");
Serial.println(morse);
inter(morse);
morse="";
Serial.println(morse);
}
}
int inter(String M)
{int l1;
if(M==a) {l1=l1+1; lcd.setCursor(l1,1); lcd.print("A"); Serial.println("A"); }
else if(M==b) {l1=l1+1; lcd.setCursor(l1,1); lcd.print("B"); Serial.println("B"); }
else if(M==c) {l1=l1+1; lcd.setCursor(l1,1); lcd.print("C"); Serial.println("C"); }
else if(M==d) {l1=l1+1; lcd.setCursor(l1,1); lcd.print("D"); Serial.println("D"); }
else if(M==e) {l1=l1+1; lcd.setCursor(l1,1); lcd.print("E"); Serial.println("E"); }
else if(M==f) {l1=l1+1; lcd.setCursor(l1,1); lcd.print("F"); Serial.println("F"); }
else if(M==g) {l1=l1+1; lcd.setCursor(l1,1); lcd.print("G"); Serial.println("G"); }
else if(M==h) {l1=l1+1; lcd.setCursor(l1,1); lcd.print("H"); Serial.println("H"); }
else if(M==i) {l1=l1+1; lcd.setCursor(l1,1); lcd.print("I"); Serial.println("I"); }
else if(M==j) {l1=l1+1; lcd.setCursor(l1,1); lcd.print("J"); Serial.println("J"); }
else if(M==k) {l1=l1+1; lcd.setCursor(l1,1); lcd.print("K"); Serial.println("K"); }
else if(M==l) {l1=l1+1; lcd.setCursor(l1,1); lcd.print("L"); Serial.println("L"); }
else if(M==m) {l1=l1+1; lcd.setCursor(l1,1); lcd.print("M"); Serial.println("M"); }
else if(M==n) {l1=l1+1; lcd.setCursor(l1,1); lcd.print("N"); Serial.println("N"); }
else if(M==o) {l1=l1+1; lcd.setCursor(l1,1); lcd.print("O"); Serial.println("O"); }
else if(M==p) {l1=l1+1; lcd.setCursor(l1,1); lcd.print("P"); Serial.println("P"); }
else if(M==q) {l1=l1+1; lcd.setCursor(l1,1); lcd.print("Q"); Serial.println("Q"); }
else if(M==r) {l1=l1+1; lcd.setCursor(l1,1); lcd.print("R"); Serial.println("R"); }
else if(M==s) {l1=l1+1; lcd.setCursor(l1,1); lcd.print("S"); Serial.println("S"); }
else if(M==t) {l1=l1+1; lcd.setCursor(l1,1); lcd.print("T"); Serial.println("T"); }
else if(M==u) {l1=l1+1; lcd.setCursor(l1,1); lcd.print("U"); Serial.println("U"); }
else if(M==v) {l1=l1+1; lcd.setCursor(l1,1); lcd.print("V"); Serial.println("V"); }
else if(M==w) {l1=l1+1; lcd.setCursor(l1,1); lcd.print("W"); Serial.println("W"); }
else if(M==x) {l1=l1+1; lcd.setCursor(l1,1); lcd.print("X"); Serial.println("X"); }
else if(M==y) {l1=l1+1; lcd.setCursor(l1,1); lcd.print("Y"); Serial.println("Y"); }
else if(M==z) {l1=l1+1; lcd.setCursor(l1,1); lcd.print("Z"); Serial.println("Z"); }
return 0; }
Please feel free to give suggestions to improve the code.
Step 3: Finally...

Connect the Arduino to your PC and dump the code to your board and try it out.
Have Fun!


