

Introduction: Motion Detecting Video Streaming Doorbell


Knock knock. Who’s there? A motion detecting smart doorbell that senses when someone is near the door! It will use a webcam to detect motion. When activated, it will play a greeting and then take a photo and email it to someone to let them know who is at the door.
In this tutorial, you will learn how to install and setup a webcam, a USB sound card, a microphone, and a speaker.
Here is a video of the completed project.
This tutorial was originally published on Intel Communities here.
Step 1: Before You Start
Before you begin, make sure you’ve followed through Intel® Edison Getting Started guide, and our tutorial. This means that your Intel® Edison:
- has updated firmware
- is connected to the local wireless network
- can connect to ssh/scp through microUSB or WiFi
Step 2: Needed Components


- Intel® Edison and Arduino expansion board
- 1 Webcam UVC compatible (Logitech HD Webcam C615)
- 1 Intel® Edison power supply
- 1 USB hub with power supply
- 1 USB sound card (with audio in and out connections)
- 1 Battery operated speaker with mini jack connector
- 1 Mini jack microphone
- Zip ties
- String
- Double sided tape
Step 3: Preparing the Intel® Edison
To be able to install all of the software needed for this project, we need to include an additional repository to our package management system A.K.A opkg. We are using an unofficial repository provided by AlexT
After logging in via SSH or terminal, type the following command in the terminal:
root@Doorbell:~#vi /etc/opkg/base-feeds.conf
This will create a new file that can be edited in Vi. Press ‘i’ to edit and then paste the following:
src/gz all http://repo.opkg.net/edison/repo/all
src/gz edison http://repo.opkg.net/edison/repo/edison
src/gz core2-32 http://repo.opkg.net/edison/repo/core2-32
Press ‘ESC’ and then ‘:’ and then ‘wq’ (Write and Quit). The repository is now ready for use in your Intel® Edison.
The next step is to update opkg. To do that, type the following command in the terminal:
root@Doorbell:~# opkg update
The information below should appear:
Downloading http://repo.opkg.net/edison/repo/all/Packages.gz
Inflating http://repo.opkg.net/edison/repo/all/Packages.gz
Updated list of available packages in /var/lib/opkg/all
Downloading http://repo.opkg.net/edison/repo/edison/Packages.gz
Inflating http://repo.opkg.net/edison/repo/edison/Packages.gz
Updated list of available packages in /var/lib/opkg/edison
Downloading http://repo.opkg.net/edison/repo/core2-32/Package.gz
Inflating http://repo.opkg.net/edison/repo/core2-32/Package.gz
Updated list of available packages in /var/lib/opkg/core2-32
Downloading http://iotdk.intel.com/repos/1.1/intelgalactic/Packages
Updated list of available packages in /var/lib/opkg/iotkit
You are now ready to install a USB webcam and a USB sound card to play and record sounds. If you would like to examine the original source of this repository, please go to AlexT's website.
.
Step 4: Configuring the USB Port

On the Arduino expansion board, check that the USB switch on the right side should be flipped up toward the USB Type A (the larger USB connector).
Step 5: Configuring a USB Sound Card for the Intel® Edison
In this section, you will learn how to set up the USB sound card and use the speaker for output.
Plug the USB sound card into the USB port.
To verify that the sound card is connected, type the following command in the terminal:
root@Doorbell:~# lsusb
The information below should appear:
Bus 001 Device 002: ID 0d8c:000c C-Media Electronics, Inc. Audio Adapter
Bus 001 Device 001: ID 1d6b:0002 Linux Foundation 2.0 root hub
Bus 002 Device 001: ID 1d6b:0003 Linux Foundation 3.0 root hub
For the audio to function, we need to install the ALSA utilities. Type the following command in the terminal:
root@Doorbell:~# opkg install alsa-utils
To check if everything was properly installed and configured, type the following command in the terminal:
root@Doorbell:~# aplay -Ll
The information below should appear:
null
Discard all samples (playback) or generate zero samples (capture)
default:CARD=Loopback
Loopback, Loopback PCM
Default Audio Device sysdefault:CARD=Loopback
Loopback, Loopback PCM
Default Audio Device default:CARD=Set
C-Media USB Headphone Set, USB Audio
Default Audio Device sysdefault:CARD=Set
C-Media USB Headphone Set, USB Audio
Default Audio Device
**** List of PLAYBACK Hardware Devices ****
card 0: Loopback [Loopback], device 0: Loopback PCM [Loopback PCM]
Subdevices: 8/8
Subdevice #0: subdevice #0
Subdevice #1: subdevice #1
Subdevice #2: subdevice #2
Subdevice #3: subdevice #3
Subdevice #4: subdevice #4
Subdevice #5: subdevice #5
Subdevice #6: subdevice #6
Subdevice #7: subdevice #7 card 0: Loopback [Loopback], device 1: Loopback PCM [Loopback PCM]
Subdevices: 8/8
Subdevice #0: subdevice #0
Subdevice #1: subdevice #1
Subdevice #2: subdevice #2
Subdevice #3: subdevice #3
Subdevice #4: subdevice #4
Subdevice #5: subdevice #5
Subdevice #6: subdevice #6
Subdevice #7: subdevice #7 card 1: Set [C-Media USB Headphone Set], device 0: USB Audio [USB Audio] Subdevices: 1/1
Subdevice #0: subdevice #0
This checks if your card is available. In this case, the sound card is “card 1” and the device name is “Set”.
To play a sound will be to create an audio configuration file. Type the following command in the terminal:
root@Doorbell:~# vi /etc/asound.conf
This will create a new file that can be edited in Vi. Press ‘i’ to edit and then paste the following:
pcm.!default sysdefault:Set
Press ‘ESC’ and then ‘:’ and then ‘wq’ (Write and Quit)
In the file text, ‘Set’ is the name of the sound card. Change this to match your own sound card’s device name.
Download and unpack the zip file to find the test sound. Type the following command in the terminal
root@Doorbell:~# aplay test.wav
***If you did not hear a sound, it could be that you have the ALSA utilities set to silent. To fix that, type the following command in the terminal:
root@Doorbell:~# alsamixer
Now press ‘F6’ to select your sound card. Check the master sound output level and adjust as necessary.
Attachments

Step 6: Configure a USB Webcam in Intel® Edison
In this section, you will learn how to set up a USB webcam. The webcam should be UVC compatible or it will not work.
Plug the USB webcam to the powered USB port.
In order to see if the system has loaded the proper modules to manage the webcam, type the following command in the terminal:
root@Doorbell:~# lsmod
The information below should appear:
Module Size Used by
uvcvideo 71516 0 ← this is the module
videobuf2_vmalloc13003 1 uvcvideo
videobuf2_memops13001 1
videobuf2_vmallocvideobuf2_core 37707 1
uvcvideo usb_f_acm 14335 1
u_serial 18582 6
usb_f_acm g_multi 70813 0
libcomposite 39245 2
usb_f_acm,g_multi bcm_bt_lpm 13676 0
bcm4334x 578947 0
The module name is “uvcvideo”.
Step 7: Preparing the Smart Doorbell
To install the packages to configure the motion detection, we will to include the repositories for a program called Motion. This will be used to detect changes in the camera field of view.
Install motion by typing the following command in the terminal:
root@Doorbell:~# opkg install motion
Power and plug the USB hub into the Arduino expansion board. Plug the sound card and the webcam into USB hub.
In this step, you will create a user for Motion and also create a directory for the daemon to be able to execute the Motion in the background.
root@Doorbell:~# groupadd -r motion
root@Doorbell:~# useradd -r -m -s /bin/true -g motion -G video motion
root@Doorbell:~# mkdir /var/run/motion/
Download the project files onto the Intel® Edison. Copy the contents of /etc in the Intel® Edison’s local etc directory. This will add a configuration file called “motion.conf”.
Copy the project file’s /motion folder into /home/motion folder that you created before.
Now we are ready to record your own doorbell greeting. When you are ready, type the following command in the terminal:
root@Doorbell:~# arecord -vv /home/motion/doorbellsound.wav
The information below should appear:
Recording WAVE '/home/motion/doorbellsound.wav' : Unsigned 8 bit, Rate 8000 Hz, Mono
Plug PCM: Rate conversion PCM (48000, sformat=S16_LE)
Converter: linear-interpolation Protocol version: 10002
Slave: Hardware PCM card 1 'C-Media USB Headphone Set' device 0 subdevice 0 Its
setup is: stream : CAPTURE access : MMAP_INTERLEAVED
format : S16_LE subformat : STD
When you are finished, press “Ctrl-C” to save the recording.
Step 8: Connecting to the Internet
We will use Temboo to connect to the different services. Go to the website and create an account if you haven’t already. Then download the Temboo Node.js SDK and place it into:
home/motion/scripts/node_modules/temboo
As of this writing, the current version is 2.7.1 version, so feel free to upgrade if you want.
You will need to set up either a Twitter, Google Drive, or Gmail account. On Temboo’s site, use Choreos to obtain necessary OAuth credentials. Enter in the necessary information, copy the code that is produced, and insert it into the appropriate script. Follow the instructions they give very carefully. You may have to make security modifications to your accounts.
In order to modify the scripts needed to connect to those services, look into:
home/motion/scripts/
There you will see 4 different files: Gmail_send.js is a Node.js script to send a photo via email to an account that you specify in the script. Insert the proper Temboo and Google API credentials into the script before running. For instructions on how to use Gmail, click here.
Twitter_post.js is a Node.js script to upload a photo to Twitter. Insert the proper Temboo and Twitter API credentials into the script before running. For instructions on how to use Twitter, click here.
Gdrive_upload.js is a Node.js script to upload a photo to Google Drive. Insert the proper Temboo and Google API credentials into the script before running. For instructions on how to use GDrive, click here.
motion_start_wrapper.sh is a wrapper script that runs a script after a motion detection event. Modify the script as needed. Once you have selected the service that you want to use, you will need to edit the file “motion.conf”. On the line on_picture_save, by default it is set to Gdrive_upload. To change the service, just uncomment the service you want to use and delete Gdrive_upload.
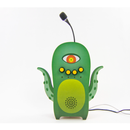
Step 9: Assemble the Smart Doorbell


- Sort the lasercut pieces for easier construction.
- Mount the webcam
- Disassemble the webcam, making sure to save the screws
- Use the screws to mount the webcam onto Part A2
- Mount the Intel® Edison onto Part A2
- Mount the braces
- Attach Part A1 and Part A3 to Part A2
- Secure the USB hub to the Intel® Edison using zip ties
- Secure the speaker to Part A3 using zip ties
- Plug in USB hub, webcam, sound card, speaker, and power cables
- Find the center of gravity and tie a string to the top to balance it
- Using glue or double sided tape, place the image of Edison onto Part A2
Attachments
Step 10: Laser Cutting Hints

- The picture of Edison is included. Here is how to cut it out neatly using the laser cutter
- Print a few copies of the PDF file to scale (do not scale to fit page)
- Place the MDF onto the laser bed and secure it using tape
- Load the laser cut file and cut the red line lightly
- Cut off the corners of Edison’s photo and use the black edges to align to cut box and tape down
- Laser cut the outline of Edison using a power sufficient to cut through the paper
- At this point, you can cut some extra ones just in case
- Finally, laser cut the MDF pieces
Attachments

Step 11: Run Smart Doorbell

Finally the only thing that you need to make the doorbell works it execute motion script, so just type in the terminal:
root@Doorbell:~# motion
You should see:
[0] Processing thread 0 - config file /etc/motion.conf
[0] Unknown config option "ffmpeg_cap_new"
[0] Unknown config option "ffmpeg_cap_motion"
[0] Unknown config option "ffmpeg_timelapse"
[0] Unknown config option "ffmpeg_timelapse_mode"
[0] Unknown config option "ffmpeg_bps"
[0] Unknown config option "ffmpeg_variable_bitrate"
[0] Unknown config option "ffmpeg_video_codec"
[0] Unknown config option "ffmpeg_deinterlace"
[0] Unknown config option "movie_filename"
[0] Unknown config option "timelapse_filename"
[0] Motion 8.4.0 Started
[0] Motion going to daemon mode
****If you want to check motion and the webcam is working properly,
use VLC software to connect to your Intel® Edison IP with the port 8081:


