

Introduction: NRF24 Jr Module for Toy Quadcopters


We will build a module for those chinese toy quadcopters like the Eachine H8 or Cheerson CX-10.
It consists of an arduino pro mini, a nrf24 2,4ghz transmitter and a 3.3v regulator.
The module should fit into the module bay of the frsky taranis.
We will use the open source nrf24_multipro project.
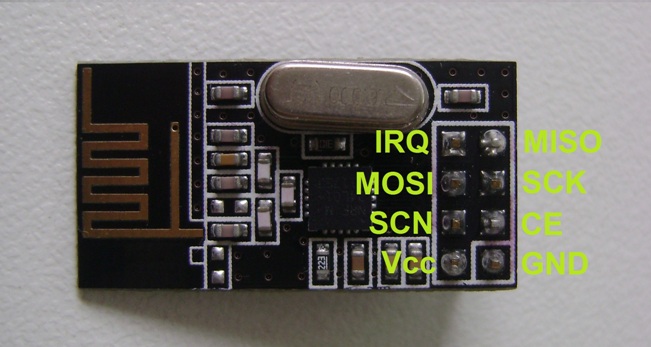
Step 1: Plan the Connections


You will need the ppm, +bat and gnd pins on your remote.
Remember that you also have battery voltage level on the ppm pin, so use a regulator or voltage divider.
The "+6v" pin is not used and has no function.
The nrf24 module will be connected to the arduino like this:
MOSI - D3
SCK - D4
CE - D5
MISO - A0
CS - A1
Well. of course you could change this in the code if you decide on a different design.
The nrf24 can take 5v logic level on the logic pins but needs 3.3v as vcc so use a 3.3v converter.
If you have a 3.3v arduino it is even easier as you could power both from the same converter.
I used a 5v arduino and used the onboard linear converter, which can take the taranis battery voltage.
Step 2: Upload the Code


We will use the nrf24_multipro project from goebish on github.
Change your pins in the "nRF24_multipro.ino" according to you wiring, if it is different.
If you are using a module without amplifier like the NRF24L01 change the line:
#define RF_POWER TX_POWER_80mW
to
#define RF_POWER TX_POWER_158mW
Don't worry. Those are just internal values. It won't transmit anywhere near that set power.
Upload your code, insert the module in your remote and maybe tape/glue it to a cover.
While powering it on, hold the sticks into the right positions for your quad as written in the readme.
Set the mixes according to your quad like in the picture.
Power the quad on, your remote and have fun.


