

Introduction: Christmas North Pole


This North Pole was a combination of math teachers and science teachers working together to build a north pole. The disco ball rotates and the the red strips blink to music. We created this project as a decorative piece for the school as well used it at our Christmas Formal Dance. We were able to salvage many parts and pieces laying around school to make this a fairly inexpensive project.
Materials Used:
5ft. cardboard tube, 6 in diameter with 3/8 in thickness
revolving Christmas Tree stand
old artificial christmas tree
wood-platform
3 -15 ft. light up rope(2 red and 1 white) with plastic clamps
2 square yards of white fabric
spray adhesive
glitter
ribbon
glue
garland
hacksaw
discoball
3D printed sign
3D printed support
yarn
white paint, rollers, drop cloth
tape measure
Music Sensor Box
Spot light
A Form 1+ 3D printer would allow for us to expand our 3D design and print program. As an educator I want my students to think outside the limitation of the 4 classroom walls. We want our students to be creative problem solvers that can have an impact in their communities. The Form 1+ 3D printer will offer new opportunities for teachers and students to scale their impact to a whole another level. The ability to creatively think, design, and problem solve with the latest technology and innovation, gives my students experience that they will otherwise never encounter. If I want me students to think big and inspire to make a difference, then I must challenge and teach in a way that fosters that goal. I must open their horizons and empower them with opportunities. With a Form 1+ 3D printer we can do more than just touch the surface, we can lead, we can change, we can impact our communities, and improve the overall education for all students.
Step 1: Notch the Tube


The revolving Christmas tree stand has four legs the four legs were rounded so fitting the tube on the stand was took some patience. We measure the width and height needed an cut 4 notches so the tube would sit down on the stand. We error on the side of caution and cut the notches small so we would have a snug fit. It took a total of 2 adjustments after the initial cut, to get the exact size we wanted. Taking our time to get a snug fit was essential for building a solid base.
Step 2: Mounting the Disco Ball


We used the inside pole of an old artificial Christmas tree. The top piece had to be stripped of all the branches and twine wrapped around this. This takes a little longer than you might think, and makes a mess. Once stripped down the top piece is a small rod.
We place the tree pole inside the tube. We removed a few mirrors and slid the disco ball down on the pole The rod was slightly taller than our tube so we sawed it down with a hacksaw. Like before we error on the side of caution and cut in small increments to make sure we got the exact height we wanted. It took 2 cuts after the initial cut to get the exact height. This was an very important process as it is hard to measure the the height of the pole inside the disco ball(diameter of a sphere). We wanted to be sure that we had a perfect distance so that when the pole spends it does not hit the tube at all and impede the rotation of the pole and ball.
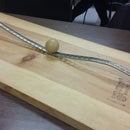
Step 3: 3D Printing


One of the issues we ran into was, that are pole was slightly leaning inside of the tube. Although its not noticeable when its an actual tree, the disco ball was not center of the top of the tube and noticeable. The problem we had is there is no support to center the tree pole in the tube at the top of the tube. We designed and printed a piece that we slid down inside of the tube, that center the tree pole at the top of the tube exit.
While having the 3D printer fired up, we designed and printed a sign that says "NORTH". This was done on a single color extruder printer, but we designed the sign with the idea we wanted two colors involved. By using different depths, we were able to pause the printing after about 50% completion and then switch from green to white to finish printing the sign with the two color effect.
Step 4: Painting the Pole and Base


The pole sits on a small wooden platform base that I had sitting in my garage. The base serves two purpose.
The base gets the pole off the floor and less likely for it to be bumped or tripped on.
The other is the base allows for me to hide some cords from sight.
We used a basic white paint and painted the pole, legs of the stand and the base as we did not want any colors to show through.
Step 5: Snow Draped Based

We took a 2 square yards of white fabric. We laid out the fabric and sprayed the fabric with a glue adhesive. We then sprinkled opal glitter on the fabric. The spray adhesive will make the cloth stick to itself and so when its comes time the draped the cloth around the base it will adhere to itself and hold in place.
Step 6: Running the Red Rope Light


Using a 2 15 foot red rope lights, we laid out the design for pole. The rope light comes with clamps that we were able to screw into the cardboard tube. After painting the tube, the tube became more solid and made screwing the clips in even easier.
We decided we wanted wide spaces and wrapped the rope around and that two ropes created a nice pattern. We snapped the rope into the clips on the back and wrapped them around being sure to space the the rope evenly throughout. The friction between the paint and rope allows for the rope to hold in place. We then ran the rope to the bottom of the pole, taped in down and ran the extra cord through the hole in the base. Like most projects we turned this step into project based learning with our students.
In the white space left over we ran some transparent glitter ribbon. The transparency of the ribbon really works well on the white pole. We used some glue on the back side of the pole to hold the ribbon in place.
Step 7: Optional Math Lesson

We were able to accurately predict how many times we could wrap the rope around the pole using some math. We knew we did not want to connect two ropes together as it would have made for an unwelcome connection on the pole that would be noticeable. We also wanted to get an idea of how tall could we make the pole and still only use one piece of the rope light. We used this setup to give our students a story problem than used
y=mx +b
inequalities
Circumference
conversions
estimation
Step 8: Finishing Touches


We hung the "NORTH" sign with some white yarn. The back of the pole where the rope light starts makes a nice spot to tie the yarn around.
We then took garland and wrapped around the top of the pole to hide the start of the rope as well as cover up the small gap between the tube and the disco ball. We also laid some white lights underneath the draped cloth to add to the snow effect.
Lastly we plugged the red rope light into a sensor box so the red lights would blink to the beat of the music.
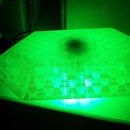
Step 9: North Pole Comes to Life


By using some LED lights and spot lights we were able to create a magical light display.

Participated in the
Formlabs Contest

Participated in the
Make it Glow!

Participated in the
3D Design Contest

Participated in the
Enchanted Objects


