

Introduction: Piano in the Square
The title of my creation is derived from its multi-user configurability. It can be condensed to suite a single player as displayed above, stretched out to its full length for multiple users or arranged in a hollow square shape to accommodate multiple users seated to face each other. There are 15 keys and 2 modes - single and multi-user mode. In single user mode the child will get all keys from middle C to a high E - which in this case is E in the next octave. In multi-user mode, there are three sets of five keys. Each set represents natural keys C-G in successive octaves. Users can record and playback their compositions as well as save up to three recordings.
Step 1: Materials Needed:
- Light fabric
- Normal cotton or nylon thread
- Iron-on Conductive fabric
- Conductive thread or foil strips
- Makey Makey – involves the reprogramming of the analog inputs
- 19-20 Alligator clips and 6 rear input cables
- My Scratch Program: https://scratch.mit.edu/projects/90469235/
Step 2: Tools Needed:
- General sewing needle
- Sewing macine
- Iron
- Chalk
- Fabric or other scissors
- pins
Step 3: The Premise and Pre-Process


My overall goal for this project was to create a piano that allows for both individual and collaborative play and that encourages creativity. In order to provide all the keys needed, you will have to repurpose some of inputs on the back, specifically, the analog mouse inputs. For simplicity's sake, I turned them into numbers from 1-6. Follow the directions on SparkFuns website to do reprogram your Makey Makey: https://learn.sparkfun.com/tutorials/makey-makey-... When you download the Makey Makey code for the first time, I recommend you verify it first to make sure it will upload with no issues. You may get an error regarding the keyboard or mouse libraries. In my research online, I found that other people just commented that out so I did the same.
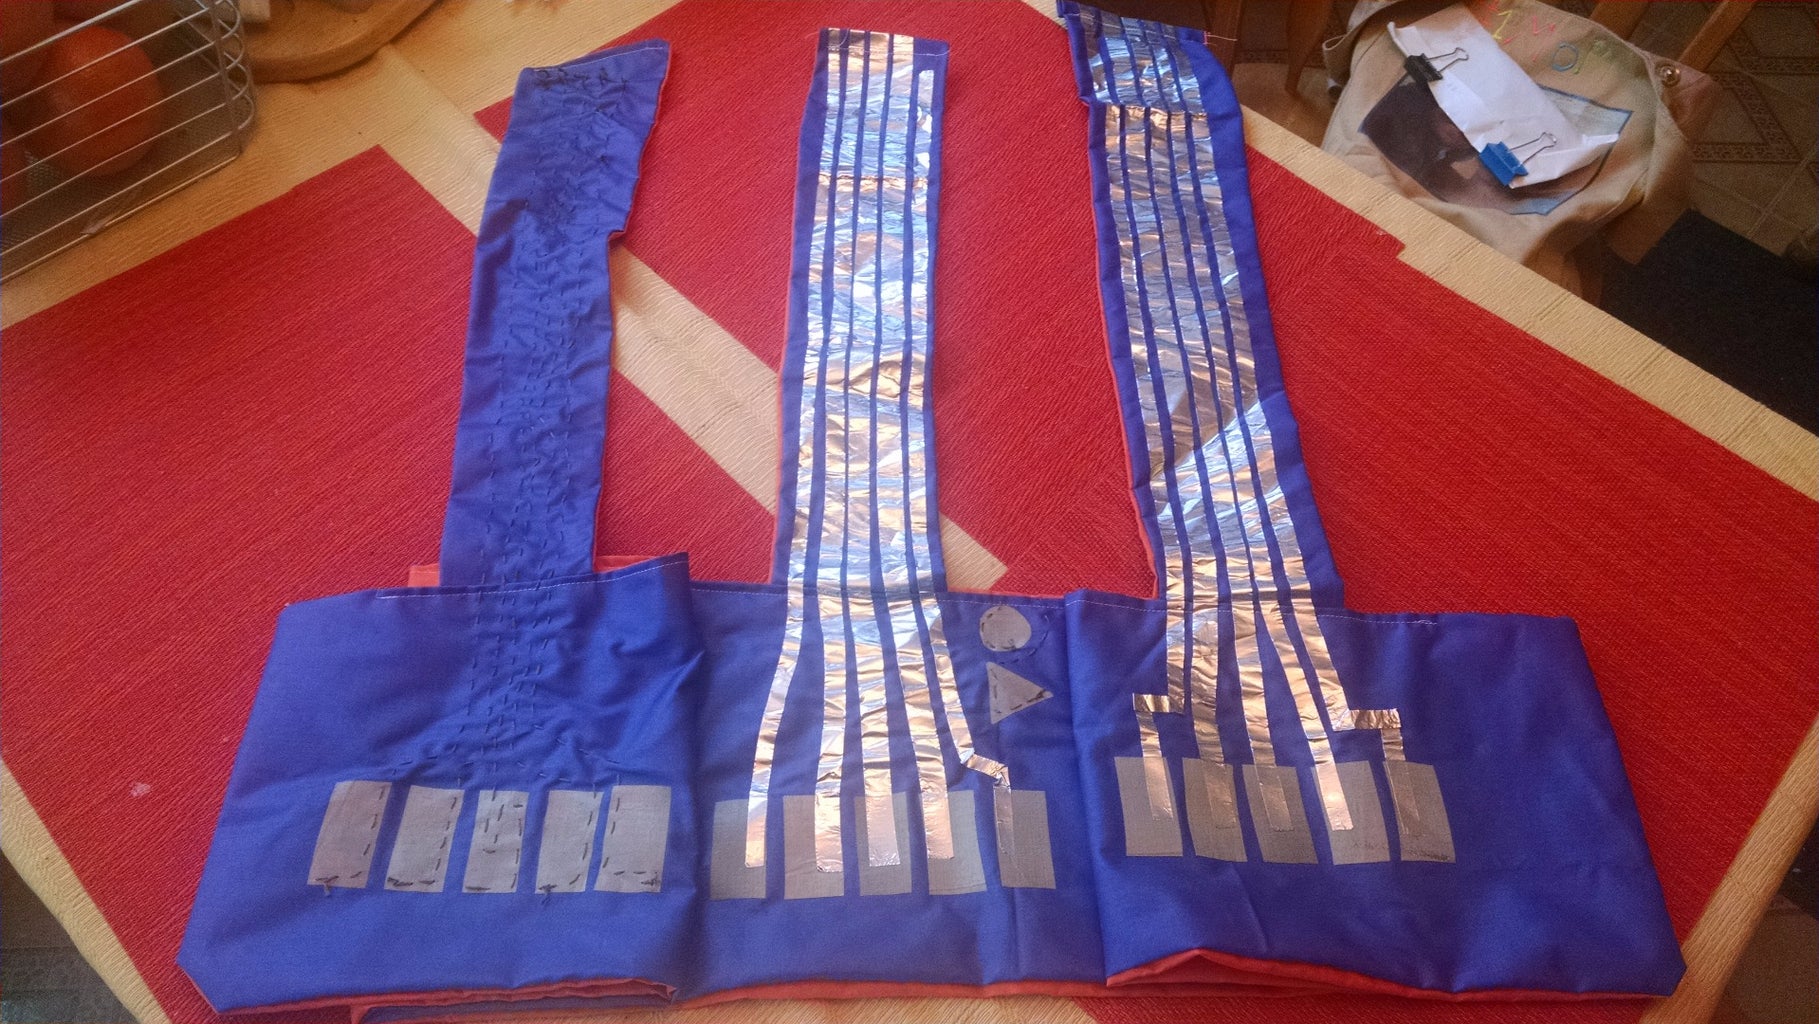
Step 4: Cut Out and Arrange Your Fabric Pieces


Start by drafting a paper version of your keyboard and cut that into four peices: 1 keyboard and 3 arms to hold the circuits running to the Makey Makey. I used my paper model as my guide. Make sure to allow about an inch or more for the seam. I then cut out the conductive fabric components for the keys and laid them out on the main keyboard to make sure they were spaced appropriately. You must be sure to cut the fabric with the iron-on surface face down. The iron on surface has a slight sheen to it. My design has 15 keys placed in 3 intervals of 5 keys each. The extra space between each interval is to allow for the multiple physical configurations I discussed above.
Step 5: Secure Your Iron on Elements to the Fabric
Once I was satisfied with my spacing, I made very light marks on the fabric with chalk to mark the intervals and collected the pieces for transport to the ironing board. To save time, you could also complete your layout on the ironing board. I then slowly and carefully placed the iron on top of the keyboard elements and ironed them into place.
Step 6: Sew a Backing on to Your Fabric Pieces


At this point I added a backing to each fabric piece for two purposes – first, it makes for a slightly sturdier construction and second, if you choose to use conductive thread as I had originally planned, having a backing guards against cross-circuit interference when re-configuring it. If you choose to use foil as I did after sewing one arm, the backing is optional. If you choose to skip the backing, make sure you fold and finish the edges to prevent fraying.
Above is an example of how to layout and pin the backing. Make sure you build in at least a one inch border. Sew only three sides, in this case, the three sides that the arms will not be attached to.
Now turn it inside outThe following link for creating a simple placemat may also be of help for all novice sewers: http://www.creativeinchicago.com/2011/09/sew-it-yo...
Step 7: Attach the Three Arms to the Keyboard
I sewed on the arms of the piano, which were built to carry the connections from the keyboard components to the Makey Makey, as well as I closed the remaining border on the main keyboard.
Step 8: Lay Down the Circuitry Between the Makey Makey and the Keyboard Components

The final step in the piano construction was to lay down the circuitry in the form of conductive thread or foil. As I stated above, I used both thread and foil. I will say that sewing the thread takes longer and it made for slightly less stable conductivity. If you sew the thread make sure to use small stitches and leave a small loop at the end of each line that the alligator clips can connect to.
Step 9: Connect the Keyboard to the Makey Makey

Based on your customized Makey Makey code, use your Alligator clips and the cables for the rear Makey Makey inputs to connect to the keyboard circuitry. This part is a little hairy because there are so many connections. If you can design a simpler version of the piano that does not require so many inputs or figure out a clever sheathing mechanism, go for it!
Step 10: Have Fun Playing!
That's all she wrote. Have fun making and creating. I would love to see someone else's take on this as I know if can be re-worked and improved.


