

Introduction: Portable Bluetooth Boombox


For this project, I created a very loud Bluetooth "boombox." This project was created for my hackathon class where you pick a topic and a challenge and have 4 hours to make your project. My topic was music and my challenge was to make it portable. The motivation behind this project was to make a cheaper, louder speaker than buying a ready made Bluetooth one. I bought some new parts and gave life to some speakers that I found at a thrift store.
Supplies
- Materials
- Speakers
- Bluetooth amp and receiver
- Rechargeable Battery
- Acrylic sheet (depends on size of enclosure)
- Enclosure material (I used wood)
- Wood for a handle
- Self tapping screws
- Hot glue sticks
- Tools
- Jigsaw
- Drill
- Band saw (circular saw will work too)
- Phillips head screw driver
- Laser cutter
- Hot glue gun
Step 1: Gathering Parts


There are a wide variety of options to choose from when it comes to picking your amplifier and receiver board. This will also determine what kind of speakers you can buy and what sort of power bank to get as well. The board I chose to use was a little bit over powered. I ended up going with a 100 watt dual speaker board. This way I could use a wide variety of speakers and it ensured that the boombox would be super loud. The board has a volume switch, is Bluetooth compatible, and a 3.5 mm jack. With this taken into account I decided to go with a 12 volt power supply. It was the middle of the range out the recommended power supplies and can power up to 2 32 watt 8 ohm speakers and 2 12 watt 4 ohm speakers. The power bank even has a USB output so that it can charge your mobile device and power the speaker. I found a pair of 8 ohm speakers at a thrift store and picked them up for around $5 for the set. When I cracked the enclosures open, I found that they were 4 watt speakers. They are very under powered for the amp and I am certain I will blow them out soon.
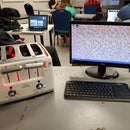
Step 2: Wiring Up an Testing

To ensure all your parts are compatible and working properly, I recommend you wire them up outside the enclosure. When I powered the electronics up, I soon realized this thing was going to be very loud. I also cut and measured the wires to their ideal length and test fit all the parts in the enclosure.
Step 3: Building the Enclosure


Given the time restraints, I decided to use one of the wooden boxes the speakers originally came in. They were nice boxes and I saw no reason to let them go to waste. I test fit all the components into the case to make sure they would fit. Next I created a hole in the side to have access to the power bank switch and charging port and amplifier boards volume switch and 3.5 mm jack. I outlined the shape of the two components on top of each other and drilled a hole and cut out the shape with the jigsaw. It took a couple of times to get the fit right, but they fit pretty snug in the end. The power bank and amplifier board were hot glued together and then hot glued into the back of the enclosure.
Step 4: Acrylic Front Panel


For the front of the enclosure I decided to use acrylic. This makes the speaker look really cool and you are able to see the insides of the speaker. All the indicator lights are visible from the front so you can ensure connection and that the power bank has charge. I measured the speakers to make sure they were 4 inch speakers and then I measured the enclosure and created a sketch shown in the pictures. I then took this drawing and put it in a sketching program suitable for the laser cutter.
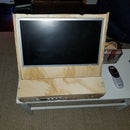
Step 5: Creating the Handle


I added a handle to the top of the case using some scrap wood I found in the trash. I started by eyeballing what looked good and then cutting the sides down to the right length. I used the band saw to do this. They ended up being about half an inch tall and the cross beam ended up being about 2 inches. I then screwed the pieces together with some of the screws that held the original speakers together. Once the handle is together, just eyeball the center of the top and screw it down using some more of the screws from the original speaker enclosures. The screws I had were a bit too short to screw the handle into the enclosure. To compensate for this I drilled large pilot holes half way through the top and was able to secure the handle using two screws. I then filled the extra space with hot glue.
Step 6: Man This Thing Is Loud!

That's all you need to make a loud, Bluetooth, boombox. I ran out of time in the ended, but to really make it pop I would add lights so that they inside could be illuminated. I still may go back and do this later. Also I plan on upgrading the speakers later to dual 8 ohm 32 watt speakers to make it even louder. I still am trying to work out how long the power bank will keep the device powered as it is only around a 3000 mAh bank. Other than that, I have received great feedback and the speaker will work great when hanging out with my friends (especially outside because it is so loud).


